🎬 When Exporting Videos Becomes a Headache
Are you aware of the ExportFoundry Plugin by aescripts? If you’ve worked with video, this scenario probably sounds very familiar: you spend hours editing, finish the project, and everything looks organized and ready to go. But the moment you think the work is done, a new and exhausting phase begins—exporting.
The situation becomes even more challenging when you need multiple exports. Usually, you need multiple versions of the same video: one for YouTube, a shorter version for Instagram, and perhaps several separate clips for a client or other platforms. As a result, you constantly find yourself going back into the project, changing settings, and exporting again.
At first glance, this might seem like a simple task. But when the number of exports increases, or projects become more demanding, this stage becomes one of the most time-consuming and repetitive parts of the editing process.

⚙️ What Is Batch Exporting?
At its core, many editors want the ability to generate multiple outputs from a single project without repeating the entire export process each time. Instead of following a repetitive manual workflow, everything is configured once, and the system handles the rest automatically.
For example, imagine you have a 10-minute video. From that single project, you need several different outputs:
- A full version for archiving or uploading to YouTube
- Several short clips for Instagram or Reels
- Specific sections for sending to a client or team members
Each of these is technically a separate export, but they all come from the same source.
If you use the traditional workflow in Adobe Premiere Pro, you need to open the Export settings for each one individually, adjust the timeline, choose the appropriate preset, and export it. That means repeating nearly the same process multiple times. In an ideal workflow, however, all these exports are defined in advance, and the system automatically renders them one after another without requiring your attention.
🧱 How Did Editors Work Before Tools Like This?
Before export management tools existed, most editors working in Adobe Premiere Pro had to rely on traditional methods. Projects were managed almost entirely by hand, and there was no such thing as intelligent export queuing.
Common approaches included:
- Using Adobe Media Encoder to queue exports
- Exporting directly from Premiere multiple times for different versions
- Creating duplicate sequences for each individual export
- Manually setting In/Out points to separate sections and export them individually
In reality, every export was treated as an entirely separate process, requiring its own time and attention.
⚠️ The Problems with These Methods
The main issue with these workflows was that everything was completely manual and repetitive. As export volumes increased, the process gradually became more complicated and difficult to manage. Export settings had to be checked repeatedly, timelines had to be reviewed again and again, and even the smallest mistake could result in an incorrect or incomplete export.
As projects grew larger and the demand for multiple versions increased, managing all those exports became a time-consuming and exhausting task that distracted editors from the actual creative work of editing.
🚀 What Does ExportFoundry Do?
This is exactly where ExportFoundry comes in. It transforms the export process in Adobe Premiere Pro from a repetitive, manual task into a structured, fully automated workflow.
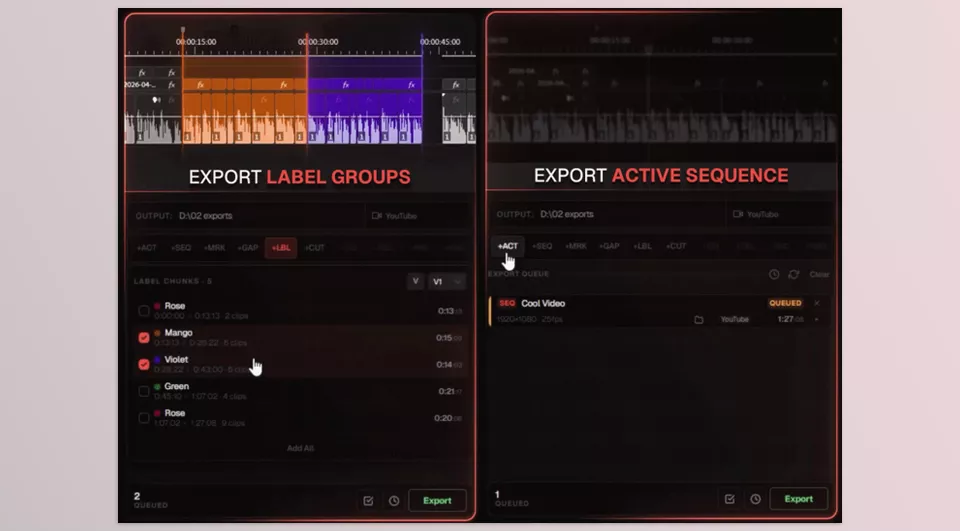
The core idea is simple: instead of exporting each version individually, you collect all exports into a single queue, and the system automatically processes them one after another. The interesting part is that this queue is not limited to a single export type—it can accept inputs from virtually any point in the timeline.
✨ Key Features and Capabilities of ExportFoundry
One of the biggest strengths of this tool is its flexibility. It can generate exports from almost anything within the timeline:
- Exporting the active sequence without manual setup
- Selecting and queuing multiple sequences from a project
- Converting markers into individual exports
- Automatically exporting cuts as separate outputs
- Using timeline gaps to create separate segments
- Queuing selected clips either together or individually
- Creating custom ranges for manually defined sections
In addition, one of its most valuable features is the ability to apply different settings to each item in the queue. For example, you can create:
- A high-quality export for archiving
- A lighter version for social media
- A different format for client delivery
⚙️ Complete Control Over Exports
ExportFoundry is more than just a simple queuing tool—it provides full control over every export:
- Changing presets and formats for each queue item individually
- Creating intelligent naming templates using project information, dates, versions, and more
- Defining separate output locations for each file
- Reordering queue items with drag-and-drop functionality
- Detecting issues before export, such as missing files or duplicate outputs
- Viewing export history for managing previous projects
🎬 A Real-World Example
Imagine you’re working on a commercial or educational project in Premiere. From a single timeline, you need several different versions:
- A high-quality master version for archiving
- Multiple short clips for Instagram and Reels
- A lighter version for client delivery
Normally, you would need to enter the Export settings for each one separately and repeat the process multiple times.
With ExportFoundry, you simply define them all in the queue once, assign the required settings to each export, and run the process.
From that point on, the tool generates every export sequentially without your involvement, allowing you to focus on more important tasks.
🧠 Tips for Getting Better Results
To get the most value from this tool, a few simple practices can significantly improve both your workflow speed and the quality of your exports. These aren’t complicated techniques, but they make a noticeable difference in real-world projects.
- 🧾 Keep Your File Names Clean and Organized
When you’re working with multiple exports, messy and inconsistent file naming quickly becomes a real headache. If you establish a clear and standardized naming system from the start, finding files and delivering projects later becomes much easier. - 🧹 Clean Up Your Timeline Before Exporting
Before adding exports to the queue, it’s a good idea to do one final pass and organize your timeline. The cleaner your source project is, the more accurate your exports will be, and the lower the chances of errors or incorrect outputs. - 🎛 Use Separate Presets for Different Platforms
If you’re exporting for multiple platforms (such as YouTube, Instagram, or client-delivery versions), it’s best to create dedicated presets for each. This saves you from rebuilding settings every time and makes your workflow significantly faster.
In the end, these small habits have a bigger impact than they might seem. Once they become part of your workflow, the entire export process becomes much smoother and easier to manage.
🎬 The End of Repetitive Exports—Time to Work Smarter
Ultimately, what often goes unnoticed is that the main problem for editors is not exporting itself—the real issue is repetition. When every project requires you to reconfigure settings, switch between sequences, and create multiple exports manually, a significant portion of your time ends up being spent on tasks that have nothing to do with creativity. They’re simply repetitive execution work.
This is where tools like ExportFoundry inside Adobe Premiere Pro become a meaningful workflow improvement. Instead of managing each export separately, everything is organized into a structured, controllable queue. Your role becomes deciding what needs to be exported—not repeatedly handling the mechanics of creating those exports.
More than just a feature, ExportFoundry becomes a necessity for editors who have to perform multiple exports on their projects. It saves editors time spent on repetitive tasks and allows them to focus on their editing and creative work.
Tired of watching long tutorials that make simple things feel difficult? Our Premier Pro Tools guide focuses on practical tools and straightforward explanations that help you save time while editing. Visit the guide now and discover easier ways to improve your After Effects projects.