When Photo Editing Becomes Time-Consuming and Exhausting…
Have you explored the Portra Original Presets before? Imagine you’ve had a perfect photoshoot: flawless natural light, subjects ready, and every moment captured just right. But when it comes to editing those photos in Lightroom, reality is a bit different.
The lighting in each photo varies slightly, the skin tones of the subjects differ, and some images are either too bright or too dark. Now you have to adjust contrast, brightness, highlights, and shadows for each photo, balance skin tones, and make sure every image looks natural and professional.
Even with plenty of experience, maintaining a consistent style across dozens or hundreds of photos isn’t easy. You might spend hours at your Lightroom desk, exhausted and stressed—especially with projects like weddings or portrait collections that require fast, cohesive results.
This is exactly where the need for a fast, professional solution arises; something that not only makes editing easier but also keeps a natural, consistent look across all images.

Traditional Methods: Editing Only with Lightroom
Before presets, photo editing in Lightroom was entirely manual and step-by-step:
Adjusting Contrast, Exposure, and Color for Each Image:
Every image required individual tweaks for highlights, shadows, and color tones. Even slight adjustments to lighting or color temperature could change the mood of the photo and demanded great precision.
Using Separate Correction Tools:
Tools like skin retouching, noise reduction, lens correction, and color adjustments had to be applied one by one on every image. For large projects like weddings or family portraits, this meant hours of repetitive work.
Problems with the Traditional Method:
- Time-Consuming and Exhausting:
Manual editing of every photo—even for a professional photographer—can take hours, especially with a large number of images. - Difficulty Maintaining a Consistent Style:
When photos have varying light conditions or subjects are in different positions, matching skin tones and colors across all images is almost impossible. - Creating a Real Film Look Requires Experience:
Simulating the classic film aesthetic or a natural, professional style on digital photos without presets requires trial and error and extensive experience.
In short, traditional methods mean frustration in Lightroom and wasted valuable time—especially for large projects with many images. This is where a professional tool like Portra Original Presets makes a real difference.
Introducing Portra Original: Professional and Fast
When it comes to editing portraits or large photo collections, one problem always remains: matching light, color, and skin tones across all images without losing their natural feel. This is where Portra Original Lightroom Presets come in, turning professional editing into a fast, simple, and predictable experience.
Key Features:
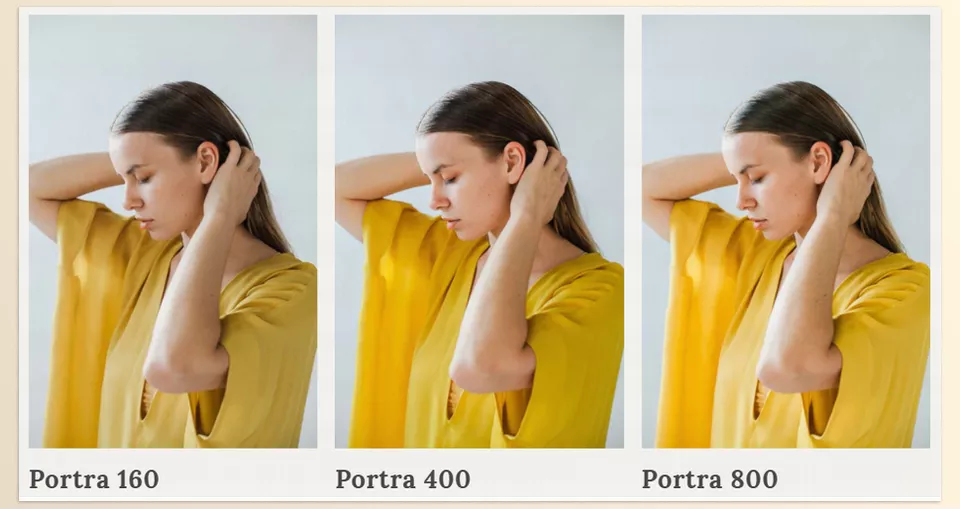
Three Main Film Presets for Different Applications:
- Portra 160:
- Soft and natural, medium contrast, smooth and even skin tones
- Perfect for daylight portraits or bright environments for a classic, natural look
- Portra 400:
- Warm and versatile, medium contrast and saturation
- Ideal for large collections like weddings with changing daylight
- Ensures consistent style and color tones across all images
- Portra 800:
- Higher contrast, suitable for low light and dim environments
- Easily turns evening or indoor photos into professional, natural-looking images
AI and Specialized Tools (Mastin Magic Toolkit™):
- Quick Skin and Light Correction:
Removes blemishes and balances skin tones without hours of work - Sky and Exposure Recovery:
Corrects overexposed skies or backgrounds without affecting the rest of the image - Photo Style Transformation:
From natural Light & Airy to Dark & Moody, all in just a few clicks
Film Simulation Tools:
- Grain and Tone Profile:
Creates a realistic, professional film look
Accurate color tones and contrast deliver the classic analog film feel to digital photos
Tutorials and Sample RAW Files:
- Start quickly without guesswork
- Learn how to use presets and tools for your personal style
Why Portra Original Presets Makes a Difference
- Unmatched Speed:
Edit 200–300 photos in minutes instead of hours - Complete Consistency:
Color tones and lighting remain uniform and professional across all images - Natural, Real Film Look:
Even digital photos gain the feel of classic film photography - Customizable and Flexible:
AI tools and film settings allow personal style to shine
Real-Life Example:
Imagine a wedding shoot with changing daylight and photos taken in multiple rooms and outdoor spaces. Using Portra 400:
- All photos gain consistent color tones
- No need to edit each photo individually
- Skin tones, light, and contrast adjust quickly
- Overall look remains natural, filmic, and professional
In simple terms, Portra Original Presets acts like a smart professional assistant, saving time, ensuring consistency, and letting photographers focus on creativity and storytelling rather than hours of manual editing.
Professional Techniques and Tips for Best Results
To get the best results from Portra Original Presets and ensure natural, professional, and cohesive edits, follow these key tips:
- Adjust White Balance Before Applying Presets:
Even the best presets don’t perform perfectly if the photo’s light and color temperature are off.
Correct the white balance first to keep skin tones natural and color tones accurate. Example: For a sunset photo, slightly adjust color temperature to make the preset render skin tones correctly. - Use AI Tools for Final Details Only:
Apply AI tools like skin retouching or sky recovery only for precise detail adjustments, not full edits.
This keeps the results natural and filmic. Example: Brighten a slightly shadowed subject without affecting the whole image. - Combine Grain and Tone Profile for a Film Look:
Presets usually deliver clean images; adding appropriate grain and tone profile creates the classic film aesthetic.
Choose light grain for daylight portraits or medium grain for low-light scenes. Example: A family portrait in natural light with proper grain and tone profile replicates the 35mm film feel. - Use a Consistent Preset for Large Projects:
For weddings or portrait collections, applying one preset across all images maintains a uniform, professional style.
After applying the preset, minor AI tweaks finalize consistency. Example: Apply Portra 400 to 200 wedding photos, then use AI to adjust skin tones and lighting.
💡 Key Insight:
Following these techniques not only multiplies editing speed but ensures consistent, natural, and professional results while preserving the real film look across all images.
Why Portra Original Presets Is Worth Your Time
Editing photos can take hours and drain creative energy. When working with a collection of images with varying light and color, matching them all without losing their natural, professional feel is a major challenge. You’ve probably experienced it: lots of photos ready but not knowing where to start.
Imagine spending all that time and energy on the creative side of photography, rather than small, repetitive adjustments. When style and color tones are consistent, it brings a sense of professionalism and calm. Not only are results better, but the editing process becomes enjoyable and satisfying.
For large projects or many images, you don’t have to worry about losing style or quality. A fast, predictable, professional workflow ensures your images are ready without stress or trial-and-error, keeping your focus on creativity instead of hours of exhausting manual editing.
If you enjoy experimenting with colors in images, don’t miss our color grading article, where we cover every detail of the color grading process.