

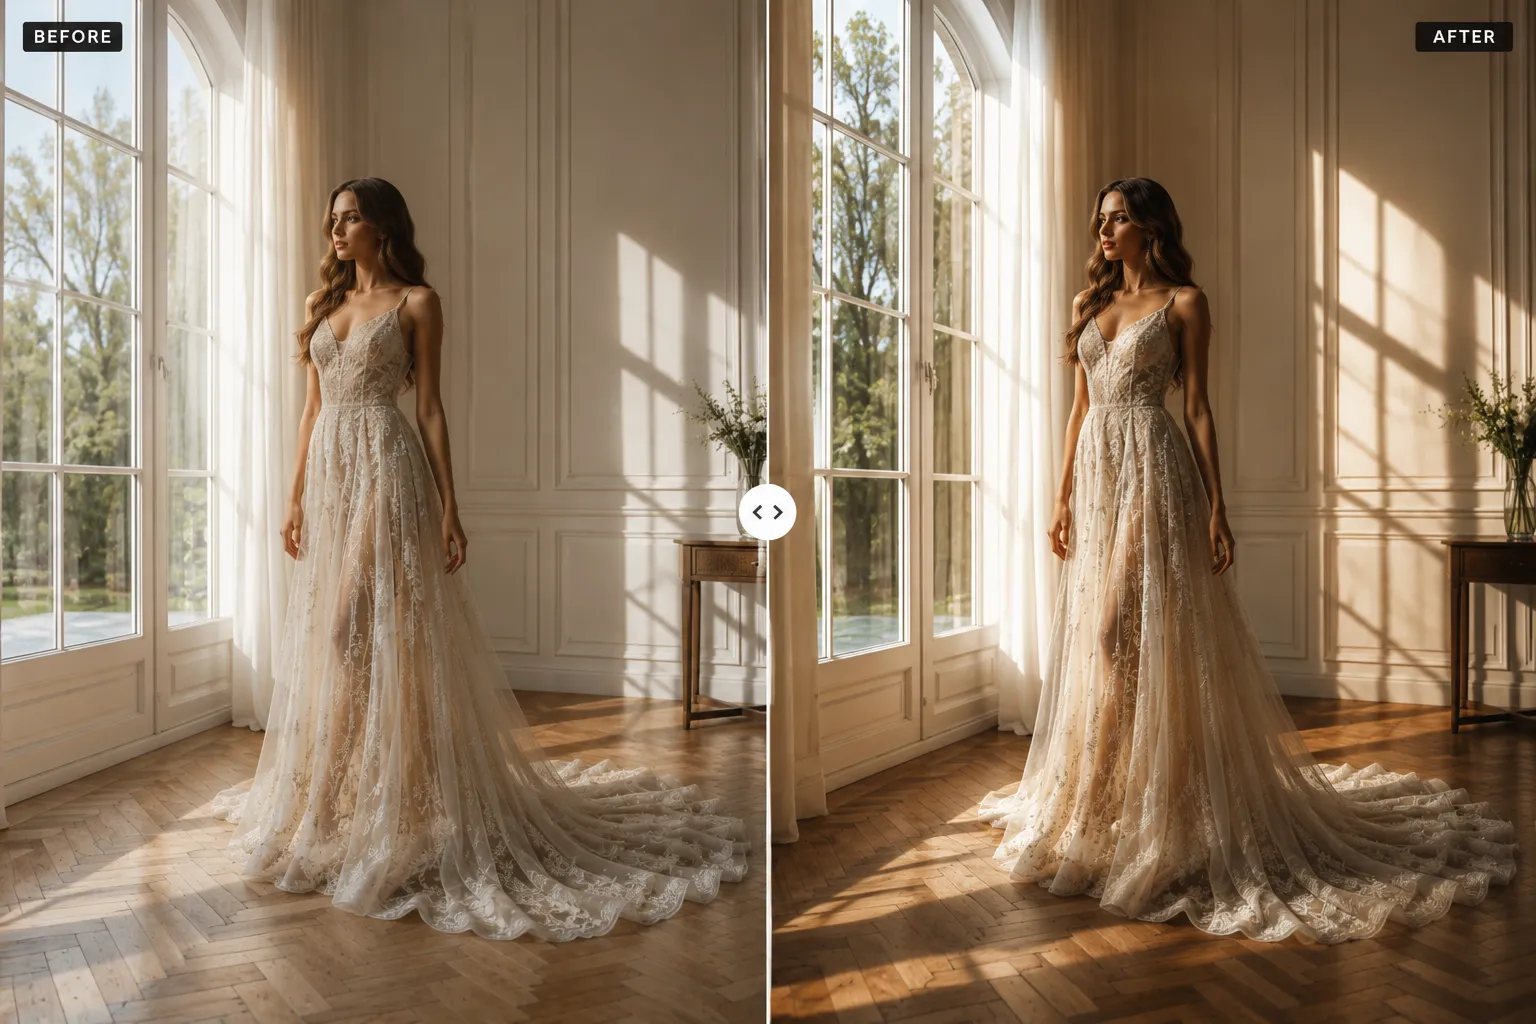
When Small Details Turn an Ordinary Photo into a Professional Result ✨
Have you ever looked into the Lightroom Toolkit Plugin by Ratta Studio? Many photos have the potential to become something extraordinary, but what truly makes them stand out is the small, precise refinements made after the shoot. Sometimes, just a few subtle adjustments to the lighting, colours, or specific details of an image can transform a good photo into a striking, professional one.
Oftentimes, there are certain lighting issues with the subjects of the photographs. The subjects may not stand out against the background of the photographs. Or, certain areas of the subjects may not have the proper look for the editorial features expected in the photographs.
However, making these subtle refinements isn’t always easy—especially when you’re working with a large number of photos, such as wedding, portrait, or professional photography projects. Selecting different areas for each image, creating masks, and manually adjusting everything quickly becomes repetitive and time-consuming, especially when that time could instead be spent on creativity and improving the final result.

What Is Masking in Lightroom, and Why Is It Useful? 🎭
Simply put, masking tells Lightroom: “Only change this specific area and leave the rest of the photo untouched.”
For example, imagine you have a portrait and want to soften only the facial skin without affecting the clothing, hair, or background. With masking, you can select just the face and apply your adjustments exclusively to that area.
In other words, masking gives you much greater control over your edits. Instead of applying an adjustment to the entire image and hoping for the best, you can edit each area independently.
Common Uses of Masking
- 👤 Natural Portrait Retouching
You may want the skin to appear cleaner while still preserving its natural texture, or make the eyes stand out a little more without making the image look artificial. - 🌄 Background Control
Sometimes the subject looks great, but the background draws too much attention. With masking, you can subtly adjust the lighting or colour behind the subject so the viewer’s focus remains where it belongs. - 💡 Creating More Depth
By slightly brightening the subject and controlling the surrounding areas, you can create more depth and give the image a more professional appearance. - 🎨 Correcting Colours in Specific Areas
Maybe the sky is too bright, the skin has an unwanted colour cast, or the clothing needs a colour adjustment. With masking, there’s no need to edit the entire image.
Common Ways to Create Masks in Lightroom
Before intelligent tools made the workflow faster, most photographers relied on Lightroom’s built-in masking tools to control different parts of an image. These tools are still useful today and work well for many editing tasks—they simply require more time and precision.
To create masks manually, photographers typically use the following options:
- Select Subject: Lightroom automatically detects the main subject in the image and selects it for editing.
- Select Sky: Separates the sky from the rest of the image so you can adjust its lighting, colour, or contrast.
- Brush Tool: One of the oldest methods, allowing you to manually paint over the desired area and apply adjustments only there.
- Radial Gradient and Linear Gradient: Used to create gradual adjustments across areas such as faces, backgrounds, or the brighter and darker regions of an image.
For example, you can select the subject to add a little extra brightness and clarity, or use the Brush Tool to work only on facial skin and improve portrait details. These methods offer excellent control and are well-suited for simple edits.
Manual Masking Becomes More Difficult as the Number of Photos Increases 😅
The biggest limitation of these methods becomes apparent when you’re working with large batches of images. Imagine editing a wedding project with several hundred photos. Creating multiple masks for each image, selecting different areas, and carefully adjusting each one soon becomes a slow, exhausting process.
On top of that, creating a mask isn’t just about selecting part of a photo—you also need to know what adjustments work best for each area to keep the result looking natural. If the edits are too strong, the image can easily look artificial and lose its authentic, professional feel.
Lightroom Toolkit: Making Detailed Editing Faster and More Precise 🎯
This is where Lightroom Toolkit comes in—a professional collection of tools for Lightroom and Adobe Camera Raw that gives you greater control over image details without having to build everything from scratch every time.
The Toolkit includes 40 intelligent masking tools designed for editing different parts of an image, from portrait retouching to controlling lighting, colour, and depth.
Instead of spending time creating multiple masks for every photo, you can use ready-made masks and achieve results much faster. This removes a significant portion of repetitive work, giving you more time for creative decisions such as choosing a visual style, refining colour grading, and shaping the image’s final mood.
Lightroom Toolkit is especially designed for photographers who work in portrait, wedding, and editorial photography—where maintaining a natural look is essential, and the goal isn’t simply to change a photo but to enhance the beauty that’s already there.
What Becomes Easier with Lightroom Toolkit? ✨
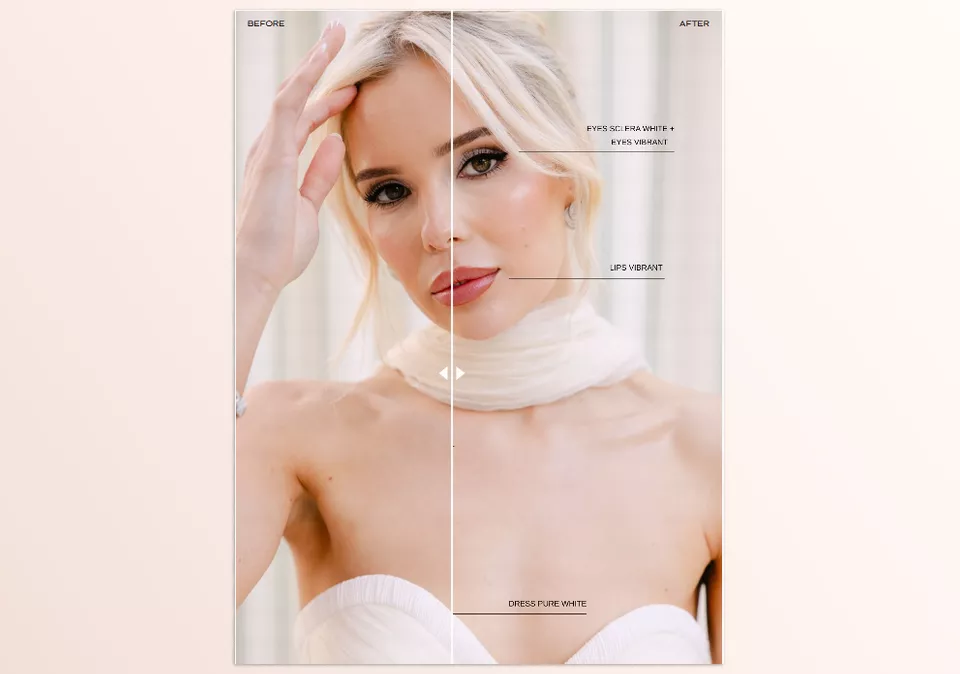
👤 Skin and Face Retouching Without Losing the Photo’s Natural Look
One of the most important aspects of portrait editing is refining the skin and facial features. But skin doesn’t have to become perfectly smooth and textureless—those natural details are what make an image feel real.
The tools in Lightroom Toolkit help you make subtle skin adjustments, reduce uneven colour tones, and create a cleaner, more polished appearance.
👁️ Enhancing the Eyes and Facial Details
In portrait photography, small details often have the biggest impact. The eyes, hair, and key facial features naturally attract the viewer’s attention.
With the Toolkit’s ready-made masks, you can control these areas independently and make the important details stand out without creating an exaggerated result.
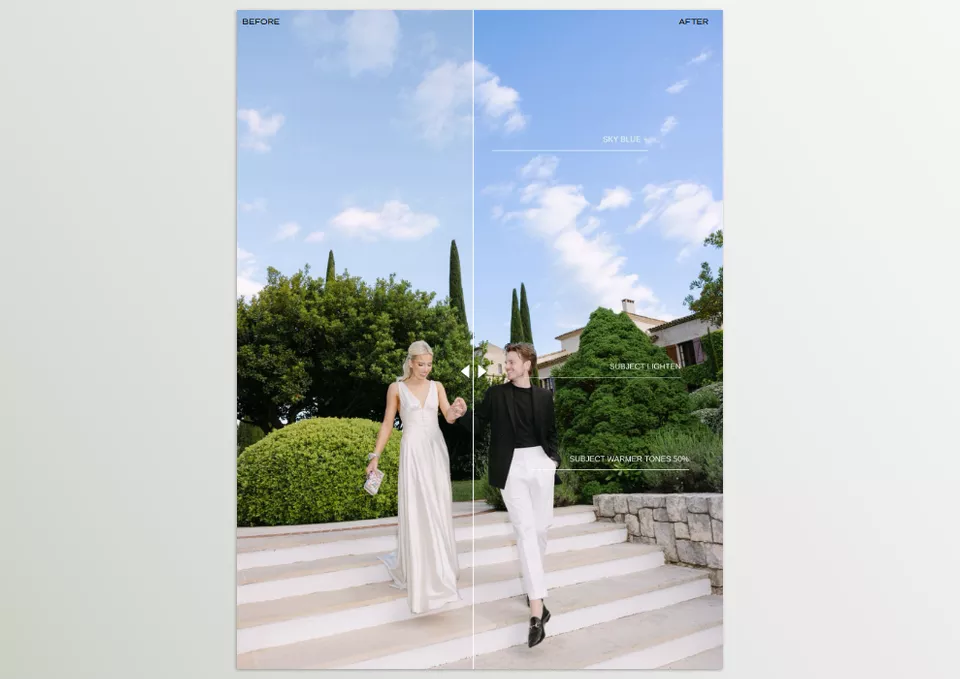
🎯 Better Subject Separation
Sometimes a composition is strong, but the subject doesn’t separate enough from the background.
By independently controlling the lighting, colour, and contrast of both the subject and the surrounding environment, you can add more depth and naturally guide the viewer’s attention toward the main subject.
🌫️ Creating Depth and an Editorial Feel
One of the key differences between ordinary and professional photographs is how light and atmosphere are controlled.
These tools help you create greater depth through subtle adjustments across different parts of the image, making the subject stand out while allowing the surrounding environment to play a supporting role.
☁️ Precise Sky and Background Control
In outdoor photography, the lighting and colour of the sky or surrounding environment can significantly influence the final result.
Instead of adjusting the entire image, you can refine only the specific area you need—for example, controlling the brightness of the sky, balancing the background, or creating a more cohesive overall atmosphere.
🎨 Adjusting and Balancing Colours Across Different Areas
Sometimes only one part of an image needs a colour correction, and editing the whole photo simply isn’t the right solution.
With masking, you can independently adjust areas such as skin, clothing, the environment, or the sky to achieve better overall colour harmony.
🌁 Controlling the Overall Atmosphere and Mood
Sometimes a photo is technically correct but still doesn’t convey the cinematic or emotional feeling you’re looking for.
The tools in Lightroom Toolkit help shape the overall atmosphere through controlled adjustments to light, contrast, and fine details.
✨ Grain Refinement and Final Image Finishing
Final details such as grain, texture, and overall appearance also significantly impact the quality of the finished result.
Lightroom Toolkit helps you complete these final steps with greater control, ensuring your images are ready for publishing or client delivery.
Ultimately, the real value of Lightroom Toolkit isn’t simply having a collection of ready-made masks. What makes it truly practical is that it shortens the path from a raw photo to a polished final image.
Especially for photographers who edit large volumes of photos, having tools that both speed up the workflow and maintain the quality of the final result can make a significant difference in their editing process.
A Few Tips for Achieving More Natural Masking Results 💡
Masking delivers the best results when it’s used with purpose and precision. The goal isn’t to completely transform every part of the image; it’s to highlight the photo’s strengths while preserving its natural look and feel.
- Don’t Overedit
The best edit usually isn’t the one everyone notices. It’s the one that makes the photo look better without making the editing itself feel obvious or unnatural. - Build the Overall Look First
Before focusing on the details, establish the overall lighting, colour, and style of the image. When the foundation is right, your masks will produce more consistent and harmonious results. - Treat Every Photo Individually
Even if you’re using a ready-made tool, always adjust the strength of your edits based on the lighting, colours, and conditions of each individual image. A setting that works perfectly on one photo may not produce the same result on another. - Understand the Purpose of Masking
You don’t need to change every part of the image. Masking should help direct the viewer’s attention to the most important areas of the photo, rather than turning every section into an edited focal point.
Ultimately, professional masking is successful when the viewer simply appreciates the final image without noticing the work that happened behind the scenes. The more subtle and intentional the adjustments are, the more natural and professional the final result will appear.
When Attention to Detail Transforms Image Quality 🎯
The difference between a good photo and a professional one often comes down to the small details that may not be immediately noticeable. It’s where the facial lighting is refined, the subject is separated more effectively from the surroundings, the colours become more balanced, and the image gains a stronger sense of depth and cohesion. These details are what make your work feel like more than just an edited image—they give it character and a distinct visual identity.
However, when working on real-world projects, time becomes just as important as quality. Creating multiple masks for each image, selecting different areas, and making every adjustment manually not only requires a significant amount of time and energy but also distracts you from the more creative aspects of the editing process. Having tools that streamline and organise this workflow allows you to spend more time refining your style, shaping the mood of your images, and improving the final result.
Lightroom Toolkit is designed for photographers who want greater control over their editing without spending hours on repetitive tasks like creating multiple masks from scratch. When you have the right tools for refining image details, achieving your vision becomes much easier—whether you’re working on a single portrait, a large wedding project, or an editorial photo series that demands both professional quality and consistency.
While Lightroom Toolkit helps you perfect specific areas of an image with intelligent masking, Frontier Presets shape the overall color, tone, and cinematic mood. Together, they create a faster and more professional Lightroom workflow. Want to give your photos a cohesive cinematic look? Read our complete guide to Frontier Presets.



