

When Choosing Colors Takes Too Much Time 🎨
Do you know what the GradientHub Plugin by aescripts is? When creating a logo animation, typography animation, or promotional video, you can often make your work more appealing simply by changing the color combinations. But finding the right colors and trying out different gradients doesn’t always happen quickly, especially when you want to test several combinations across different layers and effects.
On the other hand, a gradient might look great on text, but applying the same gradient to a shape’s stroke or a Glow effect might not give you the result you expected. To achieve the desired combination, you have to change the colors several times and check the results again.
Now, if you want to keep successful combinations for future projects, finding them again or creating similar versions can become a hassle. An organized collection of gradients you can easily find, modify, and apply to different parts of your design can eliminate much of this repetitive work.

🌈 What Is a Gradient, and How Is It Used in Motion Graphics?
A gradient is a combination of two or more colors that transition gradually into one another. Instead of using a single solid color, you can arrange multiple colors in your preferred order, direction, and blend ratio to create a variety of results.
Gradients have many applications in design and animation. For example, you can add depth to text, design colorful backgrounds, create glowing strokes, and even gradually change element colors in an animation.
🎬 Where Can Gradients Come in Handy?
- Logo Animation and Typography: Imagine you’re creating an animated logo for a technology brand. With a blue-and-purple gradient, you can make the logo more appealing, or use Gradient Overlay to add color depth to text.
- Creating Neon Effects: To create glowing text or luminous lines, combine pink, purple, and blue with Outer Glow for a more varied result than a single-color glow.
- Designing Animated Backgrounds: In a promotional video, a gradual background color change can help create a sense of movement, even when the main elements of the image remain still.
- Designing Colorful Strokes: If you use animated lines in motion graphics, a gradient can turn a simple line into a more eye-catching graphic element.
- Creating Creative Color Effects: With tools like Colorama, you can change an image’s colors and experiment with different combinations to give footage or animation a new look.
The important thing is that gradients aren’t just for making a layer look more attractive. When you manage colors in an organized way and reuse successful combinations, it becomes easier to maintain a consistent look across different parts of a project.
🛠️ Ways to Create Gradients in After Effects Without Plugins
After Effects has several built-in tools for creating gradients, so you can build a variety of color combinations for your motion graphics without installing additional plugins. Depending on whether you’re working with text, vector shapes, or footage, you have several options:
- Gradient Fill and Gradient Stroke: To create gradients on the surfaces of shapes and vector lines, you can adjust the colors, gradient point positions, and whether the gradient is linear or radial.
- Gradient Overlay and Glow: Using Layer Styles, you can apply gradients to text and graphic layers or create glowing effects with Outer Glow and Inner Glow.
- Colorama: To change the colors of footage or animation, use Colorama and its Output Cycle settings to create a variety of color combinations.
- Animation Preset: After configuring your effects, you can save the settings in the
.ffxformat so you can reuse them in future projects.
⏳ Why Does Managing Gradients With Traditional Methods Take Time?
These tools handle gradient creation well, but when you have many color combinations, finding the right preset and applying it to different effects can be time-consuming. For example, you might want to try the same color combination on text, a stroke, and a Colorama effect. In that case, you have to manage each set of settings separately.
On the other hand, if you’ve downloaded ready-made gradients from different websites, you might need to enter the colors manually or spend time preparing them for use in After Effects. Saving presets solves part of this problem, but with a large gradient collection, organizing it and quickly finding the right options can still be a hassle.
🚀 GradientHub: Managing and Creating Professional Gradients in After Effects
GradientHub is an Adobe After Effects panel that brings gradient selection, application, editing, mixing, and saving tools into one environment. Instead of starting from scratch for every color combination, you can use ready-made presets, modify them to suit your needs, and apply the results to different effects and layers.
With more than 650 built-in gradients, support for importing external gradient files, and the ability to create custom presets, this tool helps you keep your color collection organized and reuse it across different projects.
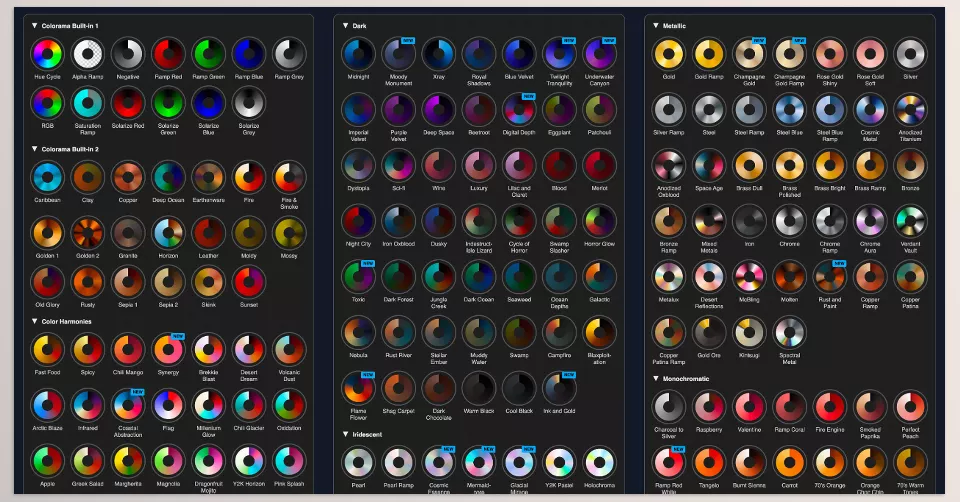
🎨 Browse More Than 650 Ready-Made Gradients With Visual Previews
One of GradientHub’s main features is its large collection of ready-made gradients, which you can browse using thumbnails. Instead of reading preset names and testing each one on a layer, you can view the color combinations directly in the panel and decide faster which ones best match your project’s look.
You can also change how the thumbnails are displayed. View previews as color wheels or linear gradients to make it easier to compare combinations.
For example, if you’re creating a logo animation with warm colors, you can find several suitable gradients from the previews and test them on your logo without manually building each combination.
Color Filters and Favorites Management
To keep you from getting lost among hundreds of presets, GradientHub provides several tools for narrowing down the results:
- Color Filter: You can select one or more colors to display only gradients that contain the colors you’re looking for.
- Favorites: You can mark frequently used presets with a star and view only those presets later.
- Combining Filters: You can use the color filter and Favorites together. For example, you can display only your favorite gradients that contain red.
These features become especially useful when you have a large gradient collection and want to find a suitable combination quickly without checking every preset individually.
⚡ Apply Gradients to Six Different Target Types
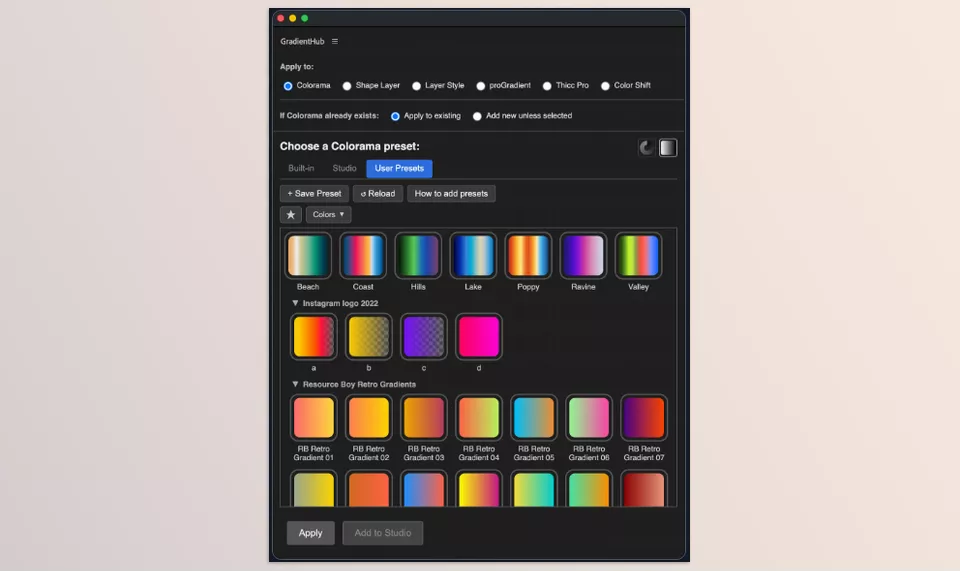
GradientHub supports six target types: Colorama, Shape Layer, Layer Style, proGradient, Thicc Pro, and Color Shift. This means you can maintain a collection of gradients for different purposes and reuse the same color combination across your project, depending on the layer or effect you’re working with.
Colorama: Changing the Image’s Color Combinations
With Colorama, you can apply a gradient to the Colorama effect in After Effects and use different color combinations to change an image’s appearance. This feature is useful for experimenting with different color looks on footage, animation, or graphic elements.
GradientHub can update the gradient in an existing Colorama effect or add a new instance when needed. This means you don’t have to recreate the effect from scratch every time you want to try different presets.
Shape Layer: Controlling Gradient Fill and Stroke
If you work with vector shapes in After Effects, GradientHub can apply gradients to Gradient Fill or Gradient Stroke. This feature is useful for designing icons, colorful lines, graphic shapes, and animated elements.
In this case, you can specify whether the changes should apply to Fills, Strokes, or both. You can also update existing gradients or add a new Gradient Fill or Gradient Stroke.
For example, if a logo consists of several shapes and strokes, you can apply a suitable gradient to the parts you want and change their color appearance without manually adjusting every color point.
Layer Styles: Changing Gradients Without Modifying Other Settings
GradientHub supports gradients for three layer styles:
- Gradient Overlay: Applies a gradient to the layer’s surface.
- Outer Glow: Creates a glow around the layer.
- Inner Glow: Creates a glow inside the layer.
If one of these styles is already applied to a layer, GradientHub replaces the gradient colors while leaving the other style settings unchanged.
For example, if you’ve already adjusted the Spread and Size of a Glow effect on a piece of text, you can change its color combination without having to configure the previous glow settings again.
proGradient: Using Presets in Animated Gradients
If you use the proGradient plugin, you can apply GradientHub presets to the plugin’s gradients. Instead of entering colors manually, you can start with ready-made combinations and use them alongside proGradient’s animated gradient capabilities.
GradientHub also allows you to update the gradient in an existing effect or add a new instance. This feature gives you more control over how many effects you apply to a layer when experimenting with different color combinations.
Thicc Pro: Changing the Colors of Graphic Strokes
Thicc Pro is a plugin for creating graphic strokes with variable widths and 3D capabilities. GradientHub can apply color presets to the plugin’s gradients, letting you change the look of lines and strokes faster.
In this case, GradientHub updates the existing gradient instance. That’s because adding another Thicc Pro instance to the same layer might completely cover the previous stroke and produce an unwanted result.
Color Shift: Creating Different Color Combinations
By selecting Color Shift, you can use GradientHub presets to change the gradient in this effect and create different color combinations for your image. As with Colorama and proGradient, you can update an existing effect or add a new instance.
Overall, support for these six targets means that your color presets aren’t limited to just one type of layer or effect. You can use a single gradient collection across different parts of your project.
🧪 The Studio Section: Mixing Gradients and Creating New Colors
Sometimes a ready-made preset is almost exactly what you want, but the order of the colors or the way they’re blended isn’t quite right for your project. The Studio section is designed for these situations and offers two main tools: Mixer for combining and rearranging colors, and Editor for precise control over color stops and transparency.
Mixer: Combining and Rearranging Gradients
In Mixer, you can place one gradient in position A and another in position B, then create a new result using different methods. Each method arranges or combines the colors differently, and you can adjust the result to match your desired look.
The different Mixer methods include:
- Consecutive: Places the colors from the two gradients one after another. Use the slider to adjust the amount of gradual blending between them.
- Luminance Sort: Arranges colors from dark to light based on their luminance. This method offers three algorithms, Oklab, Rec. 709, and HSL, so you can choose the visual result you want.
- Hue Sort: Arranges colors by hue and their order on the color wheel.
- Random: Randomizes the order of the colors. Shuffle: Lets you try new random arrangements.
- Metallic: Alternates between light and dark colors to create a pattern resembling the bright and dark reflections on metallic surfaces.
- Morph: Combines two gradients, and you can use the slider to change how much each one contributes to the output.
In addition, you can reverse or mirror gradients A and B, and mirror the final output separately. These controls let you create multiple variations from two original gradients and discover combinations that you wouldn’t get by simply selecting a preset.
Creating a Cyclic Gradient With Make Cyclic
The Make Cyclic option is useful when you want the beginning and end of a gradient to reach the same color so that the transition between them looks natural. This feature can be useful for creating repeating gradients and animations designed to run continuously.
You can also adjust color blending and cycle position to smooth the transition between the gradient’s beginning and end. The Tile x3 option displays the gradient in three adjacent sections, allowing you to inspect the color transitions and see how seamless the boundaries look when the gradient repeats.
This feature helps you design animated backgrounds, continuous color-changing effects, and visuals that need to repeat without interruption by letting you check the continuity of the color combination before using it in your final project.
Editor: Precise Color and Transparency Adjustments
If you want to modify the details of a gradient directly instead of mixing presets, or create a completely new gradient, you can use Editor. This section lets you manage color stops and transparency stops separately, giving you greater control over how color and Alpha change throughout the gradient.
The main Editor features include:
- Adding a Color Stop: Click in the lower section of the gradient bar to add a new color stop.
- Adding an Alpha Stop: Create a transparency control point by clicking in the upper section of the bar.
- Moving and Removing Stops: Drag stops to your desired positions, or remove them by dragging them outside the bar or using the Delete button.
- Visual Color Selection: Select colors using the Saturation and Value square and the Hue slider.
- Entering Exact Color Values: You can enter HSV values or a HEX code. So, if you have a specific color code from a brand guide or another design, you can use it directly.
- Adjusting Transparency: You can change the Alpha value with the slider or enter the exact value you want.
- Undo and Redo: These buttons let you return to previous steps or reapply changes you’ve undone.
As a result, Editor isn’t just for modifying existing presets. You can configure all the color and transparency stops from scratch and create a custom gradient. This is useful when you need a specific color combination or want to match a project’s color codes.
💾 Save Custom Presets and Reuse Them Across Different Projects
One of GradientHub’s important features is that a successful color combination you create doesn’t have to remain limited to the project where you made it. You can add gradients created in the Studio section or obtained from existing effects and layers to your User Presets collection and reuse them later.
Custom presets are saved as .ffx files in GradientHub’s dedicated folder and remain accessible from the panel. This means you don’t have to recreate a color combination from memory or repeat every step to use it again.
Tools for Managing Custom Presets
- Save Directly From Studio: You can save your preferred output from Mixer or Editor under a name of your choice.
- Save From Effects and Layers: You can save gradients from Colorama, Shape Layer, Layer Style, proGradient, Thicc Pro, and Color Shift.
- Automatic Thumbnail Generation: GradientHub generates a thumbnail from the gradient information, so you don’t have to create a separate preview image for every preset.
- Organize With Folders: You can organize presets into folders and subfolders. The panel supports a folder structure with up to two levels of subfolders.
- Custom Thumbnails: If you want to change a preset’s preview, you can place a PNG or JPG file with the same name as the
.ffxfile in the same folder. If both formats are present, PNG takes priority.
A saved preset isn’t necessarily limited to the effect it was created from. You can save a gradient from one target and later apply it to any of GradientHub’s six supported targets.
For example, if you find a suitable gradient for a logo stroke in one project, you can save it and try it on a Shape Layer, Gradient Overlay, or one of the supported effects in another project. This lets you build a collection of reusable color combinations you can expand for different projects.
📂 Import Gradients From Photoshop, Websites, and Design Software
GradientHub isn’t limited to its own built-in gradients. It can also read color information from .GRD, .CSS, and .SVG files and convert it into presets that you can browse and use from the panel. However, each format has its own limitations, and not every gradient or color definition is supported.
Importing Photoshop GRD Files
.GRD Files, which are used to save gradients in Adobe Photoshop, can be imported through GradientHub. Each named gradient in the file appears as a separate preset, allowing you to select the available combinations individually.
Gradients with colors stored in HSB and RGB modes are supported, but gradients based on CMYK, Grayscale, and Lab may be ignored. Photoshop’s procedurally generated Noise gradients are also not supported by this tool.
Extracting Gradients From CSS Files
If you find a color combination you like on a website or in a stylesheet, GradientHub can extract linear-gradient() definitions from a CSS file and display each gradient as a separate preset.
The tool ignores other parts of the file, such as selectors and rules, and focuses on gradient definitions. The following color formats are supported:
- HEX color codes
rgb()andrgba()values- Color names
hsl()values
However, CSS variables aren’t supported. As a result, gradients whose colors depend on CSS variables may be ignored.
You can also specify a custom preset name by placing a named comment on the line immediately before the gradient definition. This is useful when a CSS file contains several gradients, and you want to find each one in your collection by its own name.
Importing SVG Gradients From Illustrator, Figma, and Similar Tools
GradientHub can also read linear and radial gradients defined in SVG files. This means you can import color combinations from exported files from software such as Adobe Illustrator, Figma, Sketch, and Inkscape.
However, this feature doesn’t cover every type of SVG gradient, and Freeform Gradients aren’t supported. Therefore, if a design uses a complex freeform gradient, you might not be able to import it directly into the panel.
How to Import External Files Into the Panel
To import files, simply place them in the User Presets/GradientHub folder and select Reload from the panel. GradientHub checks the files and adds supported gradients to the list with automatically generated previews.
For example, if a brand’s colors are defined in an SVG logo file or a CSS file, you can use the information already available in that file. As a result, you don’t have to select every color manually and recreate each one’s position from scratch.
⚙️ Control How Gradients Are Applied and Preserve Existing Settings
GradientHub offers several options for controlling how presets are applied, allowing you to change gradients without unnecessarily disrupting the effect structure or existing layer settings. These options behave differently depending on the target you select.
Apply to Existing and Add New
With Colorama, proGradient, and Color Shift, you can choose whether to apply the gradient to an existing effect or add a new instance of the effect:
- Apply to Existing: Updates the gradient in the existing effect while preserving its other configured parameters.
- Add New: Adds a new instance of the effect so you can apply the gradient to it separately.
With Shape Layer, you can also update existing gradients or create a new Gradient Fill or Gradient Stroke. The Fill and Stroke options let you specify which types of selected elements should receive the changes.
Thicc Pro behaves differently: GradientHub updates the existing gradient instance because adding a new instance to the same layer might completely cover the previous stroke. This behavior helps prevent unnecessary extra effect layers and unwanted results when you change stroke colors.
Potential Differences Between the Preview and Final Result in proGradient
Under certain conditions, the gradient you see in the panel might not look exactly the same as the final proGradient result. This can happen when the effect’s color space is set to HCL and the hue interpolation mode is set to something other than Shortest.
In such cases, changing proGradient’s color space to OkLAB or RGB can help the result match the preview more closely. If the output colors differ from what you saw in the thumbnail, it’s worth checking these settings as well.
🧩 Installation Tips, File Access, and the Trial Version
GradientHub uses temporary .ffx files to apply many gradients. This is because After Effects doesn’t expose gradient parameters directly to scripts, so the tool uses these temporary files to transfer gradient settings to effects.
These files are cleaned up automatically and are different from the custom presets you save yourself. So, you shouldn’t confuse temporary files with your User Presets collection.
To save and load custom presets, After Effects must have permission to access and write to the Documents folder. Most systems don’t require any special configuration, but if Windows or macOS security settings prevent the application from accessing the folder, you might need to check After Effects’ permissions.
A trial version of GradientHub is also available, but it has some limitations: the trial includes only the built-in Colorama presets and the first seven presets in each other category. This means you can try part of the panel’s workflow, but you should keep the trial limitations in mind if you need access to the full preset collection.
🎨 Practical Tips for Selecting, Customizing, and Managing Gradients in GradientHub
To get the most out of this tool, don’t settle for simply choosing an attractive preset. How you select colors, where you use gradients, and how you manage your preset collection can also affect the quality and speed of your work.
- Start With Your Project’s Colors: If you have a defined color palette for a brand or promotional video, first look for presets that match the project’s main colors. GradientHub’s color filter can speed up this step.
- Customize Presets Before Using Them in the Final Design: If a gradient is almost right, instead of discarding it, change the color order or blending amount in Studio. Sometimes a small adjustment produces a better result.
- Create Separate Collections for Each Project: Use folders and subfolders to keep presets for logo animations, typography, neon effects, and branding projects separate.
- Check Cyclic Gradients: If you want colors to change continuously, use Make Cyclic and Tile x3 to inspect the connection between the beginning and end of the gradient before using it in your final design.
- Choose the Right Parameter When Saving a Preset: To reduce file size and speed up loading, in cases such as Colorama or Thicc Pro, you can select the gradient parameter instead of the entire effect, depending on the effect type and the information you want to save.
- Use the Original File for Brand Colors: If a gradient is available in a brand’s CSS or SVG file, import it directly to reduce the need to select colors manually and maintain color consistency.
- Avoid Changing Existing Effect Settings Unnecessarily: When testing presets, use Apply to Existing and Add New according to your needs so you don’t create unnecessary additional layers and effects.
Finally, remember that a suitable gradient should match the project’s visual goals. Even the most attractive color combination won’t necessarily produce a good result if it doesn’t fit the scene’s overall color scheme or the brand’s visual identity.
🎨 Manage Gradients in After Effects More Easily and Quickly Than Ever
If you work with gradients frequently in After Effects projects, you probably know how much time it takes to find the right color combination, create different versions, and coordinate colors. This is especially true when you switch between several projects and want to find a specific gradient again without rebuilding everything from scratch.
GradientHub makes choosing and managing gradients much easier. It offers over 650 ready-made gradients, so you can browse colors, use filters, save favorites, and mix or edit gradients to find the right look for your project. You can also save your own gradients and sort them into folders, making it easy to find and reuse them whenever you need.
GradientHub isn’t just for choosing ready-made colors. You can customize gradients, adjust colors, and apply them across different tools and parts of After Effects. As a result, instead of spending a lot of time creating and managing gradients every time, you can focus more on the final appearance of your motion graphics, designs, and animations.
If you’ve ever looked for an After Effects plugin but got confused by scripts, extensions, and presets, our After Effects Tools guide can help. It explains what each tool does, how they differ, and how you can use them in your projects.