

Creating Natural Voiceovers for Premiere Pro Videos with the Help of AI 🎙️
Are you familiar with how the AiBow Voice Gemini Plugin by aescripts works? When you’re creating a tutorial, promotional video, or YouTube content, finding the right voice for your voiceover can be pretty time-consuming. Sometimes, you have to record your voice several times to get the tone you want, or you may need different voices for different parts of your video.
On the other hand, if you want to use AI tools to generate audio, you usually have to leave Premiere Pro, enter your text into another service, download the audio file, and bring it back into your project. When the text changes, you may have to repeat these steps.
Now imagine turning your text into natural-sounding speech and sending it directly to Premiere’s timeline, without the hassle of switching between tools! This way, you can focus more easily on matching the voiceover to your visuals and spend more time polishing your final video.

What Is Text-to-Speech, and How Can You Use It? 🎧
Text-to-Speech (TTS) converts written text into playable audio. Instead of reading and recording the text yourself, you can give it to an AI model that delivers it in a specific voice and a style that sounds close to natural speech.
This technology can be useful for many types of projects. For example, you can turn tutorial instructions into voiceovers, convert a YouTube script into audio, and sync it with your video, subtitles, and animations. For promotional videos, you can choose a friendly or energetic voice to make your message more engaging.
You can also create conversations between two or more characters. For example, if you’re making a tutorial or a short animation, you can give each character a different voice without hiring multiple voice actors or recording every line yourself.
Of course, getting natural-sounding audio isn’t just about the AI model. The way you write your script, choose the voice and tone, adjust the speaking speed, and sync the audio with your visuals all help make the final result sound better.
Common Ways to Create Voiceovers in Premiere Pro 🎬
Even without a plugin, you have several ways to add voiceovers to your videos. Depending on your project, you can record your own voice or use text-to-speech services and then import the audio file into Premiere Pro.
- Record audio with a microphone: Record the voiceover directly or hire a voice actor, then place the resulting file on the timeline.
- Adjust audio in Premiere Pro: Use tools like Essential Sound and Audio Gain to adjust volume and use keyframes to control timing and changes.
- Use AI services: Enter your text into a Text-to-Speech tool, choose your preferred voice, and transfer the generated audio file into your project.
Why Does Generating Voiceovers with Separate Tools Take So Much Time? ⏳
The main problem becomes clear when you need to change the voiceover text or tone several times. Each time, you have to return to the voice generation service, generate a new version, import the file into Premiere, and then synchronize it with the visuals and different sections of your video. On top of that, your chosen tool may not give you enough control over individual sentence delivery, and creating a conversation with two different voices may require extra steps. These back-and-forth processes can slow down your workflow, especially on projects with long voiceovers or frequent revisions, and make it harder to manage different versions of your audio files.
AiBow Voice Gemini: Creating and Managing AI Voiceovers Inside Premiere Pro 🚀
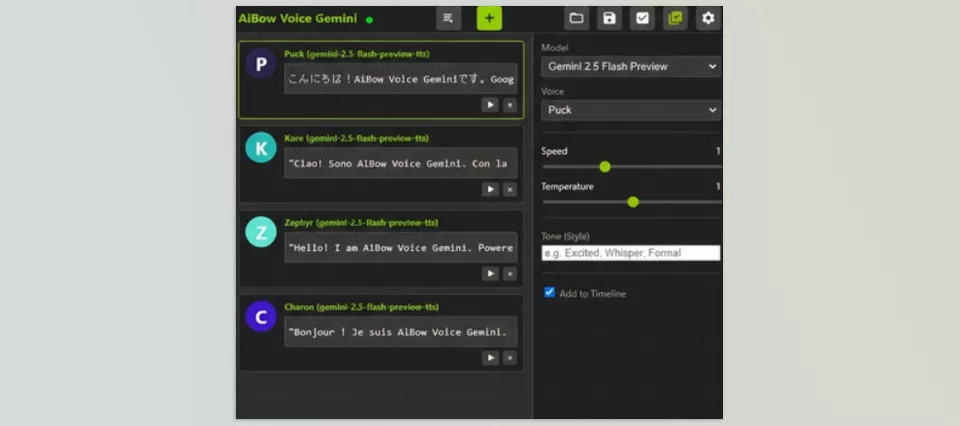
AiBow Voice Gemini is a text-to-speech plugin for Adobe Premiere Pro that brings Google’s Gemini audio models directly into your editing workflow. With AiBow Voice Gemini, you can enter voiceover text or dialogue, select your preferred voice, and send the output to the timeline without leaving Premiere Pro.
The generated audio is saved as a WAV file and placed at the current playhead position using the Add to Timeline option. This means you don’t have to switch between Premiere Pro and online tools every time you generate a voiceover or manually import the files into your project.
🎙️ Generate Voiceovers with Gemini 3.8 Flash and Flash-Lite Models
AiBow Voice Gemini supports the Gemini 3.8 Flash and Gemini 3.8 Flash-Lite TTS models. These models convert text into speech and let you generate audio with different delivery styles. Previous versions of the plugin also supported the Gemini 2.5 Pro Preview TTS model, which remains available as an older option.
Choosing a model depends on your project’s needs and the results you get from voice generation. For example, you may want a clear voice at a suitable pace for a tutorial, while a storytelling or promotional video might benefit from a different delivery style. Test a few sentences with different models before generating the full voiceover to see which option best suits your needs.
🎬 Automatically Place WAV Files on the Timeline
After entering your text and selecting your settings, simply click Add to Timeline. The plugin converts the text into speech, saves the WAV file, and places it on the timeline at the current playhead position.
This feature is useful for projects with multiple voiceover sections. For example, you can divide the explanations in a software tutorial into several parts and place each section near its corresponding scene. You can even export audio without having a Sequence open. If no Sequence is available, the plugin will warn you once when necessary.
🎭 Adjust the Tone and Speaking Pace of Each Line
One of the key features in version 3.8 is the ability to set a Style Direction for each line of text. This means you can provide separate delivery instructions for individual sentences. For example, one line can sound like a news presenter, the next can have a friendly and energetic tone, and another section can be delivered as a whisper.
The important thing to understand is that the delivery-style instruction guides the model and isn’t meant to be spoken as part of the voiceover itself. This feature is especially useful for text where the tone needs to shift with each sentence, such as storytelling videos, documentaries, and tutorials that pair serious explanations with a friendly delivery.
Speaking pace control is also available, but the pace is sent to the model as an instruction about the delivery rhythm. Therefore, the result may not match an exact duration, so it’s best to adjust the voiceover’s length to match your visuals and editing after generating it.
😄 Add Laughter, Sighs, and Short Pauses to Speech
Sometimes, changing the tone isn’t enough to make a voiceover sound more natural. You may also need vocal reactions or pauses. AiBow Voice Gemini lets you insert Vocal Tags, such as laughter, sighs, and short pauses, which tell the model how to deliver the text.
For example, in a story, you can use a pause to separate two sections. In a friendly conversation, you can try adding a short laugh. This feature helps the delivery sound less monotonous and better match your visual content’s mood.
However, these tags are instructions for the model, and the final result depends on how well the model supports them. Listen to the output and adjust the text or delivery instructions if needed.
🗣️ Create Two-Voice Conversations with Dialogue Mode
Dialogue mode is designed to create conversations between two voices. You can prepare conversation lines and generate them as a two-voice dialogue. The final output is provided as a single WAV file.
This feature is useful for conversation-based tutorials, storytelling content, dramatic scenarios, and videos featuring two characters talking to each other. Instead of generating every sentence separately and then arranging multiple audio files together, you can prepare the entire conversation in one step.
However, if your project requires precise dialogue timing, lip-syncing for animated characters, or detailed control over the gaps between sentences, you should review the final output in Premiere Pro and make any necessary adjustments.
🎤 Choose from Hundreds of Voices or Design a Custom Voice
The Voice Library gives you access to hundreds of different voices in various languages. According to the developer’s description, when the relevant version was released, the library included 115 Japanese voices. This variety gives you more options for different projects, from tutorials and documentaries to promotional and storytelling videos.
If none of the available voices match what you have in mind, the Voice Design feature lets you describe your preferred voice using text. You can then listen to a preview and, if you’re satisfied with the result, use that voice for different lines of your text.
For example, you can design a voice with specific characteristics for a video series to maintain a more consistent sound across its different episodes. However, Voice Design doesn’t always produce a result that exactly matches your initial description. It’s best to generate a few short samples and review them before using the voice in your main project.
⚡ Get Started Quickly with 12 Character Presets and Save Your Own Settings
If you don’t want to configure the voice and delivery style separately for every line, you can use the 12 ready-made Character Presets. These presets cover styles such as YouTube commentary, news, documentaries, advertising, tutorials, storytelling, and whispering. They apply the relevant voice, style, and speaking pace settings together.
In addition to the ready-made options, you can create and save your own presets. For example, if you regularly create tutorials and need a specific voice and tone, you can save your preferred settings and reuse them in future projects. This means you won’t have to configure everything from scratch every time.
✍️ Enter Multiline Text and Speed Up Dialogue Input
The plugin also lets you enter text into multiline fields. This makes it easier to prepare longer passages or several related sentences without opening a separate field for each sentence.
You can also press Ctrl+Enter on Windows or Cmd+Enter on Mac to add the next line using the same voice and delivery style. This shortcut is useful when you divide a long voiceover into shorter sentences or prepare multiple sections of text with similar settings.
☁️ Cloud Processing and Using Your Own API Key
AiBow Voice Gemini uses Google’s cloud processing to generate audio, so you don’t need to install large AI libraries on your own system. The plugin runs inside Premiere Pro, but audio generation requests are sent to Google’s service through its API.
The tool uses a Bring Your Own Key (BYOK) approach, so you need to enter your personal Gemini API key. You can obtain this key from Google AI Studio. Depending on your account, model, and usage quota, you may also be able to use the API’s free tier. However, unlimited free audio generation isn’t guaranteed, and costs or restrictions depend on Google’s service terms.
Since audio generation takes place in the cloud, an internet connection is required. This approach also lets the plugin use Gemini’s audio capabilities without installing large models on your computer. According to the developer’s description, the API key is sent in the request header rather than in the URL.
💾 Save and Load Settings and Projects
To help you return to your prepared text and settings later, the plugin also includes project-saving and loading features. With Save, you can store your project information in a JSON file and reopen it anytime with Load to continue working.
This feature of AiBow Voice Gemini is useful when you’re preparing a long project’s voiceover across multiple sessions or want to keep different texts and settings for future use. Instead of entering everything from scratch, you can load your saved file and pick up where you left off.
🛠️ API Error Guidance and a Debug Log for Troubleshooting
If you get an error while generating audio, AiBow Voice Gemini provides tips to help you understand some common API errors. For example, error 403 usually means there’s a problem with access or permissions, error 429 may mean you’ve reached a usage limit, and error 404 can mean the requested resource or model wasn’t found.
These tips help you find out what might be causing the problem, but they won’t fix every error automatically. The plugin also saves a Debug Log file in your system’s temporary folder, which can help you investigate technical issues.
Tips for Creating More Natural Voiceovers in Premiere Pro 🎨
To make the AI-generated output sound closer to the final voiceover your project needs, don’t rely on voice selection alone. The text, tone, and way the audio fits into your edit are just as important as the model you choose.
- Write text specifically for speech: Sentences that work well on screen aren’t always suitable for listening. Shorten overly long sentences and use proper punctuation to smooth delivery.
- Match the tone to your video: Clarity and easy-to-understand sentences are especially important for tutorials. For advertisements or storytelling videos, you can experiment with a more energetic or emotional delivery.
- Generate samples before creating the full voiceover: Test a few short sentences with different models, voices, and styles. This helps you choose a better option before generating a long voiceover.
- Use presets as a starting point: Presets can reduce initial setup time, but it’s still a good idea to listen to the output and adjust the delivery style or pace as needed.
- Synchronize the audio with the visuals: After moving the WAV file to the timeline, match the beginning and end of each sentence with visual changes, on-screen text, and animations. If necessary, adjust pauses or gaps between voiceover sections during editing.
- Check the output quality before delivery: Listen carefully to the pronunciation of technical terms, names, numbers, and important expressions. If a section doesn’t sound natural, you can change the text or delivery style and generate it again.
- Keep API costs in mind: If you’re generating long voiceovers or producing a large number of them, check your API usage and Google account limits so you won’t be caught off guard by unexpected costs.
Finally, remember that AiBow Voice Gemini isn’t meant to eliminate the need for review and editing. Instead, it makes voiceover generation easier, giving you more time to sync the audio with your visuals and polish the final project.
Is AiBow Voice Gemini Right for Your Editing Workflow? 🚀
If you regularly create voiceovers for tutorials, YouTube content, or promotional projects, you probably know how much switching between different tools can slow down your editing workflow. By bringing voice generation into Premiere Pro, AiBow Voice Gemini brings these steps closer together and makes it easier to add the output to your timeline.
Plus, features like setting the tone for each line, creating two-voice conversations, designing new voices, and using ready-made presets give you more options for creating voiceovers. These features are particularly useful when you produce different types of content or frequently revise the text and its delivery throughout a project.
Ultimately, if you need a lightweight tool to generate voiceovers in Premiere Pro and don’t mind using Google’s API, AiBow Voice Gemini is worth considering. Before purchasing, try the demo, evaluate the voice quality against your project’s needs, and consider potential API costs to make sure this approach fits your workflow.
If you enjoyed this article about AiBow Voice Gemini and work with Premiere Pro, check out our article on Premiere Pro tools, where we explain each one and how it can help you in different ways.