


Animating Limbs Has Never Been This Easy!
Do you know anything about the Limber Plugin? We all love dynamic characters and natural movements, but when it comes to limb motion and joint rotation, we quickly realize how time-consuming and exhausting it is to create smooth and believable movement. Even a single arm or leg can require hours of focus and precise adjustment to look natural.
Picture this. You can pose an arm, a leg, even the entirety of your character with but a few clicks, never having to touch an anchor point, parent a layer, or spend unnecessary hours making multiple keyframes. The ease of such an ability allows one to concentrate on the creative process and nuanced motion without it feeling like hard work, but instead, extensive play.

The Real Joy of Animation With Precise Joints
Precise joints are what make limb movements smooth, natural, and alive. When arms, legs, or even fingers are rigged correctly, you no longer need to spend hours adjusting every keyframe. Movements automatically stay coordinated and fluid, letting you focus on creativity and story details.
With this precision, working with IK and FK becomes like an enjoyable game: in IK, you can move the limb’s end and the rest follows naturally, while FK gives you precise control over each limb segment. The result? Complex movements like walking, waving, or bending the body are ready with just a few clicks, making your animation look professional and natural.
Basic Techniques for Limb Movement
Even with After Effects, you can create limb and joint movements using a few basic tools and simple techniques. The Puppet Pin Tool can bend different parts of a layer, and Parenting can connect segments so movements stay hierarchically coordinated. For more precise control, separate keyframes for each part and each IK or FK movement are created to design limb motion step by step.
Traditional methods in After Effects for limb and joint animation, while functional, have clear limitations: achieving natural and smooth movement requires numerous keyframes, precise anchor point adjustments, and parenting layers. Complex motions like walk cycles or multi-segment bends take hours, and controlling subtle joint details and angles is difficult—so even after spending a lot of time, the result may still not look entirely natural or coordinated.
Rig and Animate in One Click With Limber Plugin!
Limber Plugin is an amazing plugin that makes rigging and animating limbs incredibly easy and fast. You no longer have to struggle with anchor points and parenting layers; with a few clicks, movements become natural and fluid, letting you focus on creativity and your character’s story.
Key features:
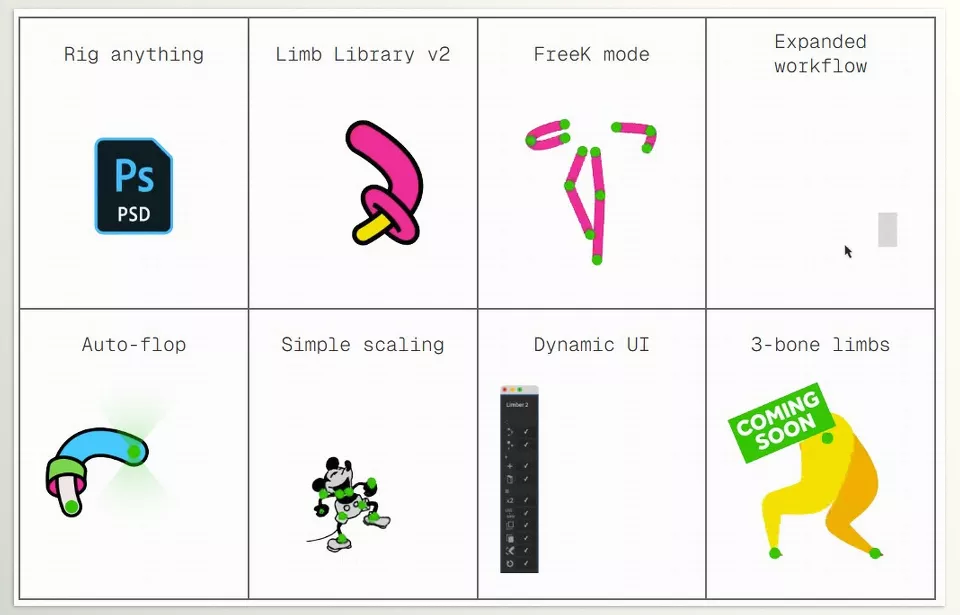
- Quick limb rigging: A simple curved path or a few basic shapes are enough to create a complete limb. It even works with raster or bitmap layers, and everything is ready for animation without manually adjusting joints or layers.
- IK / FK / FreeK modes: Every type of movement is controllable. IK creates elastic, natural motions, FK gives precise control over each limb segment, and FreeK enables front-facing and otherwise impossible movements with traditional methods.
- Vector and raster support: Whether working with vector layers, bitmap, or even puppet-pinned layers, all can be rigged and animated. Forget software limitations and easily handle any project.
- Ready-to-use limb library: Over 100 pre-designed limbs that you can download and use directly. No need to start everything from scratch each time.
- Smart tools: Includes auto-flop for automatic limb direction changes, simple scaling, and a dynamic interface that stays organized and easy to use as you resize the panel.
With Limber Plugin, you can create natural, precise, and professional animations without boredom or dealing with manual details. You feel everything is ready and under control—you just need to apply your creativity. For any 2D animation or motion graphics project, Limber 2 acts like a creative and reliable companion, making your workflow faster and more enjoyable.
Little Tricks That Make Your Work Professional
With Limber Plugin, you can make character movements more natural and fluid, and a few simple tips make it even easier:
- Use FreeK mode: For front-facing or complex movements, this mode helps arms and legs bend effortlessly and look natural.
- Adjust limb segment lengths: For walk cycles or running, adjust each segment individually for precise and coordinated movement.
- Use the ready limb library: Save design time and focus on creativity.
- Auto-flop: When limb direction changes, this tool automatically handles it so you don’t have to rotate everything manually.
- Dynamic interface: Resize the panel however you like, and all options remain organized and accessible.
Following these tips, you can create even the most complex movements quickly, smoothly, and naturally, focusing all your energy on story and character details instead of tweaking software settings.
Fast, Natural, and Enjoyable Animation
In conclusion, Limber Plugin is a fast, easy and enjoyable way to rig and animate limbs for natural motion without the painstaking hours spending on anchor points, parenting and keyframing. Everything’s set up and in control; you just have to let your imagination run wild.
Whether it’s a simple waving, complex walk cycles, or just turning facing front, Limber Plugin makes every motion look fluid and professional. All in all, if you’re looking to save time and make animation enjoyable, this tool truly gives you the sense that you have everything in the bag and only need to worry about your story and characters.
Want to take your projects to the next level with After Effects? Discover our article on essential After Effects tools.



