

🎬 When a Simple Idea Becomes Heavy Under the Weight of Repetition
Are you familiar with using the mCloner Pro Plugin by aescripts? If you’ve worked with motion graphics, this scenario is probably very familiar to you. You have a simple idea in mind; for example, a few circles or pieces of text that are supposed to spread across the scene with a specific rhythm and create an engaging motion. At first, everything seems easy and manageable.
But very soon after you start working, things change. You notice the project gradually filling up with repetitive layers, similar settings, and countless details that need to be controlled one by one. What was supposed to be a simple effect turns into a cluttered and time-consuming structure 😅
The challenge of managing repetition in projects with dozens or even hundreds of copies can be overwhelming. How does one keep all of this organized? That’s the challenge.
🧩 Behind the Scenes: Clones and Smart Distribution
On the surface, many impressive motion graphics effects may look complex, but they are actually built on a simple concept: repeating an element and controlling its distribution.
For example, imagine a piece of text whose letters enter the scene one by one like a wave. Or a series of circles distributed in a circular pattern or grid and then animated with a specific rhythm. Even effects that create a sense of explosion or organic flow are usually based on this same concept.
The important point is that the real power of these effects lies not in repetition itself, but in smart control of repetition. In other words, being able to manage all those copies at once without having to manipulate each one individually.
🛠 When We Only Use After Effects
If you want to create these types of effects using only Adobe After Effects itself, there are several methods and tools available that motion designers commonly use. Each of these approaches covers part of the process, but they are ultimately more manual than an automated system.
For example, you can use methods such as:
- Duplicating layers to create multiple instances of an element
- Using the Repeater in Shape Layers to generate organized repetitions
- Writing Expressions to control spacing, timing, or movement
- Using Pre-compose to keep the project organized and group layers
These methods work perfectly well for smaller projects and offer good flexibility, but they are more like building a system piece by piece than relying on a centralized control system.
⚠️ When the Project Gets Bigger, and Everything Becomes Harder
The problem starts when the project becomes slightly larger and more complex. When you’re dealing with dozens or hundreds of copies rather than just a few layers, managing everything becomes a time-consuming and exhausting task. Any change may affect many layers, making precise control over every detail more difficult than before.
In such situations, more time is spent organizing the structure, fixing repetitive settings, and keeping layers synchronized rather than designing and being creative. As a result, the workflow becomes heavier, and the creative freedom you had at the beginning of the project is partially overshadowed by technical complexity.
🚀 When a Tool Simplifies the Process: mCloner Pro
This is exactly where mCloner Pro enters the game: a tool designed to transform working with a large number of clones in Adobe After Effects from a manual, heavy, and repetitive process into a fully intelligent, controllable, and fast system. Instead of dealing with dozens or even hundreds of separate layers, you work with a centralized structure that manages all clones in one place.
🧠 Centralized Control System (Core System)
The core of mCloner Pro is a centralized management system that lets you control all clones from a single interface. Instead of modifying each layer individually, a single change can affect the entire system. This significantly increases workflow speed while maintaining project organization, especially in large and complex projects.
📦 Source Management and Control
One of the key sections of this tool is Source management, which refers to the reference layers. You can easily:
- Add multiple layers as sources (Mix Source)
- Exclude specific layers from the clone system (Subtract Source)
- Randomize the order and behavior of sources (Shuffle)
- Reset the entire system (Reset / Clear)
This section gives you complete control over what your clones are built from without disrupting the project’s structure.
🎯 Distribution Mode (Smart Distribution Methods)
One of the most important features of mCloner Pro is its Distribution system. This determines how clones are arranged within the scene. Various modes include:
- Linear
- Radial
- Grid
- Random
This means that without any complicated setup, you can completely change the layout of your project simply by switching modes, achieving entirely different structures.
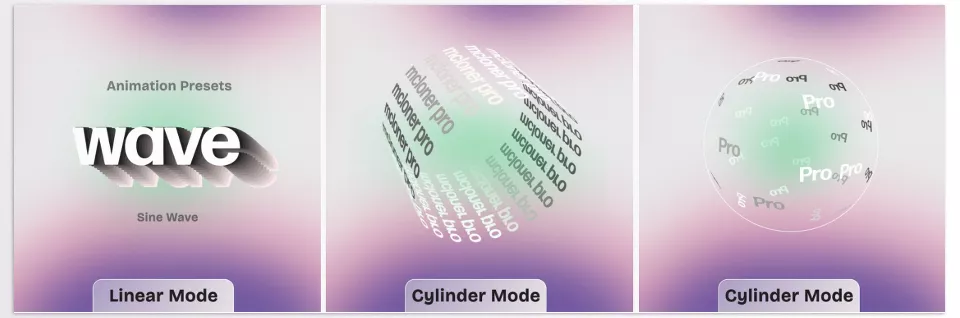
🎬 Animation and Timing Control
This tool is not only about arrangement; a major part of it focuses on clone animation. You can:
- Assign different delays to each clone to create sequential or wave-like motions
- Control animations either synchronously or independently
- Use timing synchronization to establish rhythm
- Configure movements as wave-based, progressive, or random
This makes it easy to create dynamic and lively effects without relying on complex Expressions.
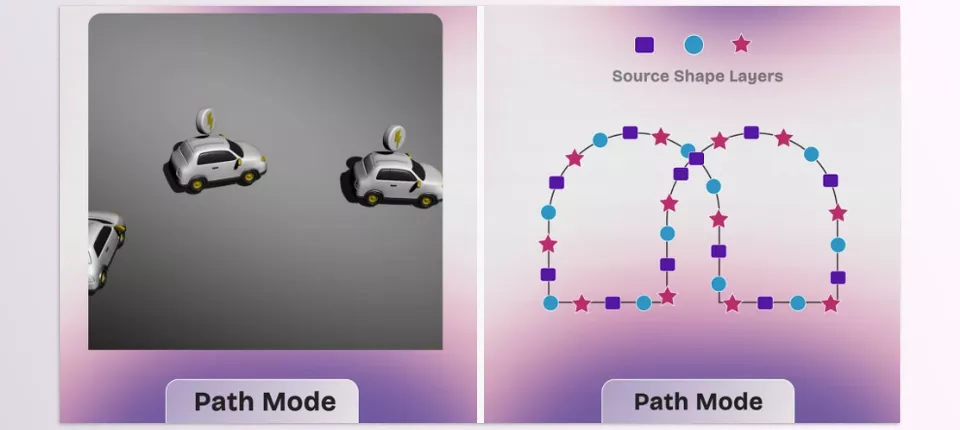
🧭 Path Mode (Movement Along 2D and 3D Paths)
One of the most important capabilities is Path Mode. In this mode, you can move clones along custom paths. These paths can be:
- Simple 2D masks
- More complex 3D paths
This feature is extremely useful for creating organic motion, visual flows, or fully cinematic animations.
🌊 Effectors (Interaction and Intelligent Behavior)
The Effectors section gives clones dynamic behavior. This means clones can react to environmental conditions. For example, they can:
- Respond to proximity or distance from a point
- Change behavior when an element enters the scene
- Generate wave-like or expanding behaviors
This section gives animations a lively, interactive feel rather than rigid, predetermined movements.
🔀 Variation and Naturalization of Motion
To prevent the final result from looking artificial, the tool provides features such as Shuffle and random variations. These features help ensure that:
- No two clones look exactly the same
- The rhythm feels more natural and organic
- Artificial repetition is minimized
🎛 Orientation and Transform Control
You can maintain complete control over every clone:
- Rotation / Orientation
- Scale
- Position
- Combined behaviors between these properties
This means that even within a large structure, you can still control fine details with precision.
🧱 Support for Advanced Projects (3D and Models)
For more professional projects, mCloner Pro even supports working in 3D space and with 3D models such as OBJ and GLB. This allows you to manage clones in a more realistic and cinematic environment and move beyond simple 2D workflows.
Ultimately, mCloner Pro is not just a tool for “duplicating layers”; it is a complete system for creating, managing, and animating collections of elements. What it provides is control, speed, and creative freedom—without forcing you to deal with the usual complexities of managing hundreds of layers.
🎨 A Few Important Tips for More Professional Results
To make your work look more professional and natural, there are a few simple yet very important tips that can significantly improve the quality of your final output. These may seem like small details on the surface, but they have a major impact on the overall feel of the animation.
🔀 Use Shuffle to Avoid Uniformity
Using Shuffle helps break repetitive and predictable patterns in clone arrangement and behavior, making the final result appear more natural, lively, and professional.
⏱ Very Small Delays for Smoother Motion
If you add very short delays between clones, the movements become more wave-like and fluid, making the animation look much more appealing and alive.
🧭 Choose Smooth Paths in Path Mode
When working in Path Mode, it’s better to use smooth, curved, uninterrupted paths because the path’s shape directly affects the feel of movement and the overall quality of the animation.
🎢 Combine Scale and Rotation for More Natural Motion
Combining scaling and rotation is one of the simplest ways to make clone movement feel less rigid and repetitive while giving it a more organic appearance.
Ultimately, these tips may seem simple, but they are exactly the things that can elevate your work from an ordinary animation to a professional and eye-catching piece ✨
🚀 It’s Time to Free Yourself from Layers, Not Your Ideas
In the end, one thing becomes very clear in motion graphics work: the main problem is usually not the idea itself, but managing the execution of that idea. Most of the time, you know exactly what you want to create, but the sheer number of layers, repetitions, and settings makes the path toward that idea more complicated than necessary.
This is where mCloner Pro effectively becomes a game-changer in the workflow. Instead of getting caught up in heavy structures and manually controlling hundreds of elements, you have a system that manages that complexity for you. Rather than spending your time organizing layers, you can focus your energy on design, rhythm, movement, and the project’s final feel.
More importantly, the automation of repetitive tasks allows for more time for designers to think about their ideas and to create projects with outcomes that are professional and as envisioned by the motion graphic designers themselves 🎬✨
If you’d like to significantly reduce the time that you spend on projects and, more importantly, to create more projects with less effort, then check out our After Effects Tools guide. In this simple guide, we discuss a variety of helpful tools for After Effects that will significantly assist with your projects. Read the guide today to make your After Effects workflow faster and more enjoyable.


