

🎯 Why LUTs Don’t Make Your Footage Cinematic
Have you ever explored creating effects with the CineKit Plugin by Jay Jankulovski? This scenario probably sounds familiar: you’ve shot your video, and in terms of lighting, framing, and even camera movement, everything seems right. But once you get into color grading, a sense of dissatisfaction starts creeping in. The image looks “good,” but it still doesn’t have that quality you see in films or professional work. The colors either feel flat and lifeless, overly saturated and artificial, or, even when a LUT that worked perfectly elsewhere is used, they ruin the result here.
At this point, the first reaction is usually to try a few different LUTs and hope one of them works. The problem is that the result remains inconsistent. Sometimes the image improves, sometimes skin tones become unnatural, and sometimes the contrast falls apart. This often leads users to think either their tools are the problem or that they still haven’t learned the “secret,” when in reality, neither is true.
The real issue is more precise: color grading is not just about applying a beautiful filter. It is a chain of technical decisions that must be made correctly and in the proper order—from converting the camera’s color space to correcting exposure, controlling contrast, adjusting skin tones, and finally building the Look. If this sequence is not handled correctly, even the best LUTs will not make your footage look cinematic.
🎨 What Exactly Is Color Grading, and Why Is It So Important?
Color grading is the process of creating the final visual appearance of an image in terms of color, contrast, and overall mood.
However, what many people misunderstand is that color grading is not simply about making an image look prettier. It means:
- Adjusting exposure and contrast properly
- Converting the camera’s color space into a standard color space (such as Rec. 709)
- Correcting skin tones so they look natural
- Creating a final cinematic Look
For example, imagine two people filming with two different cameras. If you apply the same LUT to both without accounting for differences in the original footage from each camera, the results will not match.
⚙️ Traditional Color Grading Workflows in DaVinci Resolve
If you want to accomplish this using only DaVinci Resolve’s built-in tools, you essentially have to design the entire workflow yourself from scratch. There is no predefined structure in front of you, and everything depends on your experience and decision-making. You need to know where each stage belongs and why.
In a typical workflow, you usually have to determine:
- Where the Color Space Transform (CST) should be placed
- Whether exposure and white balance corrections should happen before or after the LUT
- At which stage should skin tones be controlled
- Whether Film Grain and final effects should be added at the end or somewhere in the middle of the process
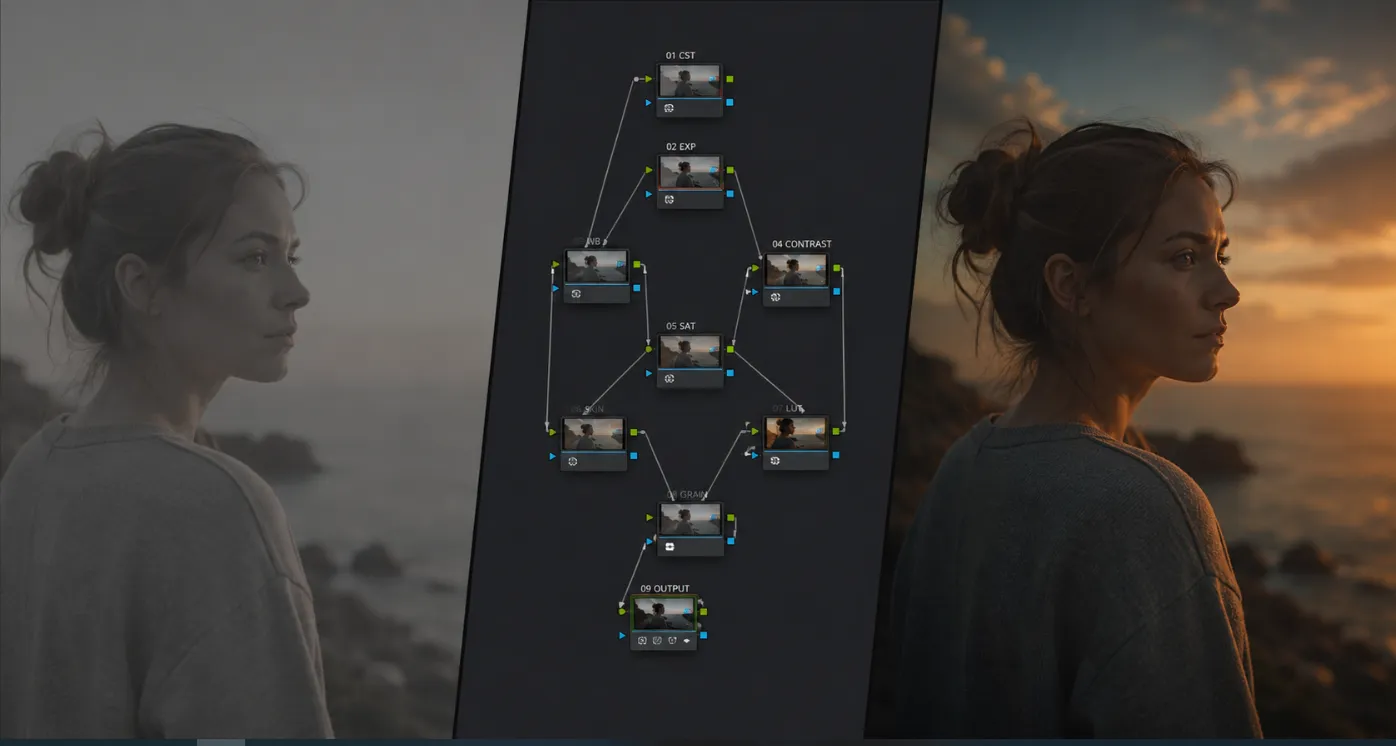
Ultimately, all of these elements reside within a Node Tree, and their order directly impacts the final image. The right structure can make footage look natural and cinematic, while the wrong structure can ruin the entire result.
❗ The Main Challenge of Traditional Workflows
The biggest challenge is that this process is highly dependent on experience and trial and error. Every project has its own conditions—from scene lighting and camera type to color space—and because of that, you cannot always rely on the same structure.
As a result, for every video, you have to rethink the workflow, rearrange nodes, run tests, and figure out which order works best. This process is time-consuming and often makes the final result unpredictable, especially for users with limited color-grading experience.
🧠 This Is Exactly Where CineKit Comes In
JAY’s CineKit is not simply another LUT that you throw onto footage and call it done. What you are dealing with is much closer to a complete color grading system—a pre-designed workflow that tells you exactly how each stage of color processing should be handled.
To understand it better, let’s start with an important question:
When you want to make an image look cinematic, where should you actually begin?
With exposure correction?
With a LUT?
With color space conversion?
Or with skin tones?
That’s the problem—most editors have to make these decisions themselves every single time.
❓ What Does “Instead of Thinking About It Yourself” Mean?
In a traditional workflow, you have to decide for every project:
Should CST (Color Space Transform) come first or last?
👉 Because if it’s placed incorrectly, colors become unnatural or the LUT won’t work properly.
Where should I place the LUT?
👉 Before color correction? After exposure adjustments? Or somewhere in the middle?
Should Skin Tone adjustments happen before the Look or after it?
👉 If done too early, the LUT may ruin them. If done too late, they may become difficult to control.
When should Film Grain and final effects be added?
👉 If added too early, they can negatively affect color correction.
These are not decisions with fixed answers, which is why many people end up confused on every project.
🧩 How Does CineKit Solve This Problem?
CineKit has already arranged all of these decisions inside a standardized and thoroughly tested Node Tree.
What does that mean?
It means:
- The node order is already defined
- Each stage has a clearly assigned purpose
- You no longer have to worry about what comes first and what comes next
Instead of building a workflow, you simply use a workflow that has already been built.
📦 What Exactly Does This System Include?
When you import CineKit into DaVinci Resolve, you are not just looking at a simple file. You gain access to a complete collection of tools and structures:
Ready-to-use PowerGrade (DRX File)
👉 A complete project/preset with the Node Tree already stored inside
Professional Pre-Designed Node Tree
👉 A structure that defines where every stage of color correction belongs
Technical LUTs
👉 Used for accurate conversion of camera color spaces into standard spaces such as Rec.709
Creative LUTs
👉 Used for building a cinematic Look and defining the final visual style
System Training
👉 Because having the tools alone is not enough—you also need to know how to use them
🎬 What Is the Final Result?
Once you import this PowerGrade into DaVinci Resolve, you are no longer dealing with a simple LUT that merely applies a visual style to your footage. Instead, an entire pre-designed color grading workflow opens up in front of you—a workflow that clearly defines where and how every stage of color correction should happen.
At that point, you no longer need to build a Node Tree from scratch for every project or constantly guess the correct order of operations. The entire structure is already prepared, and all you have to do is fine-tune each section according to your footage—such as exposure, skin tones, or the intensity of the Look.
In other words, the task shifts from “building a color grading system” to “adjusting a tested and ready-made system.”
And this is exactly where the difference between CineKit and a regular LUT becomes clear. It doesn’t just give you a Look—it gives you a pre-designed path to achieve that Look.

🔧 Professional Tips for Better Results
Even when using professional Node Trees or ready-made color grading systems, a few principles can make the difference between an average result and a polished, professional one.
Here are a few simple but highly important tips that can help in every project:
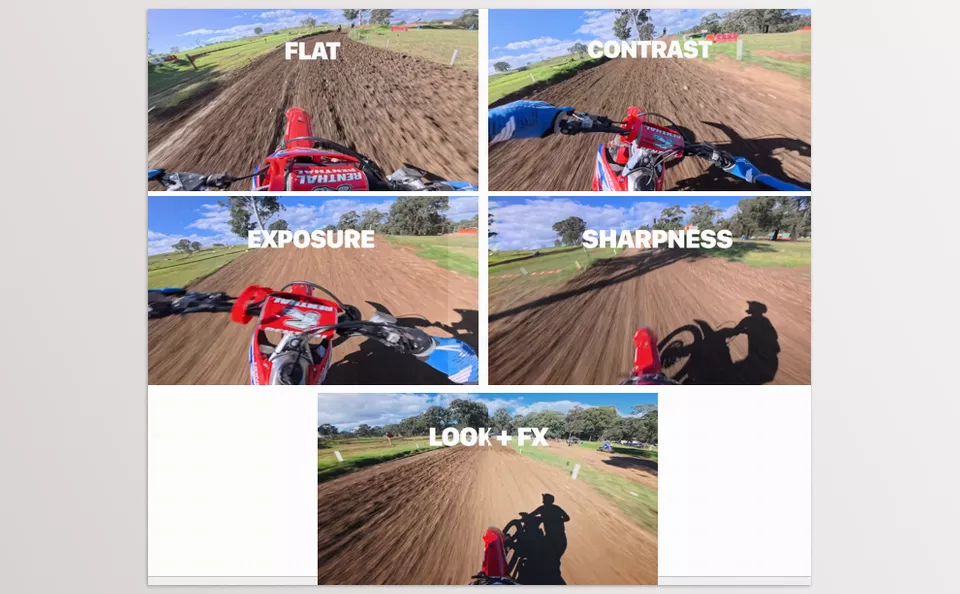
1. Exposure First, Color Second
Before applying any Look or LUT, always correct Exposure and White Balance first. No LUT can “fix” footage with incorrect exposure—it will only make the problem more colorful.
2. Control the Look at the End
If you jump into LUTs or creative Looks too early, you can quickly lose control over the image. Always make the image natural and technically correct first, then focus on making it beautiful.
3. Be Sensitive About Skin Tones
Even the best color grade will look unprofessional if the skin tones are wrong. Viewers’ eyes naturally react to faces and skin before anything else in the image.
4. Don’t Be Afraid of the Node Tree
Nodes are not complicated—they are simply different stages of the workflow. Each node represents a specific task, such as exposure, contrast, or color. Once you think of them this way, working with nodes becomes much easier.
Ultimately, the purpose of these tips is to remind you that tools like CineKit alone are not enough. Even with a ready-made system, these simple decisions are what determine whether the final result looks professional or ordinary.
🧩 Why Are These Types of Tools Actually Important?
DaVinci Resolve, on its own, is one of the most powerful color grading tools in the world, and in terms of features, it has nothing to be desired. In other words, everything you need to create a cinematic image already exists within the software itself. However, the real issue is not whether you can do it—it’s knowing exactly where to start and how to proceed.
This is where tools like CineKit come in. What these tools add is not some new power or a strange capability; rather, they provide a ready-made, tested, and reliable structure. Instead of getting lost every time between CST, LUTs, skin tone adjustments, and node order, you are given a pre-designed workflow that only needs to be configured.
Ultimately, the main value of these kinds of tools is that they move you from the “system design” stage to the “image creation” stage. Instead of spending your time on trial and error and arranging nodes, you can focus on creativity and the final result itself. And for someone who handles many projects or wants their outputs to remain consistently professional, these time savings and reduction in errors are exactly what transform such a tool from “optional” into “truly essential.”
If enhancing your DaVinci Resolve workflow and maximizing editing performance are among your goals, we highly encourage you to read our complete article featuring the top DaVinci Resolve tools every editor should know about.


