


When One Face Needs to Replace Another 🎭
Are you experienced in using the Copy Face Plugin by aescripts? Have you ever had a really good shot with an excellent actor performance, only to realize at the end that the face in the footage isn’t what you wanted for the project? For example, maybe you want to replace an actor’s face or change a character’s appearance, but then you think, “So now do I have to sit here and fix this frame by frame?” 😅
The problem is that face swapping is not simply about putting one face over another. You have to pay attention to head movement, changes in facial expressions, camera angles, lighting, and even hair that comes in front of the face. Any of these can make the final result look artificial and leave you with a lot of manual corrections.
For one or two simple shots, you might be able to work with these traditional methods, but when they become a regular part of your projects, they can take up a lot of your time. That’s where a smart solution can be really useful: a method that handles a large part of the work for you instead of making you spend hours dealing with the details of face swapping.

What Exactly Is Face Swap and Where Can You Use It? 🤔
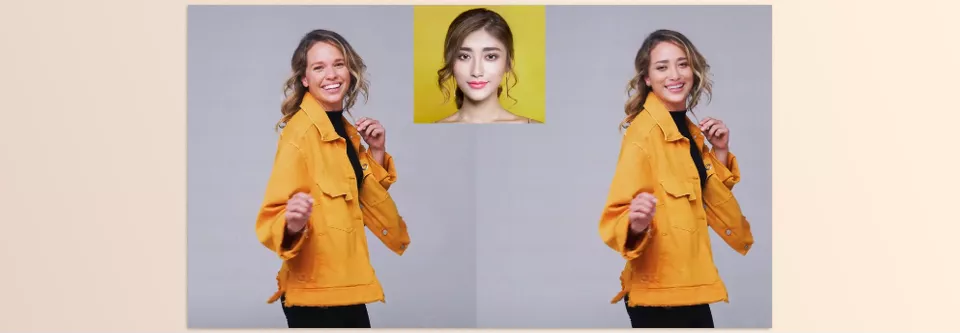
Face Swap is exactly what it sounds like: replacing one person’s or character’s face with another face while keeping the movement of the original video intact. For example, you may have an actor speaking in front of the camera and moving their head, but you want to change their character’s appearance. Instead of filming the entire scene again, you can place a new face over the same footage.
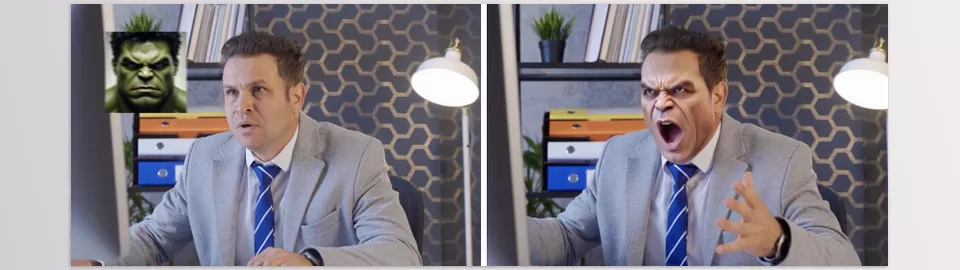
Of course, this technique is not limited to real faces. If you work with Anime, Stylized, or Superhero characters, you can use it there as well; for example, you can keep the movement of an existing character and only change its face. That is why Face Swap has many applications in VFX projects, advertising, video content creation, and character design, and it can even be very useful for quickly testing different looks for a character.
How to Do Face Swap Without a Plugin? 🛠️
If you want to perform a face swap without using a plugin, After Effects itself provides several useful tools. Depending on how complex your shot is, you can usually combine several techniques:
- Mask: First, you isolate the face you want with a Mask so that only that part of the image can be used.
- Motion Tracking: Track the movement of the face or head so the new face moves with the subject.
- Rotoscoping: If the subject moves a lot or something comes in front of the face, you can use Rotoscoping to isolate the face area more precisely.
- Color Correction: Finally, you use color and lighting adjustments to make the new face match the original footage.
For a simple shot where the subject does not move much, this combination can work perfectly well. But the more movement there is in the video, the more techniques you have to use at the same time, and the more time you need to spend cleaning up the result.
When Too Much Manual Work Becomes a Problem 😅
The main problem starts when the face constantly changes angle, facial expression, or lighting. At that point, simply placing a face over the image is no longer enough, and you have to keep correcting the Tracking and Mask so the face doesn’t move out of position. On top of that, you also have to adjust the size, color, lighting, and edges of the face so the result does not look artificial. For one or two shots, it may be manageable, but when you want to repeat this process across multiple shots or different projects, it quickly becomes time-consuming and exhausting.
Copy Face: When AI Handles the Hard Part for You 🤖
This is where Copy Face from Blace Plugins can make the face-swapping Workflow much easier. This tool is built for After Effects and uses the blace.ai AI engine to transfer one person’s or character’s face onto another face, without requiring you to manually set everything up again for every movement and change in facial expression. The processing also runs completely locally on your system, and according to the developer’s description, your project data does not leave your device.
Put the New Face Over Your Footage
Working with Copy Face is relatively straightforward. First, apply the tool’s effect to your footage and make sure there is only one face in the clip, because the current version of Copy Face processes only one face per clip. Then select another layer containing the new face as the New Face. This layer can be an image or a .cpf file prepared for the Verification system.
After selecting the new face, Copy Face transfers it onto the target face and tries to position it automatically. If the face does not align correctly, make sure the face in the selected layer is already centered and appropriately covers the entire frame.
There is also a security point here: to protect this technology, Copy Face uses Face Verification. If you use a face file as the input, that face may first need to go through the verification process; in contrast, faces generated with a Text Prompt do not require Verification.
Two Models for Two Types of Faces 🎭
Copy Face has two main models, and it is better to know exactly what each one is designed for before you start:
- Instant Model: This model is designed for real faces and is a suitable option for tasks such as replacing an actor’s face, changing a face in real-world videos, and personalizing video content. Instant is also the default model in Copy Face and focuses heavily on processing speed.
- Style Model: If your project does not involve real faces and you are working with Anime, Stylized, Superhero, or fantasy characters, this model is a better choice. In other words, you can use existing footage or movement and change the character’s facial appearance into something different.
So choosing a model isn’t just a simple option in the settings; it is better to consider what type of face you are working with from the beginning and choose the appropriate model.
Create a Face with a Text Prompt! ✨
One of the new and interesting features of Copy Face is that you don’t necessarily need a ready-made image to create a New Face. You can describe the appearance of the face you want using Text Input, and Copy Face can transfer that face onto the target face.
This feature can be especially interesting for creative work. For example, if you are working on character design and want to test several different facial styles on the same movement, you can describe different ideas with text and reach a result faster. Also, according to the developer’s description, faces generated with Text Prompts do not require Face Verification.
Instant Model: Fast and Suitable for Real Footage ⚡
The Instant model is designed to deliver good results with real faces, and high speed is one of its main features. According to the developer’s description, this model can process each frame in less than 300 milliseconds under suitable conditions and even supports 4K and 32-bit footage.
This speed matters when you want to preview the result repeatedly or work on longer video projects. However, the number the developer states depends on processing conditions and hardware, so you shouldn’t expect the same speed on every system.
Style Model: When Your Project Is Stylized 🎨
The Style Model has one important difference from Instant: how it processes the sequence of frames. This model has two main modes:
- One Frame Preview: In this mode, the face is replaced separately in each frame. Its advantage is that it is much faster for Preview and testing settings, allowing you to see the result without waiting too long. However, because the frames are processed separately, the output is not as Temporally Stable as a full Sequence process.
- Full Sequence: If you want a more stable final output, this mode processes multiple frames together so that the relationship between frames is better preserved. In this mode, Copy Face processes around 50 frames at each stage; as a result, the first frame and every roughly 50th frame may take longer to process, and this stage can take around 1 to 2 minutes depending on the system. The frames between these points are usually processed much faster.
The important point is that the results of One Frame Preview and Full Sequence may differ slightly. So if you are only testing settings, Preview is a good option; but for the final output, it is better to use Full Sequence. If Full Sequence processing takes too long and you want to stop it, the Stop Processing option lets you cancel the process.
Everything Is Processed on Your Own System 💻
One of Copy Face’s key features is that its processing engine runs on your system. The tool uses the high-performance C++ engine blace.ai and, according to the developer’s description, your information and footage do not leave your device for processing.
To make the most of this local processing, Copy Face also uses hardware acceleration and supports Apple Silicon and NVIDIA GPUs on Windows. However, the minimum hardware requirements vary depending on the system:
- Windows + NVIDIA GPU: Minimum 12GB of GPU memory
- Windows without an NVIDIA GPU: Supported, but processing can be very slow and requires a minimum of 8GB of memory.
- Apple Silicon + macOS Sequoia or newer: Minimum 32GB RAM
- Other macOS systems: Not currently supported according to the current specifications.
Overall, Copy Face is not just a simple tool for “changing a face”; from choosing the right model and Verification to generating a face with text, Local processing, fast Preview, and full Sequence processing, it brings several different parts together to make the entire Face Swap process inside After Effects easier and faster.
How to Make the Copy Face Result Look More Natural? 🎯
No matter how good AI is, choosing the right footage and preparing it properly can still make the result much better. If you follow a few simple tips, you will probably have to spend much less time modifying the output later.
- Choose suitable footage. If the face is very blurry, largely covered, or moving intensely, the process will naturally become more difficult.
- Consider the angle of the faces. If the original face is in profile while the new face is taken straight on, matching the two can produce a weaker result.
- Do not underestimate lighting. When the lighting on the new face differs greatly from the lighting in the original footage, even a good Face Swap can look artificial. A simple color correction after the process can help a lot.
- Choose the right model. For real faces, use the Instant Model, and for stylized characters, try the Style Model.
- Test a short section first. Before processing the entire long video, test a few seconds of the shot to see how the result looks with different movements and facial expressions.
- Pay attention to the number of faces. Copy Face currently processes each clip with one face. So if you have several people in the shot, take this limitation into account beforehand.
Ultimately, the cleaner the input and the more suitable the shot conditions, the more freedom Copy Face has to create a natural, consistent result. So before you move on to settings and rendering, spending a little time choosing the right footage can save you a lot of trouble later.
So, Who Is Copy Face Actually For? 🎬
If you only want to replace a face in a simple shot from time to time, you can probably achieve the result using After Effects’ own tools. But when Face Swap becomes something you regularly do in your projects, the situation is different. At that point, every manual step, every mask, and every frame-by-frame correction means more time spent on the project.
Copy Face is especially useful in this scenario because it leaves much of the process to AI while also supporting both real faces and stylized characters.
If you work with VFX, advertising, content creation, or character design and face swapping is a repetitive task for you, Copy Face is worth trying. Especially since it also offers a Free Trial, allowing you to see how well it works with your footage and Workflow before making a final decision.
Want to make the most of After Effects? Understanding the different types of tools available can help you build a faster and more efficient workflow. Our After Effects Tools guide covers plugins, scripts, extensions, presets, and other tools, explaining how each one can support different creative tasks.



