

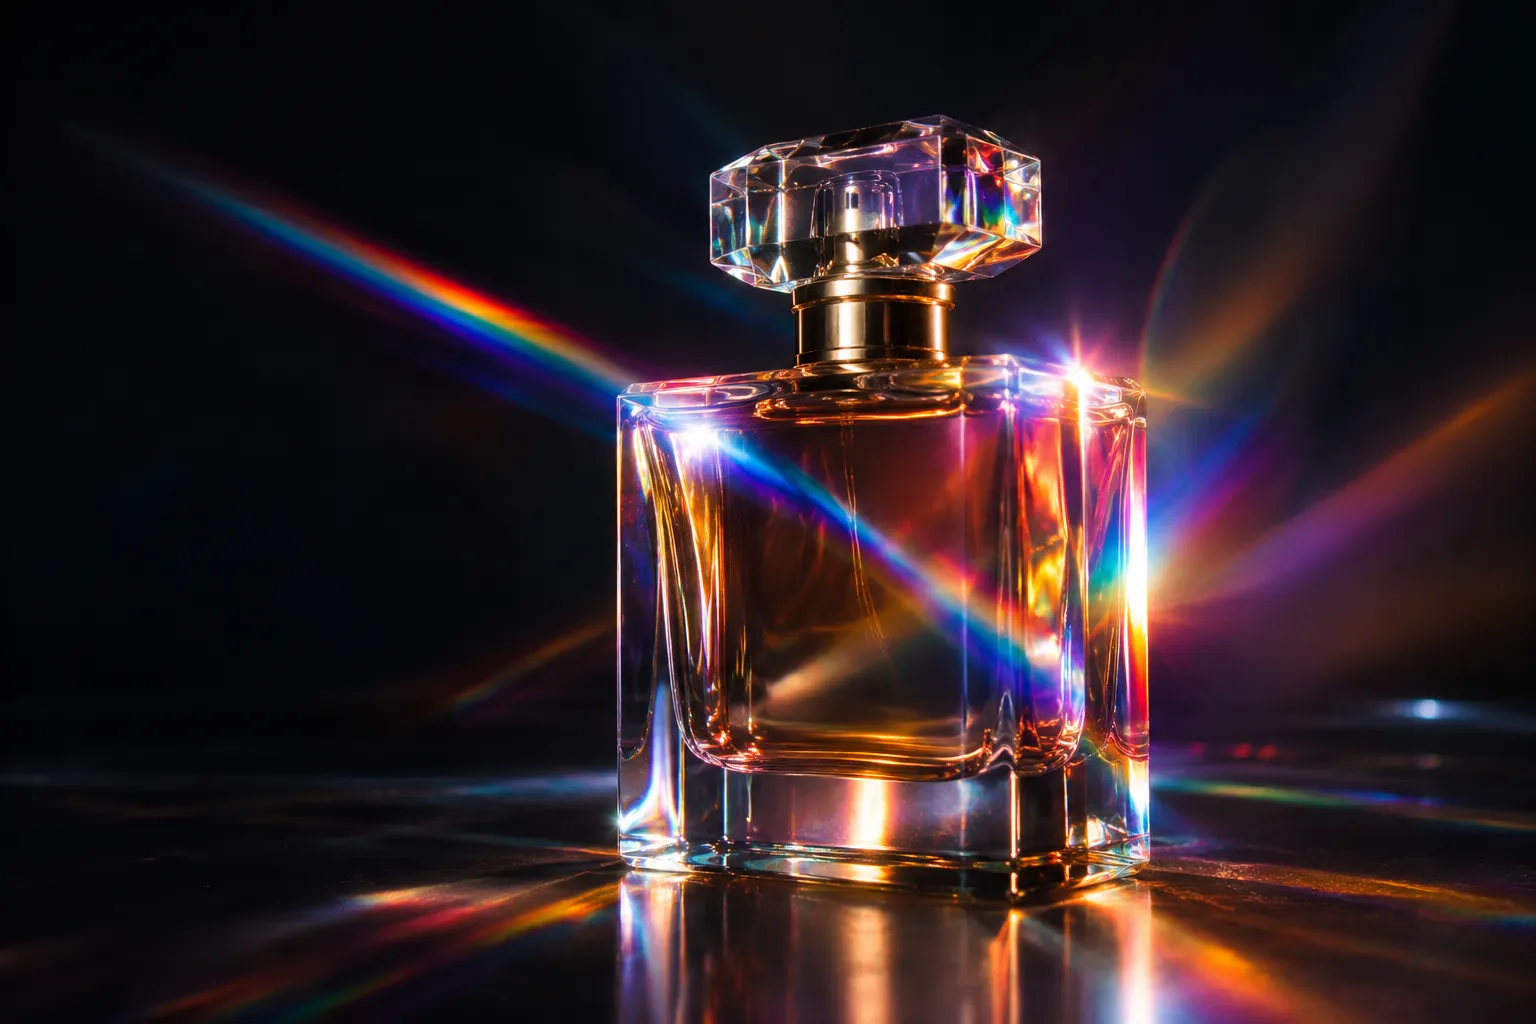
🌈 Creating Rainbow Halos and Prismatic Streaks on Footage
Have you ever used the DreamGlare Plugin by aescripts for VFX work? When creating a commercial, music video, or logo animation, you may want the lights in the image to look different. For example, a reflection on a perfume bottle might turn into a rainbow light streak, spectral rings might form around background lights, or a subject’s edges might stand out with a colorful glow. These effects can give an image a distinctive, cinematic look without changing the subject or the scene’s overall lighting.
However, creating these effects in After Effects isn’t always as simple as adding a regular Glow. To create multilayered halos, colored rings, prismatic streaks, and color dispersion around highlights, you may need to combine several effects, duplicate layers, and adjust each element’s settings separately. Controlling glow along a subject’s bright edges can also be tricky because you don’t want the same colored line around the entire subject.
Things get more complicated when you want these lights to move throughout a shot or change their appearance across several different scenes. This is where a tool that lets you create and combine multiple spectral lighting effects on a single layer can simplify your workflow and give you more freedom to design cinematic rainbow effects.

🎨 How Do Spectral Lighting Effects Change the Look of an Image?
Spectral glare effects use bright areas in an image to create colorful effects that resemble light dispersion in optical phenomena. Instead of simply blurring the image or separating the red, green, and blue channels, you can turn light into colored halos, glowing rings, or elongated streaks.
These effects have many uses and can look subtle and cinematic or completely fantastical and exaggerated, depending on their intensity and how you use them.
Here are a few examples of how these effects can be used:
- Commercials: Imagine filming a perfume bottle. Adding subtle colored halos to the light reflections on the glass, or creating a prismatic streak beside the product, can make the image more eye-catching without changing the entire scene lighting.
- Music Videos and Stylized Videos: Combining rainbow rings with moving light streaks can create a dreamy, electronic, or surreal atmosphere.
- Logo Animation and Typography: When a logo or text appears against a dark background, a colorful glow around its edges can make its entrance more appealing.
- Cinematic Effects: In shots featuring sunlight, city lights, or point light sources, carefully applied halos and color dispersion can enhance the image’s optical feel.
- AI-Generated Videos: Adding suitable lighting effects can create a more cohesive, stylized look, though these effects alone won’t fix structural problems in the footage.
The important thing is that these effects don’t always need to fill the image with color and light. Sometimes, a small halo around a light source or a coloured line along a subject’s edge works better than applying several intense effects at once.
🛠️ Manual Methods for Creating Halos, Light Streaks, and Color Dispersion
You can create different lighting effects in After Effects and Premiere Pro without using extra plugins. Just combine the built-in effects, masks, and layer blending options. The steps will depend on the lighting effect you want to make.
In After Effects, you can use the following techniques:
- Creating Light Halos with Glow: Adjust Glow Threshold, Glow Radius, and Glow Intensity to control which parts of the image emit light and how wide and intense the halo is.
- Combining Multiple Glow Passes: Duplicate the layer and use effects such as Gaussian Blur and blend modes such as Add or Screen to combine soft, wide halos with concentrated highlights.
- Creating Light Streaks with Masks and Transform: Create narrow masks, adjust the layer’s angle and scale, and apply Blur to produce elongated streaks that resemble anamorphic light.
- Creating Color Separation with Shift Channels: Shift color channels and combine them with distortion effects to simulate Chromatic Aberration or colored fringes around a subject.
In Premiere Pro, you can also use Glow, Lumetri Color, Transform, Opacity, and Blend Mode settings to create simple glows, change light colors, and combine layers. For more advanced control over light shaping and animating individual elements, you can move part of the work to After Effects.
⏳ Why Does Creating Spectral Lighting Effects Manually Become Time-Consuming?
The main problem starts when you want several effects at once, like a soft halo around highlights, rainbow rings around light sources, and streaks spreading in specific directions. Each effect may require separate layers, masks, and settings, and changing the footage might force you to redo some of those adjustments. On top of that, shifting RGB channels alone can’t recreate spectral rings or light dispersion, and creating glows that appear only along a subject’s bright edges requires more precise control. As a result, while built-in methods work well for simple effects, creating a complex, cohesive lighting look with them can become a multistep process that takes more time to manage and refine throughout a project.
🌈 DreamGlare: Creating Spectral Lighting Effects on a Single Layer
DreamGlare is an After Effects and Premiere Pro plugin that turns existing highlights into rainbow lighting effects, spectral halos, diffraction rings, and prismatic streaks. Unlike simple effects such as Glow, it doesn’t just blur and spread light. It also gives you control over the structure, color dispersion, shape, and movement of different glow elements.
One of DreamGlare’s key features is that you don’t need to pre-compose layers to create these effects. You can apply the effect directly to a layer and adjust its different lighting engines from there. The four main lighting engines combine into a shared buffer and composite over the image, while Edge Lift has its own separate compositing plane. This structure allows you to combine several effects without having to build a separate set of layers for each one.
💡 Five Lighting Engines for Different Glow Effects
DreamGlare comes with five lighting engines, each creating a different effect. You can use them one at a time or mix them together to create halos, colorful rings, and light streaks that match your video.
Halation: Creating Soft Glows Around Lights
Halation adds a soft glow around bright areas of your image. It uses several levels of blur to spread the light smoothly, making the result look more natural than a basic blur effect.
For example, if you’re editing a perfume commercial with bright reflections on the bottle, Halation can add a soft glow around those lights. You can change the strength and size of the glow to create a gentle film look or a stronger lighting effect.
Glory Ring: Adding Colorful Rings Around Lights
Glory Ring creates rainbow-colored rings around bright points of light. You can adjust the rings and add more layers to create different styles.
This effect works well with small background lights, bright reflections, or fantasy scenes. You can keep the rings soft and simple or make them stronger and more colorful, depending on the look you want.
Prism Streak: Creating Colorful Light Streaks
Prism Streak turns bright areas of your image into colorful light streaks. You can choose a single streak or create patterns with up to 12 directions.
For example, when editing a watch or perfume commercial, you can add light streaks to reflections on the product. This helps the bright details stand out and gives your video a more cinematic or professional advertising look.
Edge Wrap: Spectral Glow Along a Subject’s Light-Facing Edges
Edge Wrap creates colored light along a subject’s edges. Unlike a regular Outline, however, it doesn’t illuminate every boundary equally. This engine detects edges using alpha or image luminance and adds glow only where the image actually contains light.
As a result, if a subject is backlit, you can create a spectral fringe along the illuminated parts of its body or edges without placing a uniform line around the entire subject. You can also adjust the effect’s width, from a narrow, neon-like edge to a wider halo.
In addition to footage and backlit subjects, Edge Wrap can also be used on logos and text with clearly defined alpha edges.
Edge Lift: Separating the Contour and Splitting It into a Color Spectrum
Instead of simply creating light around a subject, Edge Lift separates the contour of text or a subject from the original image, shifts it using the Distance control, and splits it into a spectrum of colors.
This engine offers three directional modes:
- Directional: Shifts the contour in a specific direction, making it useful for creating colored lines that lean toward one side.
- Outward: Sends the lines outward from the edges to create a wider effect around the subject.
- From Light: Determines the contour’s movement direction based on the light source. This mode suits effects that make light appear to move away from the subject.
Edge Lift is disabled by default, so you don’t need to enable it if your project doesn’t require this type of effect. In logo animations, animated typography, and graphic titles, you can use it to create colored lines separated from the text.
🎨 Dispersion Control: Adjusting the Direction and Amount of Color Separation
One of DreamGlare’s important controls is Dispersion. This parameter changes the amount of spectral dispersion and determines the direction in which the colors appear. With a single control, you can shift the light from a white glow to a rainbow effect.
- Positive values push red outward, creating coloured rings with a sun-like appearance.
- Negative Values: Push blue outward, creating a look closer to certain film halation effects.
- Zero: Removes color separation and produces a white glow.
This control is especially useful when you want to keep color intensity and direction consistent across several shots. For example, you can limit dispersion in a minimalist product commercial while using stronger color separation in a music video or fantasy effects sequence.
🌀 Prism Motion: Changing How Glows Move
DreamGlare can do more than create still light effects. The Prism Motion section gives you tools to control how the glow moves and changes shape.
Shift: Moving the Glow in Different Directions
Shift lets you move the whole glow in a direction you choose. All the light effects move together, so you don’t have to animate each one separately. This makes it easier to control the movement of your lights.
Flow: Spreading Colored Streaks
Flow spreads light along colored streaks and helps change their shape. This control is also applied to the final glow, keeping the different lighting elements coordinated.
Flow Roughness: Making Light Streaks Smooth or Broken
Flow Roughness lets you change how smooth or broken your light streaks look. At 0, the streaks are smooth and connected. As you increase the value toward 100, the light starts to break into smaller parts. This gives you more control over the style of your glow.
Waver: Moving Light Effects Separately
Waver lets different parts of the light effect move on their own. Unlike Shift and Flow, which affect the whole glow, Waver works on each light element separately.
This means each Glory Ring, Prism Streak arm, and Sparkle star can move, rotate, and change in its own way, making the lighting look more natural and active.
This behavior helps create organic motion. For example, you can make light rings shift slowly, glows change, and different light elements move without feeling identical or mechanical.
Waver depends only on time, so you don’t need to create manual keyframes for continuous movement. This feature is also compatible with Multi-Frame Rendering.
Boil: Creating Small, Continuous Changes in Light
Boil divides the glow into smaller sections that change in place. The result is light whose structure is constantly evolving, giving it a livelier, more organic appearance. Combined with rings and prismatic streaks, this feature can help create more dynamic effects.
✨ 23 Ready-Made Presets for Different Styles
DreamGlare comes with 23 presets to help you create different lighting effects. Some are soft and simple, while others create stronger looks, like wide light streaks and glowing rings. There is also a preset that helps make AI-generated videos look less flat.
You can choose a preset from the Preset menu and change the settings to match your video. Each preset gives you a starting point, so you can adjust the light, colors, and overall look as you like.
⭐ Sparkle: Creating Star-Shaped Light Effects
Sparkle adds star-shaped glows to bright areas of your image. It turns small points of light into shining stars, making your scene look brighter and more eye-catching.
For example, in a jewelry commercial, a reflection on a gemstone or metal surface can become more prominent with a star-shaped glow. You can also use it in music videos and fantasy projects to emphasize bright points.
According to the developer’s documentation, under certain conditions, moving a layer with the Expand Bounds option may change the angle of Sparkle stars in some frames. It’s therefore a good idea to check the layer’s movement in both the preview and final render.
🔍 Lens Dirt: Combining Light with Lens Marks and Textures
Lens Dirt lets you add patterns associated with lens contamination. For this feature, you can use the effect’s built-in procedural patterns or select a custom layer as the source.
This feature is useful when you want the image’s glows to look different, like lens artifacts. For example, in a cinematic shot with strong light sources, you can combine lens marks with halos and colored streaks. A custom layer also lets you match the look to your preferred texture.
⚙️ Highlight Compactness: Controlling Light Spread in Bright Areas
One challenge with lighting effects is that when a large part of the image is bright, streaks and glows may spread beyond the area you intended. The Highlight Compactness control is designed to manage this behavior.
This parameter helps the effect grow more from compact, distinct light sources while remaining more limited in broad, uniform bright areas, such as a large expanse of sky. Setting it to zero disables this restriction, allowing the effect to operate without that limitation.
For example, if a shot contains both a small light and a large, bright area of sky, this control can keep the light streaks tied more closely to the light source rather than spreading across the entire bright area of the image.
🎯 Luma Edge Threshold: Adjusting Edge Detection in Edge Wrap
Edge Wrap also relies on image luminance information to detect suitable edges. The Luma Edge Threshold parameter determines the brightness level used for edge detection.
In a bright scene, you may need to lower the threshold. In contrast, a higher value may suit a night shot with a dark background. If the glow appears as separate spots on the background instead of following the subject’s edges, the selected threshold may not match the background’s brightness and may need adjustment.
This control helps you adapt Edge Wrap’s behavior to your shot’s lighting conditions, though the result still depends on edge quality and the luminance information in the footage.
🔧 Default Settings: What Happens After Applying the Effect?
When you apply DreamGlare to a layer, not all lighting engines have the same default state:
- Halation, Edge Wrap, and Sparkle are enabled by default.
- Glory Ring and Prism Streak are enabled at low values. Increase their values for more stylized looks.
- Edge Lift is disabled by default and must be enabled when needed.
The presets are also available in the Effects & Presets panel under InnovativeWorks> DreamGlare. This lets you find the effect you want directly from that panel and adjust the settings without building a collection of separate layers.
🎞️ Using DreamGlare in After Effects and Premiere Pro
DreamGlare is designed to work in both Adobe applications and, according to the published specifications, provides the same features and presets in each.
- After Effects: Supported from version 2024 onward. You can apply the effect directly to footage, text, or a logo layer and adjust the lighting effects alongside the other stages of your compositing workflow.
- Premiere Pro: Supported from version 2026 onward. You can apply the effect directly to a timeline clip and use the same presets and controls to create the lighting look you want.
According to the developer’s documentation, a single plugin installation in the shared Adobe plugins folder can be used by both applications. This means you don’t need to obtain a separate copy of the same effect for Premiere Pro.

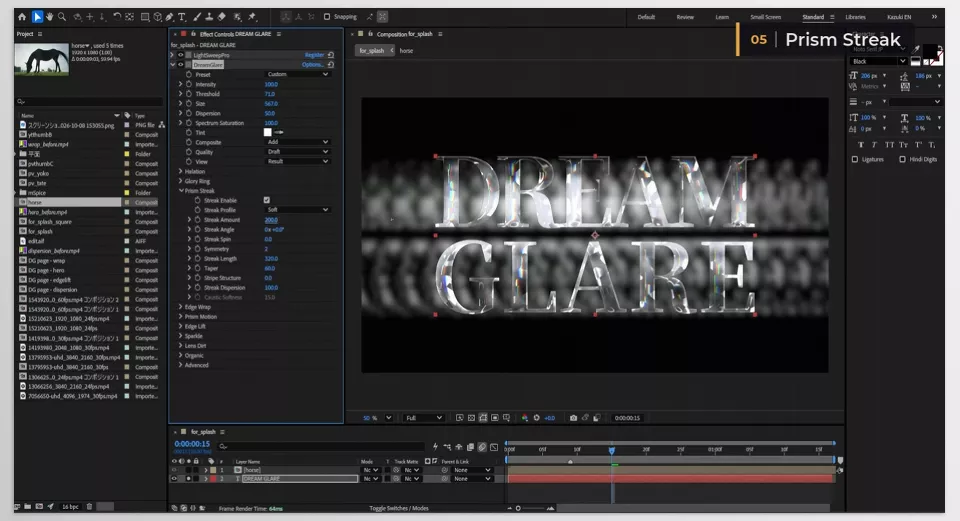
🎬 Adjusting Colored Halos, Light Streaks, and Spectral Motion in DreamGlare
To make DreamGlare’s effects work well with your footage, don’t rely on preset selection alone. The intensity of the existing lights, the subject type, and the atmosphere you want to create all significantly affect the final result. Following a few tips can help you create more controlled rainbow effects while preserving the image’s main details.
- Controlling Light Streak Spread: If streaks spread too far across large, bright areas of the image, increase Highlight Compactness.
- Adjusting Colored Edges: If Edge Wrap appears on the background instead of the subject’s edges, change Luma Edge Threshold to improve edge detection.
- Matching Color Dispersion: Use the Dispersion control to change the positions of spectral colors. Positive values push red outward, while negative values push blue outward.
- Creating More Natural Motion: Use Shift to move light streaks and Flow to spread them gradually. Flow Roughness determines whether the streaks stay continuous or fragment.
With these adjustments, you can better control the effect’s shape, color, and movement without getting caught up in unnecessary changes.
🚀 Distinctive Lighting Effects with Simpler Controls
DreamGlare is designed for situations where you want the lights in an image to do more than simply become brighter; you want them to become part of the project’s visual design. Its combination of multistage halos, rainbow rings, prismatic streaks, and glows tied to a subject’s edges gives you several ways to shape a shot’s final look.
One of this tool’s main advantages is that it combines several lighting engines into a single effect. Instead of building a collection of layers and pre-compositions for every effect, you can start with one layer, choose a suitable preset, and then adjust the details to match your needs.
If you work on commercials, logo animations, animated typography, or cinematic effects in After Effects or Premiere Pro, DreamGlare can give you a way to experiment with different lighting looks, especially when you want to use the existing highlights in your footage and achieve a more distinctive result without complicating your project’s structure.
The best After Effects workflow isn’t only about mastering keyframes—it’s also about knowing which tools can save you hours of repetitive work. Our beginner-friendly After Effects Tools guide introduces the most important tool categories and explains how each one contributes to a faster, more professional creative process.