

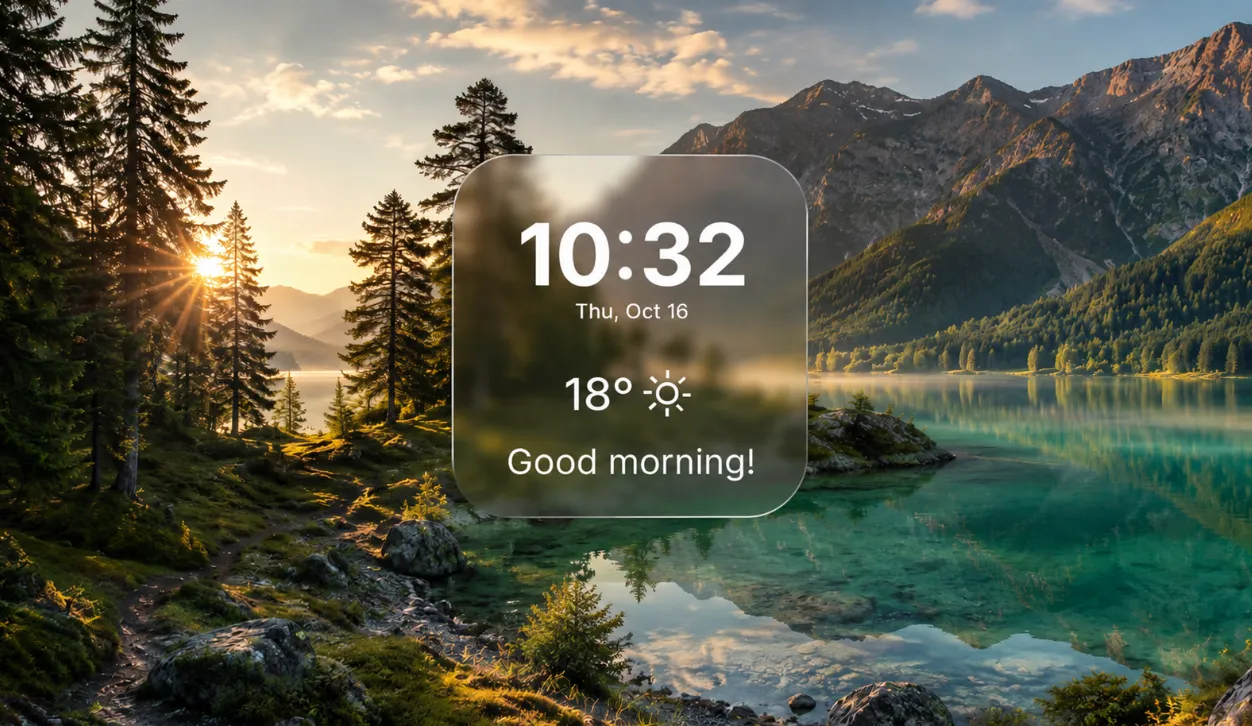
Why Are Glass Effects So Eye-Catching? 👀
Have you used the AE Glass Plugin by aecripts professionally or casually? Before a user clicks a button or even reads the teaser text, the visual design is the first thing that grabs their attention. Glass effects are one of those small details that can make a simple design look more modern, luxurious, and professional. That’s exactly why this style has become so popular in user interfaces, motion graphics, and product showcases.
Glass effects are not created with simple methods like lowering an element’s opacity or applying a basic blur to an image. For glass elements to realistically appear in a visual project, they should exhibit how real glass refracts light from the elements behind them, how they reflect light off their edges, and how they show glowing edges on the objects of interest.
Of course, recreating these details in After Effects is entirely possible, but it usually requires combining multiple effects and spending significant time fine-tuning each to achieve a natural result. And when you need to apply the same effect to multiple pieces of text, logos, or different design elements, the process can quickly become time-consuming and repetitive.

What Does a Realistic Glass Effect Actually Mean?
When we talk about a realistic glass effect, we’re not simply referring to making a layer transparent. Real glass behaves in many different ways. It slightly bends the image behind it, magnifies certain areas, catches light along its edges, and, if it’s thick enough, even produces subtle color fringing around the borders.
These small details are what make a simple design appear much more natural and professional. That’s why this style is widely used today in user interface design, motion graphics, product presentations, logo animations, promotional videos, and even modern app interfaces.
Imagine you’ve designed a glass button for a user interface. If you simply reduce the Opacity, the result looks artificial. But when the background image is slightly refracted, the edges catch light, and the glass has a soft frosted appearance, the entire design immediately feels different.
What Can the Default After Effects Tools Do? 🛠️
Fortunately, you don’t necessarily need a plugin to create a glass effect. After Effects already includes several built-in tools that, when combined, can produce something very close to real glass. However, this approach mostly relies on understanding the available effects, experimenting with different settings, and investing time into fine-tuning everything.
A typical glass effect is usually created by combining the following tools:
- Displacement Map for simulating light refraction and distorting the image behind the glass.
- Magnify or Optics Compensation for creating the illusion of magnification and glass thickness.
- Gaussian Blur or Fast Box Blur for creating frosted glass.
- Glow for adding highlights and illumination along the edges of the glass.
- Channel Blur or Shift Channels for creating subtle color fringing and realistic light dispersion.
- Mask, Shape Layer, and Pre-comp for precise control of the affected area and for building the final glass structure.
Why Isn’t Building This Effect Manually Always the Best Choice? ⏳
The main challenge begins when you try to make all of these effects work together. Each one comes with its own settings, and achieving a natural result usually requires plenty of trial and error. If you later decide to modify the glass’s appearance, you’ll need to revisit several effects and adjust their settings again. In large projects, UI designs, or scenes containing multiple glass elements, this can consume a lot of time and make the project much harder to manage.
AE Glass — Create Realistic Glass Effects Without the Usual Hassle 💎
If you’ve ever tried building a realistic glass effect in After Effects yourself, you already know it’s much more than simply lowering the Opacity or adding a Blur. To make glass actually look like glass, you need to control refraction, frost, edge lighting, glass thickness, and many other details—a process that normally involves stacking multiple effects together and spending a lot of time adjusting them.
AE Glass was built specifically to solve this problem. The plugin combines most of the features needed to create realistic glass into a single effect, allowing you to achieve the same result with just a few simple sliders. Whether you’re working with text, logos, Shape Layers, or even PNG images, simply apply the plugin to your layer and it instantly creates the glass appearance.
Even better, everything works in real time. If the image or video behind the glass moves, the effect automatically updates, so there’s no need to readjust the settings.
Refraction — The Detail That Makes Glass Look Real 🌊
If you’ve ever looked through a drinking glass or a glass window, you’ve probably noticed that the image behind it doesn’t appear exactly the same. Glass allows light to pass through, but it also bends its path slightly. As a result, the background appears distorted, shifted, or even magnified. This phenomenon is known as Refraction.
AE Glass simulates this effect very naturally. You can increase or decrease the refraction strength, adjust the glass thickness using the Depth control, or use the Magnify option to control how much the background appears enlarged. The best part is that all these adjustments happen in real time. Whenever the background changes, the glass responds instantly.
Glass Isn’t Always Crystal Clear — That’s Exactly What Frost Is For ❄️
You’ve probably seen frosted glass panels in modern apps and websites. These surfaces still allow light to pass through, but they obscure the details behind them, giving the interface a cleaner and more modern appearance. This design trend has become extremely popular in UI design and is commonly known as Glassmorphism.
Inside AE Glass, you can control the amount of frosting using a single Frost slider, ranging from perfectly clear glass to a soft frosted panel. In addition, the Splay control helps distribute light more naturally across frosted areas, making the final result resemble real glass rather than a simple Blur effect.
Edge Lighting — The Small Detail That Adds Depth ✨
One subtle thing that makes glass look realistic is the light that appears along its edges. It may seem like a minor detail, but it’s exactly these small refinements that prevent a design from looking flat or artificial.
AE Glass automatically creates this effect using its Edge Light feature. You can also adjust the Light Angle and Light Intensity to match the rest of your scene. And if you’d like the edges to appear thicker or thinner, the Rim Scale control lets you adjust their thickness.
Color Fringing — A Small Detail With a Big Impact 🌈
If you’ve ever looked closely at the edge of a crystal or a thick piece of glass, you’ve probably noticed very subtle rainbow-colored fringes around the edges. This happens because light separates as it passes through the glass, and it’s one of those details that makes glass feel much more realistic.
AE Glass recreates this effect using its Dispersion feature. It doesn’t need to be exaggerated—even a subtle amount of dispersion can make a logo, text, or glass card look far more polished and visually appealing.
Everything Is Under Your Control — With Just a Few Sliders 🎛️
One of the biggest advantages of AE Glass is that you don’t have to jump between multiple effects. Nearly every setting is organized in a single panel, allowing you to customize the glass’s appearance with just a few sliders.
Refraction strength, glass thickness, image magnification, frosting amount, light diffusion, color dispersion, edge light angle, edge light intensity, effect scale, and even the thickness of the edge highlights can all be adjusted directly from the Effect Controls panel. Even better, every parameter is fully animatable. If you want the glass to gradually become frosted, turn transparent, or change its refraction over time, simply add keyframes.
Works With Almost Anything 🚀
One of the great things about AE Glass is that it isn’t limited to a specific layer type. You can apply it to text, Shape Layers, logos, PNG images, masks, solids, and even pre-compositions. Essentially, anything with an alpha channel can be transformed into a glass surface.
The plugin runs on both Windows and macOS, doesn’t rely on GPU acceleration, and supports both 8-bit and 16-bit projects. That means you can quickly add realistic glass effects to virtually any part of your composition without changing your existing project structure.
What Types of Projects Is AE Glass Best For? 🎯
If you’re designing user interfaces, creating glass cards, working with the Glassmorphism style, or simply want to give your logos, titles, and motion graphics a more modern appearance, AE Glass can be a valuable addition to your workflow. It’s also highly useful for creating Lower Thirds, HUD interfaces, app showcases, promotional videos, and social media content.
Ultimately, the biggest value of AE Glass isn’t just that it creates realistic glass effects. What stands out even more is how much time it saves. Instead of combining multiple effects and constantly adjusting their settings, you can achieve a result that’s both more realistic and much easier to control in a fraction of the time.

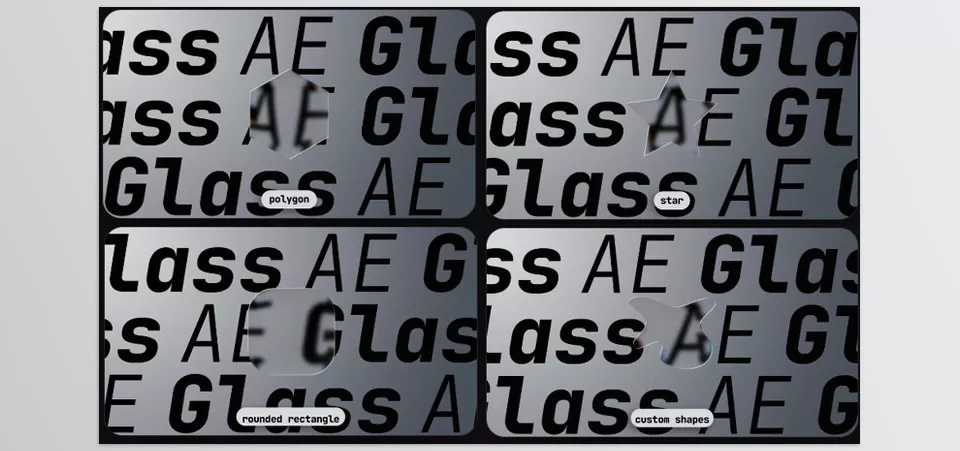
A Few Tips to Get Better Results with AE Glass 💡
AE Glass delivers excellent results even with its default settings, but following a few simple tips can make your glass effects look more natural, professional, and visually appealing.
- Keep Refraction balanced. Avoid making the refraction strength too high. If the Refraction effect is too strong, text, logos, or UI elements can look exaggerated and lose their natural appearance.
- Use subtle Frost for UI designs. In most user interfaces, fully frosted or completely transparent glass is used less often. A moderate amount of Frost usually creates a cleaner, more modern, and more readable look.
- Match Edge Light with the scene lighting. If the direction and intensity of the edge lighting match the overall lighting of your project, the glass gains a much stronger sense of depth and looks significantly more realistic.
- Don’t overuse Dispersion. Too much color fringing can make the glass look artificial. However, using Dispersion subtly can give your design a more premium and polished appearance.
- Spend time on the background as well. Glass effects look their best when there’s a detailed image or video behind them. The richer the background is in texture and variation, the more noticeable and convincing the refraction becomes.
In the end, remember that the glass effect isn’t supposed to be the center of attention—it’s there to help the overall design look more natural, modern, and visually appealing. In most cases, the more subtle and controlled your settings are, the more professional the final result will look.
When Creating Glass Effects Doesn’t Slow You Down 🎯
The truth is that AE Glass doesn’t do anything that After Effects itself is incapable of. You can certainly create a glass effect using the built-in tools. However, when achieving the desired result requires combining multiple effects, constantly adjusting their settings, and rebuilding everything from scratch for each new project, a large portion of your time is spent creating the effect rather than designing.
AE Glass streamlines that entire workflow. Instead of juggling Refraction, Blur, edge lighting, color dispersion, and dozens of different parameters, everything is available inside a single, easy-to-use effect. That means if your client asks for a different glass appearance tomorrow or you decide to change the project’s visual style, you can achieve the new look with just a few sliders—without having to rebuild the entire effect from scratch.
If you only need a glass effect once in a while, the built-in tools in After Effects will probably be enough. But if user interface design, modern motion graphics, logo reveals, Glassmorphism, or product showcase videos are a regular part of your workflow, AE Glass will quickly become one of those tools you can hardly imagine working without after using it a few times. That’s because it’s more than just a ready-made effect—it frees up your time so you can focus on the more important and creative parts of your work.
There are many ways to extend the capabilities of After Effects. If you’d like to learn how plugins, scripts, presets, templates, and other tools work, our detailed After Effects Tools guide is the perfect place to start.



