

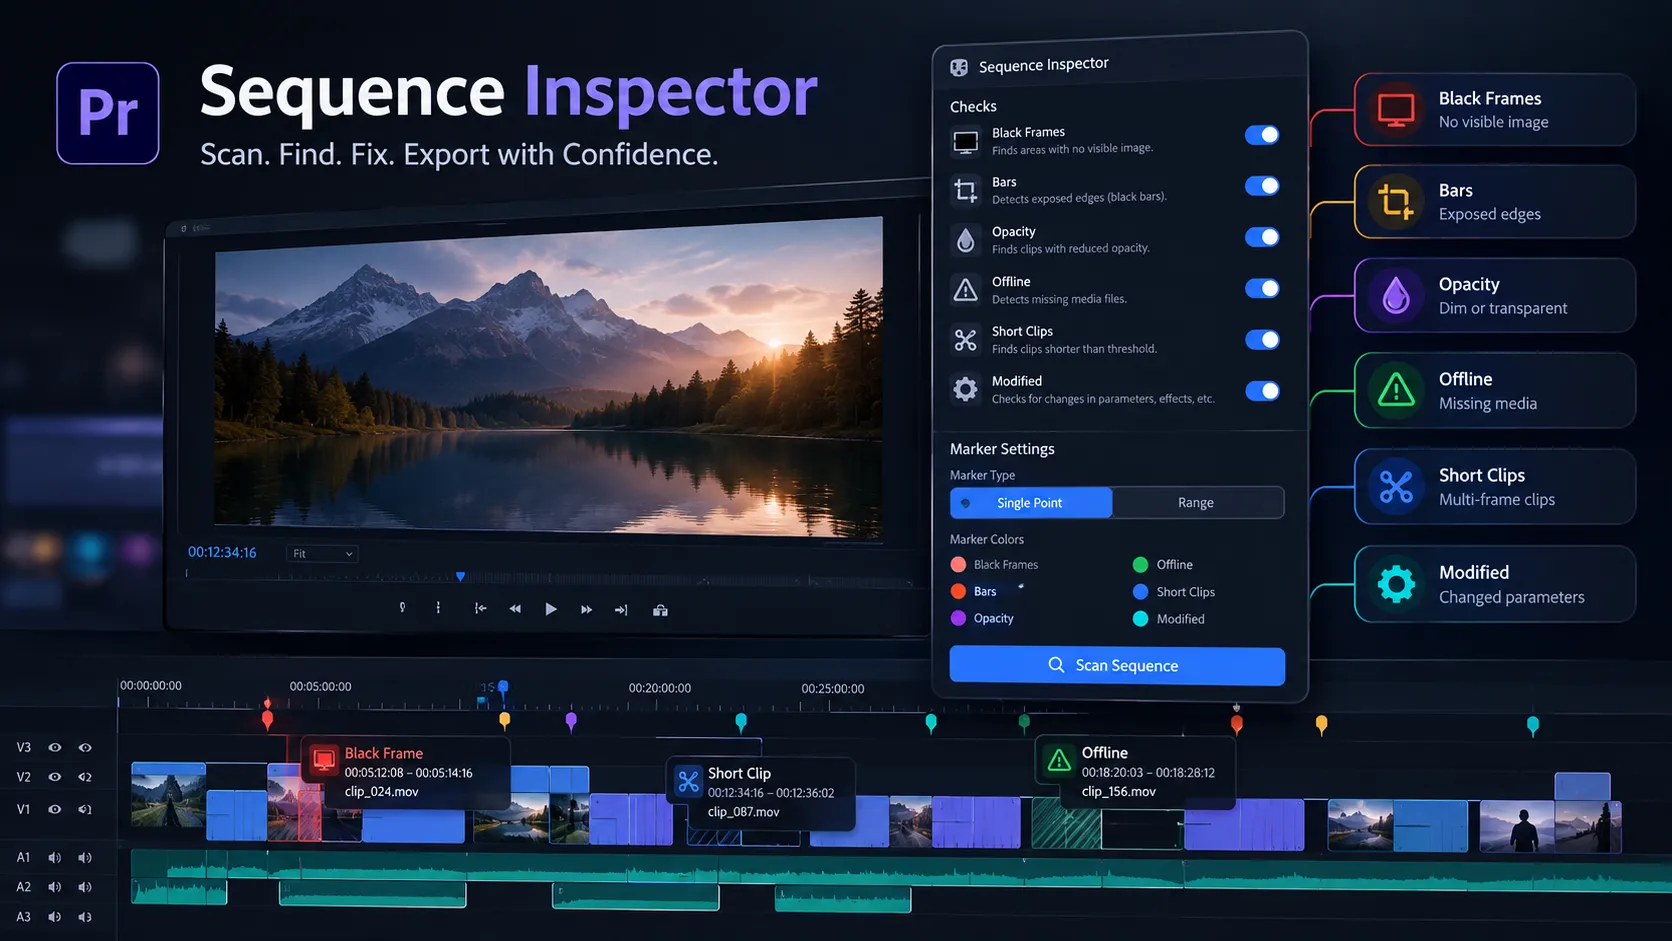
A Single Black Frame Can Ruin All Your Hard Work! 😅
Have you ever looked into the Sequence Inspector Plugin by aescripts? Everything is done; you’ve finished the edit, checked the color and effects, the music is in place, and you’ve finally reached the Export button. 🎬 But wait a second! Are you sure you haven’t left a black frame somewhere in the middle of the project? Isn’t there a tiny multi-frame clip accidentally sitting somewhere on the timeline? Do you have any Offline Media, or has part of the image turned black somewhere because of a change in Scale and Position?
When the project is short, finding these issues isn’t too difficult, but when you’re dealing with a busy timeline and hundreds of clips, manually checking each one can be genuinely time-consuming and exhausting. 😵💫 Especially when you’ve already spent several hours working on the edit and the details of the project, and just one small mistake can ruin the final output.
A plugin that can help you do a final check of your timeline can be very useful. One that runs once before Export and highlights potentially problematic areas in your sequence so you can export with more confidence. 👀✨

So, what exactly is Timeline Quality Control? 🔍
Quality Control, or QC, means reviewing everything once before delivering the project or moving to the final export to make sure nothing has been overlooked. In other words, you’re looking for those small issues that may have gone unnoticed in the middle of hours of editing.
For example, imagine you’re preparing a 30-minute video for a client and, somewhere around minute 18, a few frames from a clip have accidentally been left on the timeline. Or you’ve scaled and rotated a shot, but the corner of the image no longer covers the entire frame, creating a black area. 😅
These might not seem like major mistakes at first glance, but they can cause problems at the end. Especially in busy projects, they can easily slip past you, and you may only notice them after exporting the final output. So QC is essentially that final, careful look at the project before delivery; a kind of reassurance that nothing broken or overlooked is left in the final output. 👌🎬
How Can We Do This Without a Plugin? 🤔
Before turning to third-party tools, Premiere Pro itself has various features for checking and finding timeline issues. You can find many problems yourself with a little attention and patience. For example, to check the project, you can:
🎬 Scrub through the timeline and look for black frames or empty sections.
🔎 Zoom into different parts of the Timeline to find very short clips or suspicious cuts.
⚙️ Go into Effect Controls and check settings such as Position, Scale, Rotation, and Opacity.
📁 Check the status of your Media and, if a file has gone Offline, use the Relink options to locate the file again.
👀 Finally, Play through the entire project once to see whether there are any visual problems or unexpected changes.
In fact, if the project isn’t too large or busy, Premiere Pro’s built-in tools are perfectly sufficient for a routine check, and you don’t necessarily need an additional plugin.
What’s the Problem With This Method? 😵💫
The main problem is that it all depends on your eyes and patience. With a 45-minute timeline and several hundred clips, checking every section, looking for a black frame, or finding a tiny multi-frame clip takes a lot of time, and the risk of human error is high. You might look through the timeline once and still miss a small issue, especially when you’ve already been editing for several hours and really don’t have the patience to go through the entire project again, frame by frame! 😅
Sequence Inspector: The Timeline Inspector Has Arrived! 🕵️♂️🎬
Now that we’re familiar with the problem of manually checking the timeline, it’s time to see exactly what Sequence Inspector does and why it can be useful during the final stage of a project.
Sequence Inspector is a Quality Control Panel for Adobe Premiere Pro that checks the Sequence and looks for issues that might easily go unnoticed during a normal visual inspection. The idea is simple: instead of spending hours moving up and down the timeline yourself, the tool scans and marks suspicious items on the timeline with markers. 🎯
Sequence Inspector works on Video Tracks and isn’t meant to modify the project’s clips or effects. Its job is to find and mark problems so that you can quickly go to them yourself.
Six Important Checks, With One Scan 🔍
One of Sequence Inspector’s most important features is that it checks several types of issues in a single step. You can enable or disable each check, and for some you can also set your own Threshold or criteria.
🖤 Black Frames: Finding Black Frames
The first check is related to Black Frames. The tool looks for sections of the Sequence where no completely opaque clip is covering the image, resulting in a black frame. This doesn’t only happen when the timeline is completely empty. Certain types of Stacks, such as Adjustment layers or Media with Alpha, including PNG, TGA, TIF, EXR, and PSD, can also create conditions where the final image appears black. That’s why this Check can help you determine, before the final Export, whether an unwanted Black Frame has been created somewhere in the project.
📐 Bars: When the Edges of the Image Show
The second Check is designed for Exposed Edges, or empty areas around the image. Sometimes you move a clip, change its Scale, Crop it, or rotate the image, and as a result, part of the Frame is no longer covered by the image. If there’s nothing behind that area either, a black corner or edge becomes visible. Sequence Inspector checks for this condition so you don’t have to visually go through the entire project to find issues like these.
🌫️ Opacity: Why Has the Image Become Faded?
Sometimes you set a clip’s Opacity to less than 100 percent for whatever reason and then forget to change it back. If there isn’t a completely opaque layer underneath that clip either, the image will appear unintentionally Dim or faded. Sequence Inspector checks these cases as well and, if the required conditions are met, marks that section as an issue.
This feature can be especially useful in projects with many layers stacked on top of one another, because manually checking the Opacity of a large number of clips isn’t exactly an exciting task! 😅
⚠️ Offline: Before Premiere Catches You Off Guard!
No editor wants to run into Media Offline right before delivering a project. When a Source file has been moved or deleted from its original location and Premiere can’t find it, the associated Media becomes Offline. If this issue remains until Export, it can affect the final output.
Sequence Inspector finds Offline files in the Sequence and marks them on the Timeline. This means you can locate the missing file and fix the problem before the final Render.
✂️ Short Clips: Hunting Down Multi-Frame Clips
This one is probably very familiar to anyone who works with Razor and Trim a lot! 😄 Sometimes you make a cut and a very short piece of a clip remains on the Timeline; for example, a few frames that were never supposed to be present in the final version. Sequence Inspector lets you define what duration should be considered a “short clip.” It then finds clips that are shorter than that amount.
In version 1.2.0, we also fixed an issue related to this check: clips that were only visible for a few frames due to a cut or a change in the layers above are now identified more effectively.
🛠️ Modified: Which Clips Have Been Changed?
The final check covers clips that have been modified compared to their normal state. Sequence Inspector can check changes such as Position, Scale, Rotation, and Crop, and it can also account for Effects and Transitions. The interesting thing is that you decide exactly what “Modified” means for your project; you can enable parameter checks, check for Effects, or consider both at the same time.
Of course, being Modified doesn’t necessarily mean that there’s a problem. For example, if you intentionally changed a clip’s Scale, the tool will naturally recognize it as modified. This Check is mainly intended to give you a quick, overall view of the clips that have been altered in the project.
Everything Is in Your Hands: From Settings to Threshold ⚙️
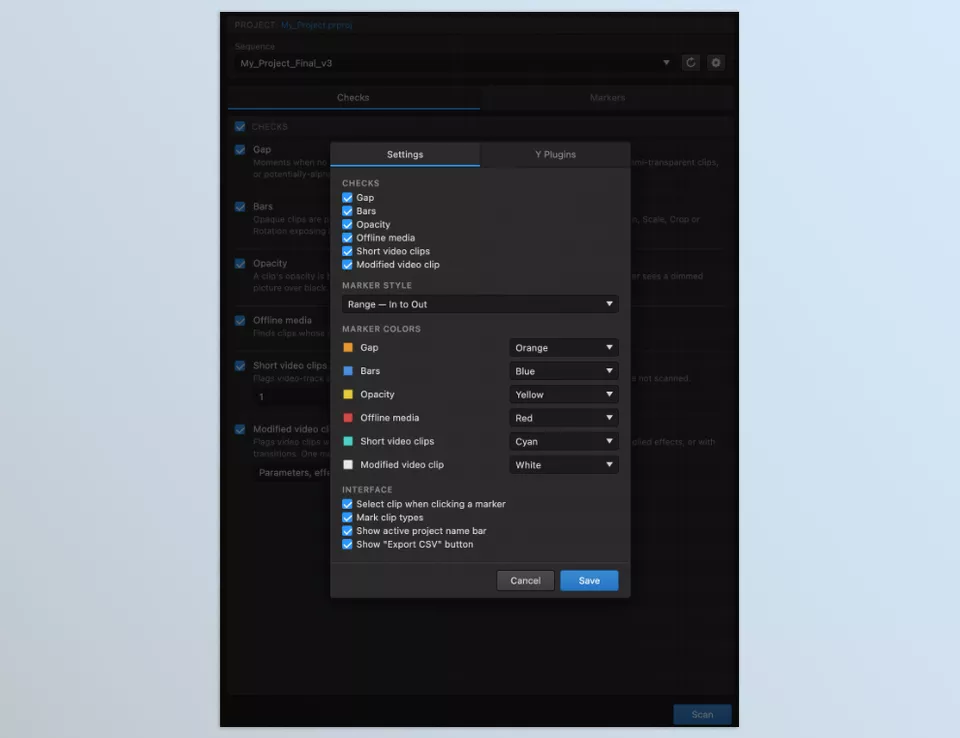
One of the strengths of Sequence Inspector is that you’re not stuck with a rigid system that decides for itself what should or shouldn’t be considered good or bad. In the Checks section, you can turn each of the six checks on or off individually. For Short Clip, you can define your desired limit, and for Modified, you can specify whether parameter changes, Effects, or both are important to you. Even the description of each Check inside the panel is written in simple language, so you can understand exactly what each option is looking for without having to guess.
Another nice feature is that the settings are saved Per Project. So if you’ve defined specific settings for a project, you don’t have to configure everything from scratch every time.
You Can Define the Inspection Range Yourself Too 📍
Version 1.2.0 also adds another important feature: the ability to limit the Scan to the range between the Sequence’s In and Out Points. This means that if you only want to check part of the Timeline, you don’t necessarily have to scan the entire Sequence. You can define the desired range and check only that section. This feature is especially useful when you’ve only changed part of the project or want to QC a specific section again before Export.
A Panel That Works With Your Workflow 🎬
Sequence Inspector isn’t simply a Scan button. Its settings let you adapt the inspection to your project and your workflow.
You can:
- Enable or disable any of the six Checks.
- Set a custom Threshold for Short Clip.
- Specify whether Modified should include parameters, Effects, or both.
- Choose the Marker type.
- Set a separate Marker color for different Checks.
- Run the Scan only within the In and Out range.
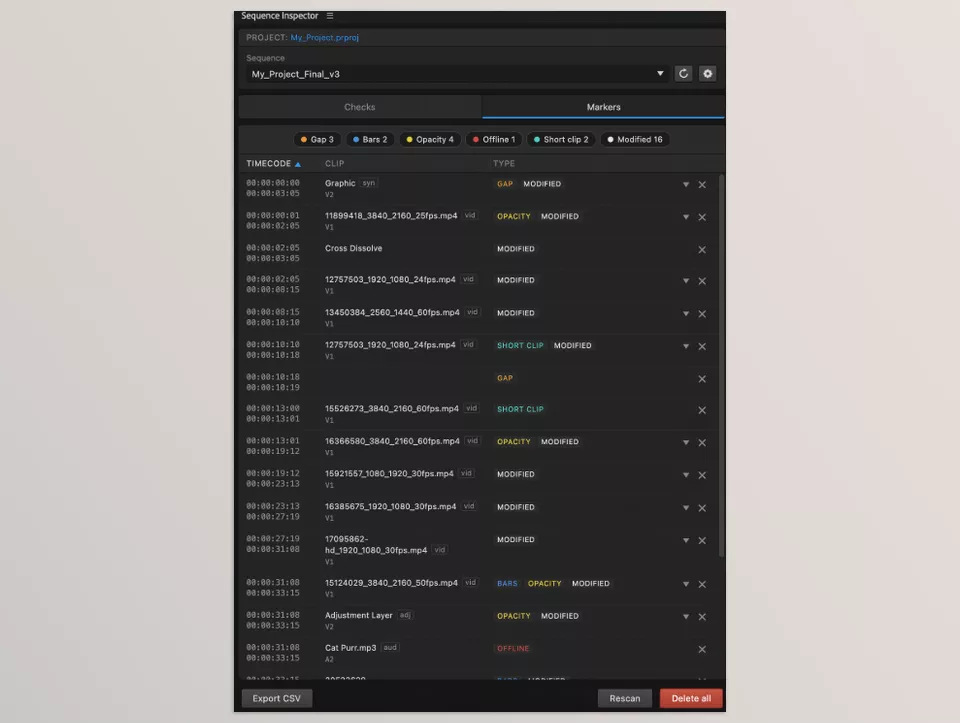
- Sort Markers by Type or Timecode.
- Delete extra Markers or remove them all at once.
- Export the list of issues as a Report for use in the QC process.
Import and export markers to and from other projects.
From Small Projects to Busy Timelines 🚀
One of the positive aspects of Sequence Inspector is that its usefulness isn’t limited to one specific type of project. If you’re editing a short video for social media, you can run a quick Scan before Export and make sure you don’t have a black frame, an extra clip, or any Media Offline. If you’re working on a long project with hundreds of clips, its value becomes even more apparent; instead of spending hours looking for small issues, you can let the tool inspect all the Video Tracks and then go directly to the suspicious items through the Markers.
In fact, Sequence Inspector isn’t supposed to replace the editor’s eyes; it works more like a QC assistant that checks the project once and says: “Take a look at these sections too.” 👀
Important Note: Not Everything It Finds Is Necessarily an Issue! ⚠️
Keep this in mind. Sequence Inspector is an inspection and review tool, not a device that can make definitive judgments about the editor’s intentions. For example, if you intentionally set a clip to 30 percent Opacity or intentionally used only a few frames of it, the tool may flag it as something that needs review because, technically, it matches the defined criteria. So the best Workflow is to treat the Marker as a warning, not a definitive error.
This approach lets the tool do what we expect from a good QC system: quickly flag suspicious items and leave the final decision to us. 😉
A Few Tips to Get More Out of It 💡
Sequence Inspector is designed to make timeline checking easier, but how you use it also matters. With a few simple tips, you can get more accurate results while spending less time. 👌
- Don’t blindly enable every option: Not everything the tool finds is necessarily an Error. For example, in projects with lots of Cuts, having short clips is completely normal. So it’s better to adjust the Checks and Thresholds according to the type of project.
- Use it before the final Export: The best time to run Sequence Inspector is after the editing is finished and right before the final Export. Run a Scan, review and fix the items found, and then run another Scan to make sure nothing remains. Those few minutes of checking can prevent you from having to render again and save you a lot of trouble. 😅
- Take the Markers seriously: One of the tool’s most useful features is the Markers it places on the Timeline. Instead of simply telling you that a problem exists, it also identifies its exact location, so you can go directly to that section and check the problem more quickly. 🎯
- Review Modified carefully: Changing Position, Scale, Rotation, Crop, or adding an Effect doesn’t always mean something is wrong and may be completely intentional. Therefore, treat the items found in this section more as “items that need to be reviewed” rather than definitive errors.
- Adjust the Short Clip Threshold to your project: If your project is fast-paced and you’ve used a lot of Cuts, a very high Threshold can generate many unnecessary results. Set this value to separate suspicious clips from short but intentional clips.
Ultimately, the best way to use Sequence Inspector is to make it part of your QC routine before delivering the project, rather than using it only when something goes wrong. A short Scan at the end of the process can give you much greater peace of mind and reduce the chance of a project being sent back because of a small mistake. 🎬✨
Ultimately, is Sequence Inspector Worth It? 🤔
After several hours of editing, the last thing you want is for a small issue to ruin all your hard work. A black frame, a multi-frame clip, or an Offline file might not be noticeable, but these are exactly the kinds of small mistakes that can cause problems when it’s time to deliver the project. 😵💫
Sequence Inspector acts as a final inspector by your side; it scans the timeline and marks areas that need review with Markers. This means that instead of going through the entire project frame by frame again, you can go directly to the suspicious points. 🎯
If you work with large, busy, or client projects, a plugin like this can be extremely useful. Sequence Inspector won’t necessarily make your editing process ten times faster, but it can prevent a small error, another export, and a significant amount of hassle. And that in itself is no small thing! 😉🎬
If you’re also a Premiere Pro user and you’re looking for ways to make your editing workflow faster, smoother, and more professional, we strongly recommend checking out our detailed article on the best Premiere Pro tools and features you shouldn’t miss.



