


Subtle Movements: The Difference Between an Ordinary Character and a Living One
Are you familiar with the tools inside the JiggleGen addon by gumroad? Have you ever animated a 3D character but, despite having the right rig and keyframes, still felt like something was missing? The body moves, but the character’s hair, clothes, or ears still look too stiff and lifeless.
Interestingly, a lot of what gives an animation life lies in these small secondary movements – the delayed soft jiggle of things that help make an animation more interesting and realistic.
The good news is that you don’t have to spend hours dealing with complicated simulation settings every time you want to create this type of movement; there are tools that make the process much faster and smarter. ✨

What Does Jiggle Mean and Where Is It Used?
In the world of animation, Jiggle refers to the soft, springy movement of parts of a model; movements that happen with a slight delay relative to the body and convey a sense of weight, softness, and flexibility.
This technique can be useful in almost any character-focused project, for example:
- Natural hair movement after turning the head
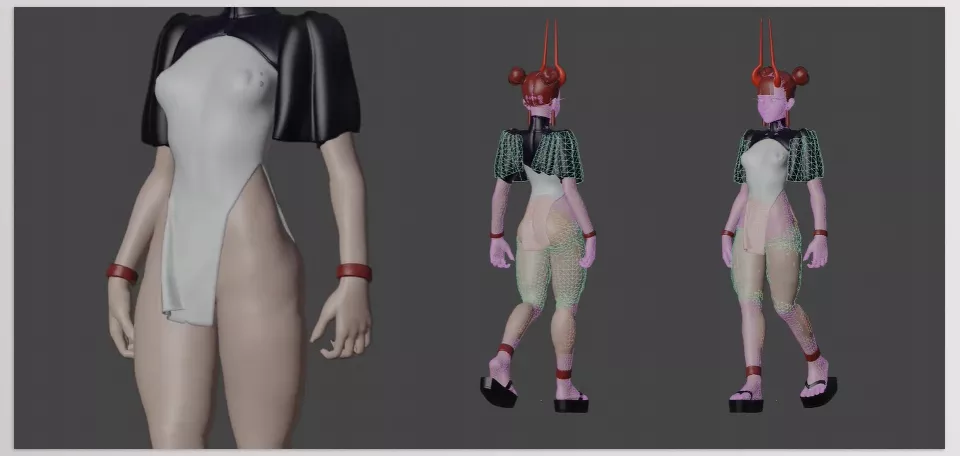
- The movement of sleeves, scarves, or skirts while walking
- Springy movement of rabbit ears or animal tails
- The movement of soft clothing elements in stylized animations
These small details help take a character out of a mechanical state and make the viewer subconsciously feel like they are looking at a living creature rather than a stiff 3D model.
How Can We Do This Without an Add-on? 🛠️
If you use Blender’s built-in tools, creating Jiggle is completely possible. Blender has a powerful system for Cloth Simulation, Collision, and Vertex Groups, and you can even create some dynamic behaviors with Geometry Nodes.
The workflow usually looks like this:
- Creating a Vertex Group to define the moving area
- Adding a Cloth Modifier to a separate mesh
- Setting up Collision for the character’s body
- Connecting the simulation result to the main model with Surface Deform
- Baking the dynamics and testing again
But Where Is the Limitation?
The main problem is that you have to repeat these steps for every section. If your character has multiple clothes, hair, ears, and a tail, the number of Modifiers, helper meshes, and settings can quickly become overwhelming.
Every time you want to change the jiggle intensity or fabric behavior, you also have to edit the settings or even bake the simulation again from scratch. For larger projects, this part can take more time than the animation itself.
Creating Jiggle with a Few Clicks: Introducing JiggleGen ✨
This is where JiggleGen enters the Blender workflow. This add-on turns the process of creating soft, jiggling, fabric-like movement from a long, modifier-heavy workflow into a few simple clicks. Most importantly, it doesn’t change the original model, rig, materials, UVs, or Shape Keys, and it runs all simulations non-destructively.
Instead of creating helper meshes for every piece of clothing, hair, or soft part of the character and manually setting everything up, you simply select the area you want, choose a preset, and JiggleGen handles the rest of the process automatically.
Selecting an Area with Vertex Groups; Turn Any Part into a Dynamic Area
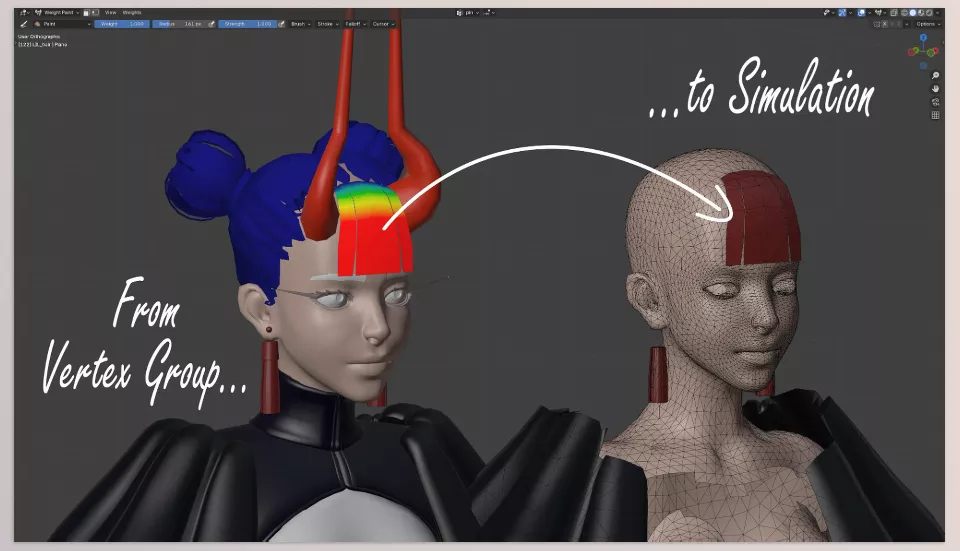
Getting started is completely simple. You just create a Vertex Group on the model and weight-paint areas such as the ears, hair, sleeves, skirt, or tail.
JiggleGen turns that Vertex Group into a Simulation Mesh; a mesh specifically created for simulation and completely separate from the original model. Each piece of clothing or character section also gets its own Simulation Mesh, so you can have different settings for each part.
You can even change the cloth settings before generating the mesh, so you don’t have to rebuild everything from scratch after Generate.
Automatic Creation of Cloth, Collision, and Connection to the Main Model
One of the most tedious parts of Cloth Simulation is preparing all the modifiers. JiggleGen automates this process.
After Generate, the add-on:
- Creates the Cloth Mesh.
- Creates the Collision Mesh.
- Automatically Binds Surface Deform.
- Retries the Bind operation if an error occurs to ensure a reliable connection.
- Parents the simulation meshes to the original object when needed.
As a result, the original model displays only the simulation result, without changing its underlying data.
Cloth Settings Before Creation: Full Control Over Fabric Behavior
Unlike many tools that create the mesh first and only let you edit it afterward, JiggleGen lets you define fabric behavior before generating.
You can adjust parameters such as softness, elasticity, resistance, damping, and other Cloth settings from the start so the output matches the project’s needs exactly. This means fewer testing and rebuilding cycles.
Preset Library: Set It Up Once, Use It Anytime
If you have specific project settings, you don’t have to recreate them every time.
JiggleGen uses Blender’s Native Preset system and gives you the following options:
- Save personal presets
- Quickly load settings
- Freely manage and delete presets
- Use presets created outside JiggleGen
You can even change the preset storage folder to a location of your choice and open that folder directly in the system with one click.
Managing All Character Parts at Once with Batch
When a character has multiple pieces of clothing, accessories, and moving parts, managing them manually can be extremely time-consuming.
The Batch Management panel keeps all dynamic elements in an organized list and allows you to:
- Generate multiple objects at the same time.
- Choose a separate preset for each Vertex Group.
- Copy and Paste settings between sections.
- Apply one setting to all sections.
- Regenerate each part later.
This feature is especially useful for characters with coats, scarves, skirts, ears, and tails.
Two Simulation Engines: Classic or Geometry Nodes
JiggleGen isn’t limited to the traditional Cloth system and offers two simulation methods.
The Classic Cloth Modifier is Blender’s stable, well-known system and is the best choice for most projects.
Alongside it, there is also Geometry Nodes Cloth mode, which uses the new Cloth Dynamics system in Blender 5.2 and later. This engine is experimental, and for each body section you can choose which Backend to use. It also has its own settings and presets.
Hair Cage: Turn Geometry Nodes Hair into Jiggling Hair
One of JiggleGen’s most interesting features is its support for Hair Curves.
Instead of using the old Particle Hair system, you simply select the hair object and add it to the Batch. The add-on creates a Hair Cage, simulates it, and transfers the result to the original hair.
This means you can control stylized hair, bangs, or long hair sections with the same Jiggle system and get soft, natural movement.
Helper Modifiers for Creating Cleaner Simulation Meshes
Before starting the simulation, JiggleGen provides several useful tools for optimizing the mesh:
- Offset: Increase or decrease the influence range of the Vertex Group
- Threshold: Determine which weights should be included in the simulation
- Decimate: Reduce the number of vertices to increase processing speed
- Smooth: Smooth the mesh surface and create cleaner deformation
These tools help you create a lightweight and simulation-ready mesh without changing the original model.
Quick Tools Panel: Everything in One Place
The main panel also includes several useful shortcuts that reduce the need to move between different sections of Blender:
- Show or hide Jiggle in the Viewport and Render
- Bake All Dynamics to bake all simulations at once
- Clear Bakes to quickly remove all Bakes
- Copy or extract Cloth settings from the active object
- Quickly switch between Pose and Rest modes
- Tools for preparing Hair Curves before creating a Hair Cage
Smart Collision and Collision Management
Object collisions are also managed separately. JiggleGen creates only one Collision Task for each object, and with Smart Collision Exclusion, you can increase or decrease the collision margin so that areas that should not be included in the simulation are properly excluded.
This is especially useful for clothing that sits close to the body, helping prevent the fabric from penetrating the model.
Transferring Settings Between Projects and Different Versions
If you have previously worked with older versions of JiggleGen, you don’t have to build everything from scratch.
The add-on can:
- Import Batch data from version 1.1.
- Restore old Proxy meshes.
- Export and Import Batch settings.
- Transfer configurations between different objects or files.
This feature is especially useful for long-term projects or team collaborations.
Detailed Reporting and Non-Destructive Workflow
After every Generate, JiggleGen displays a detailed report showing:
- Which sections were successfully created.
- Which parts were skipped.
- The reason why each section failed or was skipped.
Most importantly, if one area runs into a problem, the entire operation doesn’t stop, and the remaining sections are still created. Also, after the process completes, it restores the active object, selections, Mode, and even the current frame to their previous state so your workflow isn’t disrupted.
Overall, JiggleGen isn’t just a tool for adding jiggle to clothing or hair; it makes creating, managing, and editing dynamic simulations in Blender more organized and faster. From automatically creating simulation meshes to managing Batches and presets, supporting Hair Curves, and providing mesh optimization tools, it is designed to reduce time spent on technical settings and keep your focus on creating natural, engaging animation. Now, let’s move on to a few tips that can help make your results look even more professional. 💡
A Few Tricks for More Natural Results 💡
Even the best Cloth settings won’t look completely natural without a few small details. These simple tips help make the movement of hair, clothing, and soft character parts feel more realistic while keeping the project lighter and easier to manage.
- Keep the Weight Paint boundaries soft
Try to create a smooth gradient between the fixed and moving areas. This prevents sudden movements and makes the Jiggle look more natural. - Keep the hair roots fixed and the tips free
For Hair Curves or hair sections, give the roots more weight and gradually reduce it toward the tips so the hair moves more elastically and fluidly. - Don’t make the simulation mesh unnecessarily heavy
The more vertices there are, the slower the simulation becomes. Using Decimate on the Simulation Mesh usually provides a good balance between quality and speed. - Have a separate preset for each character section
The physical behavior of a soft ear is different from that of a thick coat or a long skirt. Saving custom presets also helps you reach the desired result faster in future projects. - Always Bake before the final render
Once you’re happy with the result, bake the simulation so the animation plays more smoothly and consistently, without unwanted changes.
These small adjustments usually have a much greater impact than unnecessarily tweaking dozens of Cloth parameters, and they help make the final output look more professional and believable.
A Tool That Adds Living Details to Your Character 🎯
In a character animation, these small movements can make a big difference. When hair lags slightly after a head turn, ears move with the body, or clothing reacts while walking, the character looks more natural and alive. But creating these details manually can take up a lot of the project’s time.
JiggleGen makes this time-consuming part simpler. Instead of creating a separate simulation mesh for every section, setting up Cloth settings, and manually managing multiple parts, you can quickly prepare and simulate different areas and manage them as a Batch. Presets also help you reuse successful settings in future projects.
If you spend most of your time in Blender creating and animating characters, JiggleGen can make a repetitive and technical part of your Workflow much more streamlined, especially when you’re working with characters that have multiple pieces of clothing, Geometry Nodes hair, or several dynamic areas. The result is more time to focus on the movement itself and the story of the animation, without complicating the project. 🚀
New to Blender and wondering what plugins, scripts, extensions, and presets actually do? You’re not alone. Our complete beginner’s Blender Tools guide explains each type of tool in clear, practical language, helping you understand when to use them and how they can make your workflow faster, smarter, and more creative.



