

Stop Fighting with Extra Empty Space!
Are you aware of how the Auto Crop Plugin functions? You’ve probably experienced this: you open a motion graphics or animation project, and most of the composition is empty space, while your layers sit in just one corner of the frame. This extra space makes it harder to find the right placement for elements and wastes a lot of time adjusting them. Even when applying effects or animations, an oversized frame reduces precision and makes controlling motion more difficult.
Extra space in a composition isn’t just a visual issue; it directly affects the project itself. When a composition is larger than the actual content, After Effects still has to process all those empty pixels—even if nothing is there. The result? Heavier projects and longer render times. Especially in larger projects with multiple animated layers and complex effects, this can seriously slow you down and make working in the software exhausting.
Now imagine if the composition could be exactly the size of the content. No extra space—just what’s truly needed. When the project frame matches the content, everything becomes easier: layer placement is clearer, effects and motion are more precise, and the final render is lighter and more optimized. This is where tools like the Auto Crop Plugin can handle everything with a single click and save you a huge amount of time.

A Precise Composition Means Full Control Over Your Project
In After Effects, every project is built on something called a composition—essentially a digital canvas where all layers, text, shapes, and animations live. The size of this composition is critical because it directly impacts performance, alignment, and the final output.
Why Does Composition Size Matter?
- Removing unnecessary empty space:
When a composition is properly sized, the software only processes pixels that actually contain content. The result? A lighter project that runs faster. - Easier layer alignment:
A precise frame makes it easier to place layers and apply effects or motion more naturally. You no longer have to deal with large, empty areas. - Faster rendering and standard output:
The right size produces a clean, professional result—no unwanted empty borders or cropping issues in the final output.
A Real-World Example
Imagine you have an animated logo or text centered on the screen, but the composition is much larger than necessary:
- Every time you want to adjust the animation or add an effect, you have to wrestle with extra empty space.
This leads to wasted time and a reduced sense of control over the project.
When You Had to Do Everything Manually…
Before professional tools like Auto Crop Plugin existed, resizing or precisely adjusting compositions usually relied on traditional methods. These included:
Traditional Methods for Managing Compositions
- Manually changing composition size:
Go to Composition > Composition Settings, adjust the size, and then reposition all layers so they fit correctly within the frame. - Using Pre-Composition:
Placing layers inside a new composition to make cropping or size management easier—especially useful when dealing with multiple layers at once. - Cropping specific areas of each layer:
Sometimes you had to inspect each layer individually and crop only the necessary parts, particularly when layers had transparency or alpha channels. - Duplicating and repositioning layers:
To get layers in the right place, you might duplicate them, manually resize them, and reposition everything again. - Using masks or manual cropping:
Some artists relied on masks to limit visible areas of layers—another time-consuming workaround.
Problems with Traditional Methods
When everything had to be done manually, you faced several challenges and limitations:
- Time-consuming:
Manually resizing compositions, moving layers, and applying masks or pre-compositions can take hours—especially in large projects. - High risk of errors:
A single wrong move or misaligned layer can break the project’s balance or cause effects to behave incorrectly. - Complexity in large projects:
Managing sizes and layers becomes confusing and exhausting when you’re dealing with multiple animated layers and pre-compositions. - Issues with animated or 3D layers:
If layers are animated or exist in 3D space, manually resizing the composition can cause unwanted shifts or break animations. - Pixel-level precision required:
When cropping each layer manually, it’s easy to miss a tiny pixel or accidentally cut off an important part of the content. - Heavy workload across multiple projects:
In serial projects or when working with many similar compositions, repeating all these manual steps is both tedious and energy-draining.
Auto Crop Plugin: Fast, Precise, and Hassle-Free
Auto Crop Plugin is a native plugin for After Effects designed to do one thing perfectly:
crop compositions to the exact size of their actual content—without the usual headaches of manual adjustment.
Instead of guessing or visually cropping, this tool accurately analyzes the composition’s content and adjusts the project frame so that no extra space remains and nothing gets cut off from the image or animation.
How Does Auto Crop Do It?
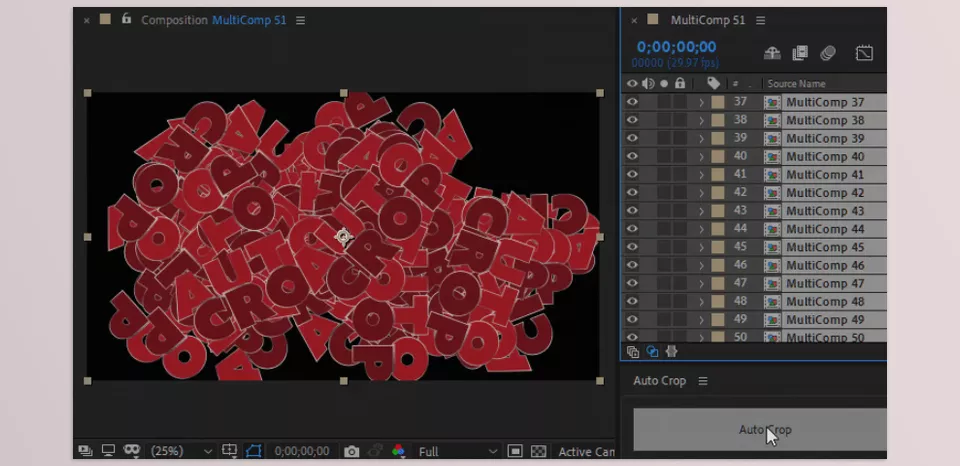
Auto Crop Plugin scans all layers in the composition and, based on visible pixels (the alpha channel), finds the smallest and most precise bounding area that contains the content.
It then resizes the composition exactly to that area—without disrupting layer positions, animations, or effects. All of this happens with a single, simple command.
What Makes Auto Crop Different?
- High speed:
As a native plugin, it runs much faster than older scripts and can process multiple layers simultaneously without performance drops. - True pixel-level accuracy:
Even if just a single pixel of a layer is visible, Auto Crop detects it and includes it in the final size. Nothing gets accidentally cut. - Preserved layer positions:
After cropping, layers remain exactly where they should be—no jumps, no unwanted shifts. - Full animation support:
If layers are animated, Auto Crop scans the entire timeline to ensure no frame of the animation gets cut off. - Simultaneous expansion and cropping:
If parts of layers extend beyond the current frame, you can expand the composition first and then crop it precisely—without manual effort. - Customizable user interface:
- Dedicated panel inside After Effects
- Keyboard shortcuts
- Adjustable cropping preferences
A Practical, Real-World Example
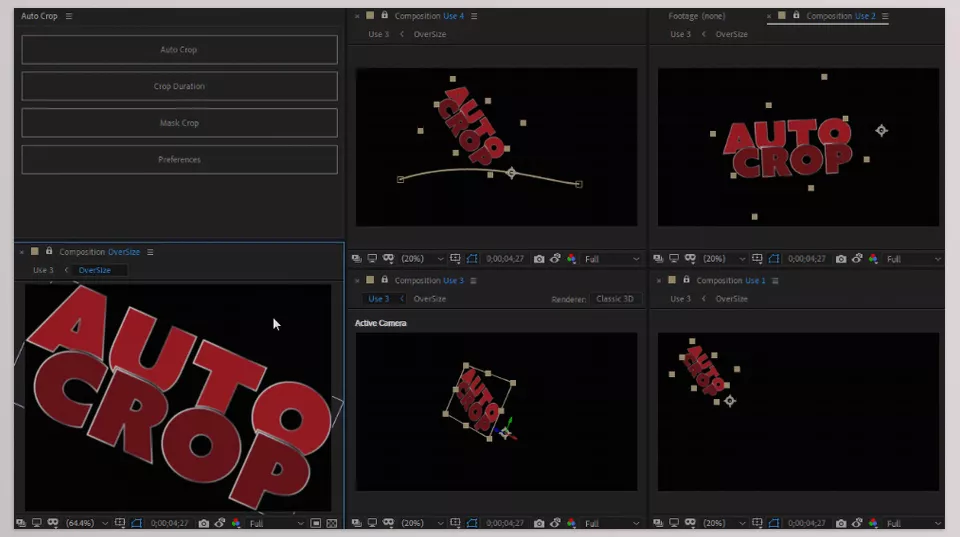
Imagine you have an animated logo or text centered on the screen, but the composition is much larger than needed. Instead of guessing frame sizes, moving layers around, or running multiple test renders, you simply run the Auto Crop Plugin.
In an instant, the composition resizes itself exactly to the logo. The animation stays intact, and no extra empty space remains in the project.
How to Use It More Professionally
Auto Crop Plugin may look simple, but using it correctly can significantly streamline your workflow and make it more professional. With a few small precautions, you’ll get more accurate results and avoid potential issues after cropping.
Be Careful with 3D Layers
Before cropping a composition, if your project contains 3D layers, it’s best to pre-compose them. Changing the composition size can affect how 3D layers are displayed. Pre-composing preserves their position and depth, ensuring everything stays exactly as designed after cropping.
Handle Expressions Smartly
If you’re using expressions, always review them before running the Auto Crop Plugin. Some expressions depend on the composition’s size, and cropping can shift layer positions. To avoid this, it’s better to convert those expressions to keyframes so the final result remains predictable and accurate.
Make the Most of the Dedicated Panel
Auto Crop Plugin provides a Script UI Panel that keeps your most-used options always visible. This means:
- Less time navigating menus
- Faster composition cropping
- A smoother, more professional workflow
Fully Check Your Animations
When working with animated projects or long timelines, always enable cropping based on the full animation duration. This ensures Auto Crop Plugin analyzes every frame and confirms that no movement or effect ever leaves the frame at any point in time.
Design More, Fight the Frame Less
Auto Crop Plugin ensures your compositions are exactly the size you actually need—no bigger, no smaller. By removing unnecessary empty space, After Effects runs faster, renders are lighter, and controlling layers and animations becomes much easier. This means your focus shifts away from frame sizes and technical adjustments and back to creativity and design.
With the Auto Crop Plugin, many repetitive and exhausting manual tasks are solved with just a few clicks. There’s no more guessing composition sizes, repositioning layers, or worrying about parts of your animation slipping out of frame. Everything is precise, clean, and reliable—resulting in a more professional final output.
Ultimately, the Auto Crop Plugin isn’t the most revolutionary of plugins, but you’ll feel it in your workflow right away. It saves you time, it improves your projects, and it makes After Effects a far superior program to work in. If you do motion graphics or use After Effects for animation, this is one small plugin that you’ll at least want to try once.
If you’ve ever wanted to work smarter in After Effects and make the most of every plugin, script, and preset available, our complete After Effects Tools guide provides a clear, detailed roadmap for all motion designers.



