


When All Your Projects Start to Look the Same…
Are you aware of the 5000+ Professional LUTs Bundle? Have you ever spent hours editing, only to reach the end and feel like your image still doesn’t have that “cinematic” vibe? Everything is technically adjusted, but the final output feels like it’s missing something special. You go back to the same repetitive tweaks: a bit more contrast, slight skin tone correction, a color balance layer… and once again, the result looks just like your previous project.
As the number of projects increases, this repetition becomes more obvious. Instead of focusing on the mood and atmosphere of your work, your time gets consumed by manual adjustments and trial and error. Gradually, the colors of all your projects start to blend together, and that exciting visual diversity fades away.
Now imagine being able to create a different atmosphere for each project with just a few clicks — without starting from scratch every single time. A place where color becomes the strength of your work, not a tiring final step in the editing process.

What Exactly Is a LUT and Where Does It Help?
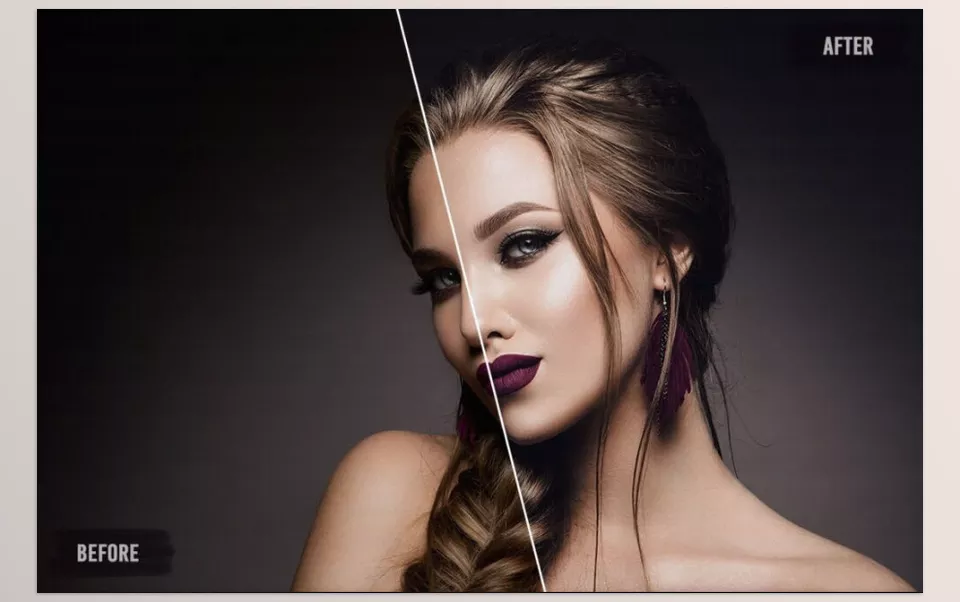
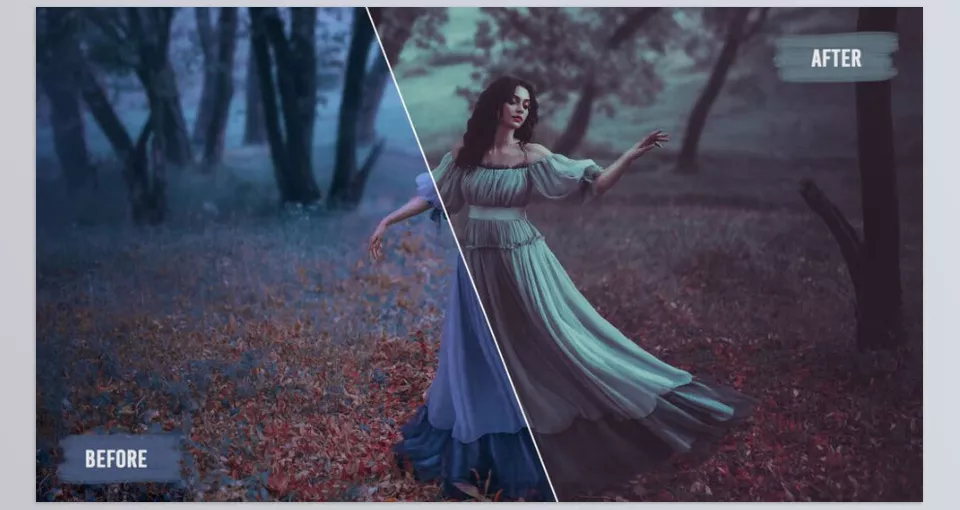
A LUT (Look-Up Table) is a ready-made color grading file that redesigns your image’s colors based on a specific style. Simply put, it’s a professional preset for color grading that can transform the visual mood of your work in seconds.
Instead of starting from zero with Curves and Color Wheels and diving into long trial-and-error sessions, you apply a LUT and instantly get a cohesive, professional color base. After that, you can adjust the intensity of the effect or refine the output further with additional corrections to personalize it precisely.
Real-World Uses in Everyday Projects
LUTs aren’t just a luxury tool for cinematic productions — they’re extremely useful in everyday projects too. For example, you can:
🎬 Create a cinematic and eye-catching vibe for advertising teasers and branding motion projects
📸 Unify and harmonize the colors of a wedding, portrait, or fashion photo series
📱 Publish more professional and cohesive social media videos
🎥 Quickly reach a standard starting point for final grading when working with raw (Flat or Log) footage
This means you save time while giving your outputs a more consistent visual signature.
Why Is It So Important?
Because color isn’t just a technical adjustment — it’s a storytelling tool.
Cool tones can create a sense of distance, seriousness, or loneliness, while warm tones convey intimacy and energy. Even subtle changes in shadows and highlights can completely transform the mood of a scene. LUTs help you build that atmosphere faster and more precisely, creating professional consistency across projects without diving into complex and time-consuming settings every time.
You Can Work Without Professional LUTs Bundle… But How?
If you want to achieve an attractive color style without ready-made LUTs, you’ll need to rely on the software’s default tools. This method is fully professional, and many editors prefer it because it gives them complete control over image details.
In this approach, you decide exactly where the shadows lean, how warm the highlights should be, and how color saturation is adjusted.
Common tools used in this workflow include:
- Curves for controlling light, contrast, and overall tone correction
- Color Balance for adjusting color separately in shadows, midtones, and highlights
- Lumetri Color in Premiere for performing full, multi-layer grading
- Hue/Saturation for boosting or reducing specific colors
- Color Wheels for achieving a more cinematic color balance
- Gradient Map for creating stylized and unique color atmospheres
With the right combination of these tools, you can create almost any mood — from warm and emotional to cool and dramatic tones.
But What Are the Challenges?
Although this method is completely achievable and even professional, it’s usually time-consuming and requires a lot of focus. When projects pile up or deadlines approach, manually adjusting colors for every sequence can become exhausting.
Achieving a consistent style across multiple projects isn’t easy either — you often have to start from scratch or try to recreate previous settings by memory. On top of that, finding a color combination that feels both natural and distinctive usually involves significant trial and error.
That’s when color grading stops being a creative stage and turns into a repetitive, time-consuming part of the editing workflow.
This Is Where the 5000+ Professional LUTs Bundle Comes In
This is exactly where having a professional LUT archive can transform your workflow. The 5000+ Professional LUTs Bundle is a massive collection of over five thousand ready-made LUTs designed for both photo and video, with a strong focus on diverse cinematic styles.
Instead of starting from zero every time and searching for the right color combination, you have a complete library of ready-made atmospheres waiting to be chosen.
⚡ High-Speed Color Grading
The biggest advantage of the Professional LUTs Bundle is speed. Instead of building a style from the ground up, you simply select the right LUT and instantly see the result on your image.
This allows you to test multiple atmospheres within minutes and choose the best option — without diving into complex, time-consuming adjustments.
🎬 Wide Variety of Styles
This collection isn’t limited to a single aesthetic — it gives you flexibility in your choices. Inside, you’ll find styles such as:
- Warm and dramatic cinematic tones
- Cool and minimal styles
- Vintage and film-inspired atmospheres
- Modern, high-contrast effects
- Color palettes suited for advertising, music videos, or social content
This diversity ensures that for every project — from branding teasers to Instagram videos — you’ll have a suitable option ready.
🎯 Flexible and Adjustable
An important point is that LUTs aren’t fixed or unchangeable. You can reduce or increase the intensity, adjust contrast, or combine them with other tools to reach your exact desired result.
In reality, these LUTs give you a professional starting point — not a locked or limited final result.
💻 Compatible with Multiple Software
Professional LUTs Bundle is compatible with a wide range of editing software, including:
- Photoshop
- Premiere Pro
- After Effects
- Final Cut Pro
- Affinity Photo
- Luminar
- On1
And virtually any software that supports LUTs. It runs smoothly on both Mac and Windows, so compatibility won’t be a concern.
📦 Extended Commercial License
One of its key advantages is the extended commercial license. You can use it repeatedly in personal or client projects without limitations on usage frequency.
For example, when working on an advertising teaser, you can quickly test multiple styles to match the brand’s atmosphere — without spending hours manually adjusting colors.
This means faster workflow, more professional output, and greater focus on creativity.
In the End, What Do You Gain?
Having a large and diverse archive of professional LUTs isn’t just about adding a few color effects. It means more speed, broader choices, and more cohesive results across your projects.
When you don’t have to build color grading from scratch every time, you can invest your energy into ideas, editing, and the overall feel of your work. For anyone working with photo and video, a complete Professional LUTs Bundle can become a practical tool that saves time while elevating final quality.
A Few Tips to Make Your Results More Professional
Using LUTs is simple, but if you follow a few subtle tips, your output will move from “good” to “professional.” The difference lies in the details.
🎛 Don’t leave the LUT at 100% intensity. When applied at full strength, the effect can look unnatural or exaggerated. Usually, a 60–80% range produces a more natural and polished result — especially in advertising or portrait projects where skin tone matters.
🎨 Correct exposure and white balance before applying the LUT. A LUT won’t magically fix incorrect lighting or messy white balance. Clean up exposure, base contrast, and color balance first, then apply the LUT for the best outcome.
🧩 Test multiple LUTs and don’t dismiss options too quickly. Some styles work beautifully on certain footage and look average on others. Try several options in sequence and choose carefully — not just the first one that “looks okay.”
👤 Be sensitive to skin tones. Skin is usually the first place where unnatural color becomes noticeable. If it looks overly orange, green, or dull, refine it with masks, HSL adjustments, or additional corrections to keep it natural.
🔁 Maintain consistency across a full project. It’s better to use one main LUT or a few closely related ones so your entire video or photo set maintains a cohesive visual identity. Constantly changing styles between sequences can create a sense of inconsistency — even if each individual shot looks beautiful.
Ultimately, following these simple tips ensures that a LUT isn’t just a ready-made effect, but a professional tool that makes your output cleaner, more natural, and more cohesive.
So What Do You Walk Away With?
In the end, what you gain from the Professional LUTs Bundle isn’t just a collection of ready-made color effects. Its greatest advantage is shortening your path to a professional and eye-catching result. Instead of spending a lot of time building a style from scratch, you quickly reach a solid — even compelling — outcome, then focus only on refinement.
When you have a diverse LUT archive, your choices aren’t limited to one or two repetitive looks. You can experiment with different atmospheres for each project, compare styles quickly side by side, and select the best one. This means your focus shifts toward storytelling, editing, rhythm, and creativity — instead of getting stuck in repetitive and time-consuming color adjustments.
If you work with photo and video and care about giving your projects a strong and defined visual identity, having a large, Professional LUTs Bundle can be a serious advantage. A tool that increases your speed while helping every project be published with a cohesive and impactful style.
For a deeper understanding of how LUTs function within a grading workflow, we invite you to explore our full article on color grading.



