

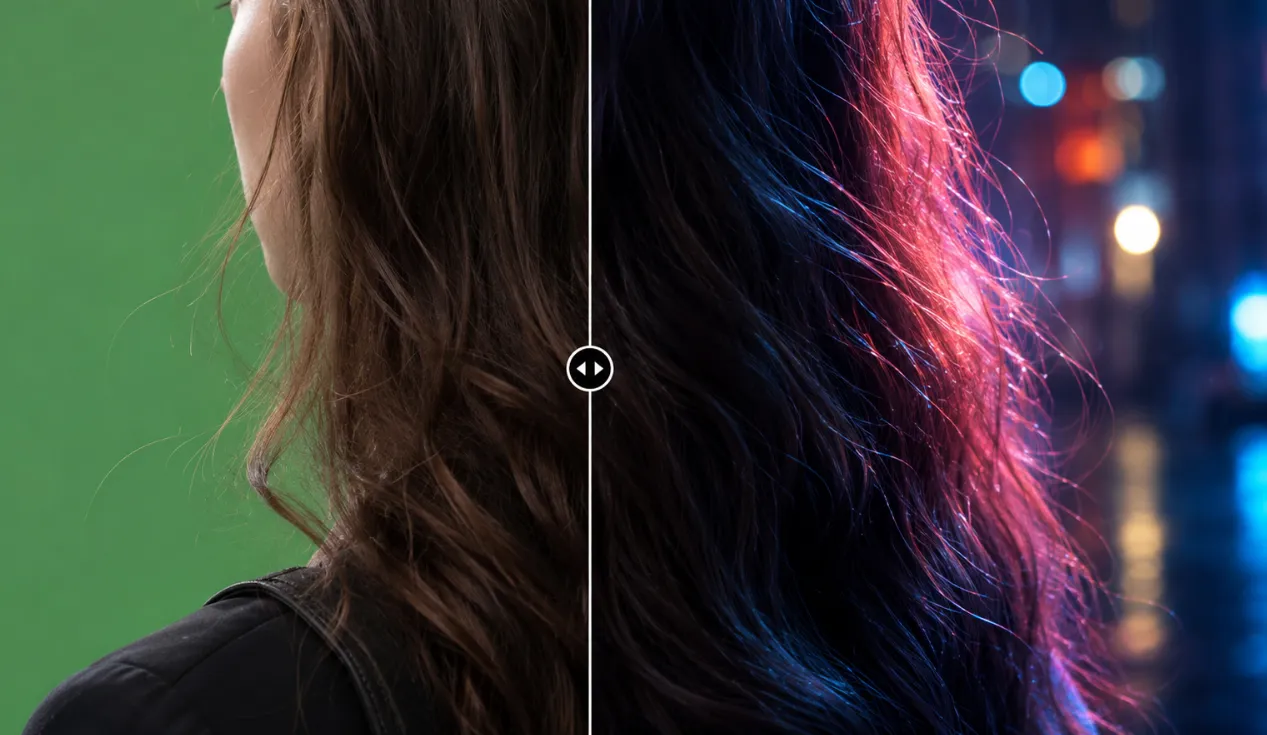
When Your Subject Still Doesn’t Feel Part of the Scene: The Hidden Problem Behind Many Composites 🎬
Looking for a professional Light Wrap solution? Why not try Light Wrap Fantastic by Digital Anarchy for After Effects, Premiere Pro, Final Cut Pro, and Motion? Have you ever cleanly removed a subject from a Green Screen, replaced the background, and everything seemed technically correct—but something still felt off? It looks like the subject isn’t actually inside the new environment and has simply been placed on top of the image.
This is one of the most common issues in compositing. In many cases, the problem isn’t the Green Screen key or the image quality. The real issue is that the lighting and colors of the new environment haven’t affected the subject at all. In the real world, nothing exists independently of its surroundings. The light in a scene influences the edges of the body, hair, and clothing, as well as the colors of object surfaces. These small details are what make an image feel more realistic.
This is where one of the most important techniques in visual effects and compositing comes in—Light Wrap. It helps blend the background light and colors into the subject, making the separation between the two much less noticeable.

What Is Light Wrap, and Why Does It Make a Composite Look More Natural? ✨
When you isolate a subject from one image and place it into a new environment, simply removing the background and positioning the subject in the scene isn’t enough. What makes the result feel realistic is the harmony between the lighting, colors, and surrounding environment. In the real world, no subject appears completely isolated from its surroundings. Indoor lighting, the color of the sky, street lights, and nearby reflections all influence how a subject looks.
The Light Wrap technique adds part of the environment’s light and color around the subject, creating a more natural connection between the subject and the background. This light is usually most visible along the edges of the subject—such as the hair, shoulders, clothing, or any areas closer to the light source—and helps soften the boundary between the subject and the environment.
For example, imagine filming an actor in front of a Green Screen and then placing them into a busy city street at night. Even if the keying is perfectly clean, the actor may still feel like they came from a different scene. But once the blue and red lights from the street signs subtly affect the edges of the actor’s clothing and hair, the final image immediately feels much more cohesive and believable.
The goal of Light Wrap is to reduce the visual separation between the subject and the environment, making the different elements of the image feel like they belong together. These subtle lighting details are what transform a simple composite into a realistic, professional-looking scene.
What Is Light Wrap Used for in Compositing? 🎥
The Light Wrap technique is most useful when you want the subject and the new environment to truly appear as parts of the same image. In many cases, after the background is removed, everything is technically correct, yet the final result still feels artificial—as if the subject has simply been placed on top of the scene instead of naturally blending into it.
Making Green Screen and Blue Screen Composites Look More Natural
One of the primary uses of Light Wrap is in Green Screen and Blue Screen workflows. After removing the background, the edges of the subject—especially around the hair, clothing, and body—often appear visually separated from the environment.
Adding the background’s light and colors to these areas helps reduce this separation, allowing the subject to blend more naturally into the scene.
For example, imagine filming a product or a person in a studio and later placing them in an outdoor location, such as a city street, natural surroundings, or an urban environment. If the lighting from that environment also influences the subject, the final result looks significantly more realistic, making it much harder for viewers to notice that two separate images have been combined.
Combining Live-Action Footage with Digital Environments
In VFX projects, live-action footage is often combined with digitally created environments. A real actor may be placed inside a 3D city, a fantasy world, or an entirely computer-generated scene.
In these situations, matching the lighting between the two elements is extremely important. When the digital environment’s lighting also affects the real subject, the two blend together much more naturally, making the final image appear like a single realistic scene.
Giving Your Image a More Cinematic Feel
Sometimes a composite is technically perfect but still feels flat or lifeless.
Adding carefully controlled environmental lighting can create more depth, giving the image a more polished appearance that’s closer to the look of professional cinematic productions.
In reality, Light Wrap is less of a flashy visual effect and more of a subtle detail that strengthens the connection between the subject and the environment—the kind of detail viewers may never consciously notice, but whose absence is immediately obvious.
Creating Light Wrap Without Dedicated Tools: How Traditional Methods Worked 🛠️
Before dedicated Light Wrap tools existed, compositors typically created this effect manually inside software such as After Effects. The basic idea was simple: use the background itself as the light source and, through several compositing steps and adjustments to effects, transfer part of the environment’s lighting onto the subject.
The general workflow usually consisted of several steps:
- Duplicate the Background First, a copy of the background layer was created to serve as the lighting source. This layer would later transfer the environment’s colors and brightness onto the subject.
- Soften the Light Using Blur Effects. The duplicated background was then blurred using effects such as Gaussian Blur, creating soft, natural-looking lighting rather than projecting a sharp image onto the subject.
- Blend the Light with the Subject. Next, blending modes such as Screen or Add were used to apply the background lighting onto the subject, creating the impression of natural environmental light wrapping around it.
- Control the Light Using Masks. Since the entire subject shouldn’t be affected, masks were used to limit the light primarily to the edges, hair, and areas closest to the light source.
This method is still a valid way to create Light Wrap, and with enough time for careful adjustments, it can produce excellent results.
What Are the Drawbacks of Manual Methods? ⏳
Although creating Light Wrap manually is entirely possible, managing all of these steps becomes time-consuming and tedious as the number of shots increases. Every project is different. One scene may have warm lighting, another cold lighting; one may feature a moving subject, while another includes camera movement. As a result, the light intensity, masks, effect strength, and blending settings often need to be adjusted separately for every shot.
This becomes especially challenging in larger projects with numerous composites, where a significant amount of time is spent on repetitive tasks. That’s why many compositors prefer using tools like Light Wrap Fantastic that speed up the process while providing greater control over the final result.
Light Wrap Fantastic: Faster and More Professional Environmental Lighting 🎬
When placing a subject into a new scene, simply removing the background isn’t enough. What makes the image feel realistic is the relationship between the environment’s lighting and the subject itself. Without that connection, even a clean composite can still appear somewhat artificial.
This is where Light Wrap Fantastic comes in. It is a compositing plugin for After Effects, Premiere Pro, Final Cut Pro, and Motion that makes creating the Light Wrap effect much faster and easier.
Using Light Wrap Fantastic, you can simulate the background’s light and color on the subject, allowing the edges and fine details to blend more naturally with the surrounding environment. Instead of building multiple layers and repeating the same workflow for every project, most necessary controls are available in a single centralized interface.
What Features Make Light Wrap Fantastic Easier to Use? ✨
Natural Background Light Simulation on the Subject
One of the primary strengths of Light Wrap Fantastic is its ability to simulate how the surrounding environment’s lighting and colors affect the subject.
This reduces the appearance of separated layers and helps the subject integrate naturally into the scene.
For example, if you’ve filmed an actor in front of a Green Screen and later place them into an urban or natural environment, the lighting from that environment can naturally appear along the edges of the actor’s hair, clothing, and body.
Creating More Natural Green Screen and Blue Screen Composites
One of the Light Wrap Fantastic plugin’s main purposes is improving Green Screen and Blue Screen composites.
After removing the background, the biggest issue is often that the subject still feels disconnected from the environment.
By introducing environmental lighting, this separation becomes much less noticeable, making the final composite feel more unified. This is especially valuable in commercials, short films, music videos, and professional content production.
Better Integration Between Live Footage and Digital Environments
VFX projects frequently combine live-action footage with computer-generated environments. A real actor may be placed inside a 3D city, a fantasy world, or an entirely digital scene.
In these situations, lighting consistency between the subject and the environment is crucial. When the digital environment’s lighting also affects the subject, both elements appear as parts of the same image.
Full Control Over the Appearance of the Light
Every scene has different lighting conditions, so a single preset cannot work for every project.
Light Wrap Fantastic lets you adjust the light intensity, color, spread, and its effect on the subject, making it easier to match the effect to the project’s overall mood.
Matching the Subject with the Environment
Sometimes the issue isn’t that the subject was poorly keyed.
The problem is that it still doesn’t feel like it truly belongs in the environment.
Adding subtle lighting details—such as reflected environmental colors along the edges—helps strengthen that connection and makes the final image feel more realistic.
Faster Compositing Workflow
Creating Light Wrap manually is entirely possible, but as the number of shots increases, rebuilding layers, masks, and effects repeatedly becomes time-consuming.
Light Wrap Fantastic helps speed up those repetitive tasks, allowing you to spend more time focusing on the creative aspects of your project.
Overall, Light Wrap Fantastic can significantly streamline the workflow for artists working in compositing and visual effects, as well as in integrating live-action footage with different environments. After all, it’s these subtle lighting details that transform an ordinary image into one that feels natural and professionally crafted.

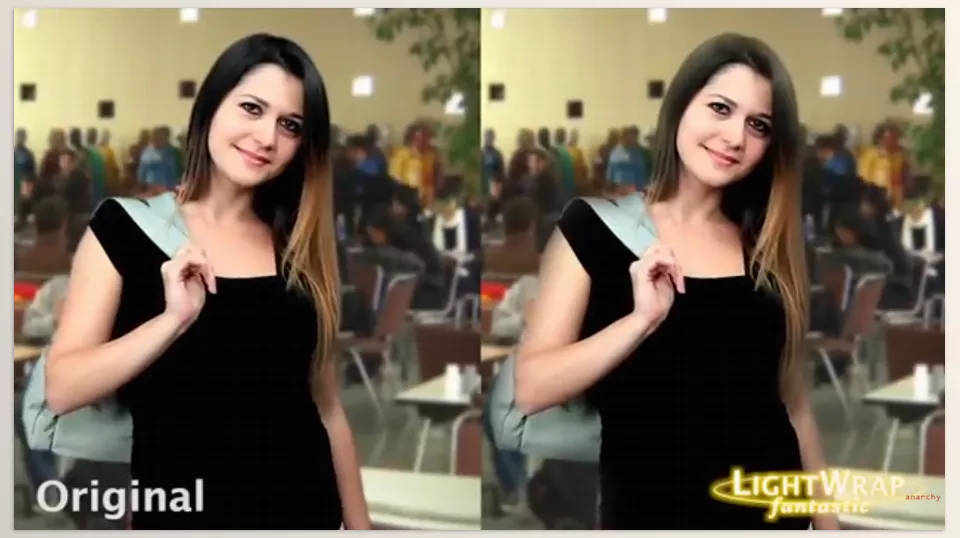
Tips for Achieving More Natural Results with Light Wrap 🎨
Creating a great Light Wrap isn’t just about adding light to the subject. If you want the final result to look natural and professional, pay attention to these small details. These subtle adjustments are what make the subject truly blend into its environment.
- Don’t Overdo the Light Wrap Effect
The goal of this effect isn’t to make it obvious that you’ve added a new light to the image. The best results happen when viewers don’t notice the effect itself—they simply feel that the image looks more natural. - Match the Light Color to the Environment
The added light should always match the background’s mood and color. For example, if the scene has a cool blue atmosphere, adding a very warm light can once again make the subject feel disconnected from the environment. - Focus on the Subject’s Key Edges
Areas such as hair, shoulders, clothing edges, and the body’s outer contours are usually most affected by environmental light. Properly adjusting these areas can make the biggest difference in creating a more realistic composite. - Start with a Clean Key
Even the best Light Wrap settings can’t completely fix a poor Green Screen key. First, make sure the subject is cleanly and accurately separated from the background. Then focus on matching the lighting and improving the integration with the new environment.
Ultimately, Light Wrap delivers the best results when it’s treated as part of the scene’s natural lighting rather than as a separate visual effect. The more subtle and well-balanced your adjustments are, the more believable the final image will appear.
🎯 When Light, Subject, and Environment Truly Become One
A professional composite isn’t just about separating a subject from its background and placing it into a new image. What makes a composite truly believable is the small details—such as matching the lighting, colors, and environmental reflections. These are the details that viewers may never consciously notice, but their absence immediately makes an image feel artificial.
One of the most common tools used to accomplish this is known as Light Wrap. This technique allows for subtle environmental lighting and color to be added to the edges of the subject within the composite image. This can help to provide a more unified and believable composite image of that subject within its new environment.
If you frequently work with Green Screen, VFX projects, or integrating live-action footage with digital environments, Light Wrap Fantastic can be a valuable tool to speed up this part of your workflow. Instead of spending time manually building layers, masks, and repeated adjustments for every project, you can achieve natural-looking results much more efficiently and devote more attention to the creative aspects of your work. In the end, it’s these subtle lighting details that turn a good composite into a truly professional image.
Are you ready to explore the different types of After Effects tools and learn how they work? In our After Effects Tools guide, we explore the different tools available in this software and how they can enhance your projects.





