


When You Have a 3D Scan, But Can’t Use It in Motion…
Are you familiar with what the Gaussian Splatting Plugin can do? Have you ever filmed a space or subject with your phone, then used AI tools to turn it into an incredible 3D scan, and gotten seriously excited? Everything looks perfect; you’ve got the model, the depth, the real detail. But the moment you try to bring it into After Effects and push it into your motion world, you realize it’s not that simple.
The file is there, but you don’t have control. You want to build a reveal, animate it, add effects, or design a cinematic composite — but the workflow gets complicated. You either have to convert formats, jump into another software, or move forward with limited and temporary solutions.
That’s where a serious question comes up: why should there be a gap between the world of AI scans and motion graphics? When we can scan reality, does it make sense that we can’t easily animate it inside our own timeline?

What Exactly Is the Gaussian Splatting Plugin and Why Does It Matter?
Gaussian Splatting Plugin is a new technique for building and rendering 3D scenes that, instead of using classic Meshes and Polygons, constructs the image from thousands of intelligent points (Gaussians). Each of these points contains color, lighting, and depth information, and together they create a fully realistic scene.
Unlike traditional modeling, where you have to design precise geometry, here the system analyzes the photos or videos you’ve captured and reconstructs the 3D structure of the space on its own. The result is usually lighter and renders faster — especially when using the GPU.
How Is It Created?
The process is simpler than you might think.
First, you film your subject or location with your phone or camera. You try to move around it from different angles so all details are captured. Then you upload the video into tools like Luma AI, Polycam, or Nerfstudio. These applications process the footage intelligently and generate a 3D model based on Gaussian Splats.
That means no manual modeling, no dealing with complex UVs and textures — just a 3D space that genuinely conveys a sense of real presence.
Why Is It Important for Motion?
For those of us working in Motion Design, this technology is a major advantage:
- We can bring reality directly into After Effects or our 3D project space
- Real lighting and texture details are preserved
- Rendering becomes faster and smoother
- The sense of depth and spatial presence feels more natural
In fact, the Gaussian Splatting Plugin acts as a bridge between real-world filming and 3D design. Instead of building everything from scratch, you capture reality and then move into the creative and animation phase.
Without Specialized Tools, How Can You Do This?
If you don’t have a specialized Gaussian Splatting Plugin tool, you’re usually forced to rely on traditional methods. That means converting files or building an approximate version of the scene just to simulate depth. These methods are workable, but they weren’t designed for point-based data.
The most common approaches are:
- Using Element 3D after converting the model to OBJ
- Working with Cinema 4D Lite to manage the 3D model
- Importing files in OBJ / FBX formats
- Creating depth using 3D cards and manual layering
- Using Camera Projection to simulate space
Each of these methods can produce a relative result, but they usually require extra tweaking and adjustments.
What’s the Problem with These Methods?
The main challenge is that Gaussian Splat files in .ply format are not inherently designed for these systems. So you have to convert formats — and that’s where part of the detail gets lost. Renders become heavier, real-time performance is almost gone, and most importantly, you lose creative control over the Splats themselves.
In the end, you either move to software like Unreal or Blender, or you patch the project together with temporary solutions — a path that usually slows down workflow and creative momentum.
So What Does a Professional Tool Do?
This is exactly where the game changes.
The Gaussian Splatting plugin for After Effects allows you to directly import .ply (Gaussian Splat) files into AE and render them in real-time using the GPU.
What does that mean?
It means AI scans created with Luma or Polycam go straight into your motion graphics timeline — without format conversion, without jumping between multiple software tools, and without losing detail.
In practice, this plugin builds a direct bridge between the AI Scan world and Motion Design.
Key Features
🎯 1. Direct Import of .ply Files
No need to convert the file or turn it into a Mesh.
- Direct support for Luma AI output
- Compatible with Polycam
- Usable with Nerfstudio, PostShot, and Scaniverse
- Import Gaussian Splat files without quality loss
- Smooth GPU-powered performance inside After Effects
That means the same level of detail you saw in the scan appears inside your project.
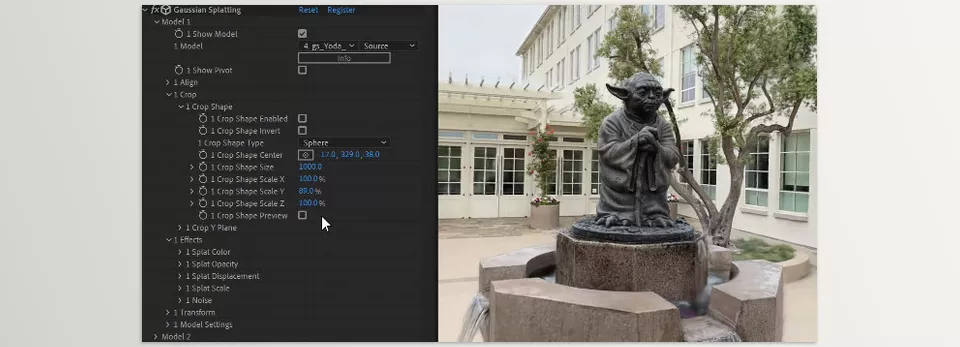
🎯 2. Smart Scene Cropping and Control
Instead of displaying the entire scan at once, you can control it precisely.
- Crop with Sphere
- Crop with Box
- Slice the scene with a Y Plane
- Isolate specific parts of the space
- Align the model to the center and level it horizontally
This feature is incredibly useful for staged reveals, 3D cuts, and cinematic effects.
🎯 3. Direct Animation on the Splats Themselves
Now you don’t just have a 3D model — you have a dynamic structure where you can animate the points directly.
- Opacity Ramp for gradual appearance
- Scale Ramp with spherical or box control for explosive or structural reveals
- Displacement for motion effects
- Noise for artistic distortion
- Color Ramp for creative colorization using spherical or box mapping
- Separate Color Grading per model
You can transform a realistic scan into a digital, glitch, or artistic effect — without leaving AE.
🎯 4. Combining Multiple Scans in One Scene
If your project is more complex, this is crucial:
- Use up to 10 .ply models in a single scene
- Independent animation for each model
- Separate Color Control for each one
- Create layered, multi-part environments
For music videos, modern teasers, or conceptual projects, this feature gives you real flexibility.
🎯 5. Depth Pass Output for Professional Compositing
One of the most practical features:
- Render a Depth Pass
- Better integration with effects
- Control focus and Depth of Field
- Create fog, volumetric light, and cinematic atmosphere
This means Splats aren’t just display objects — they enter the professional compositing stage.
🎯 6. Real-Time GPU Performance
All these controls and animations are GPU-accelerated.
You can see changes instantly without waiting minutes for each render test.
🎯 7. Re-Export the Scene to .ply
If you make changes and want to export:
- Export the scene as .ply
- Transfer it to other software if needed
A Real Example of Its Use
Imagine you scanned an industrial location with Luma AI.
Inside After Effects, you can:
- Use Opacity Ramp to reveal the model from the ground up
- Create a digital reveal effect with Scale Ramp
- Break apart or ripple the model with Noise and Displacement
- Combine multiple scans
- Add volumetric light and cinematic fog with Depth Pass
- Change the environment’s color using Color Ramp
And do all of this without leaving After Effects.
Ultimately, the Gaussian Splatting Plugin turns a 3D scan from just a file into a living, animatable material that fits directly into your motion graphics workflow.

Professional Techniques and Tips for Better Results
Here are a few practical tips that can elevate your work from a simple technical test to a more professional result 👇
✔ Movement matters before scanning
Move slowly and consistently around your subject, avoid sudden shakes, and capture from different angles and heights. The more complete your coverage, the cleaner and more stable your Gaussian Splat output will be.
✔ Take environmental lighting seriously
Even stable lighting helps preserve detail. Harsh lighting changes or strong shadows can disrupt 3D reconstruction.
✔ Play smart with Crop
You don’t always need to show the entire scene.
Isolate a specific area, build a gradual reveal with Sphere, or design 3D cuts with Box for a more engaging visual narrative.
✔ Design reveals in stages
Combining Opacity Ramp and Scale Ramp gives the model a “being built” or “digitizing” feel. This technique works especially well for tech-style teasers.
✔ Don’t overdo Noise
A small amount of Noise can add a digital or glitch feel, but overusing it destroys the model’s original form and clutters the image. Always adjust it subtly.
✔ Use Color Ramp intentionally
Instead of recoloring the entire scene, use the ramp to emphasize a specific area. This creates visual focus and makes the work feel more refined.
✔ Don’t underestimate Depth Pass
With Depth, you can create natural fog, add volumetric lighting, or design cinematic Depth of Field. This single feature can elevate your output several levels.
✔ Combine multiple scans logically
When bringing multiple models into one scene, pay attention to scale and placement. Proper alignment and color harmony make the space feel more believable.
If you follow these simple tips, your result can evolve from a basic technical test into a polished, presentation-ready motion piece.
When Reality Enters the Timeline
The Gaussian Splatting Plugin is actively reducing the boundary between real-world filming and motion graphics. You no longer need to model everything from scratch to create a believable space. You can capture a location or subject and then transform that same reality inside After Effects into a creative, animatable visual experience.
Gaussian Splatting Plugin effectively builds a smart bridge between the AI Scan world and Motion Design. Instead of moving between multiple software tools and converting formats, everything goes directly into your own timeline. If you work with 3D scans — or are just starting to explore this space — having this level of control inside After Effects can make your workflow faster, smoother, and more creative.
And most importantly, the feeling of working changes. It’s like dealing with a living material that you can shape, reveal, break apart, or recolor — not a rigid, limited 3D model. That sense of flexibility and freedom is what makes this technology so appealing for motion designers.
If you want to enhance both your creative flexibility and production efficiency in After Effects, our comprehensive After Effects Tools guide serves as a reliable reference.



