

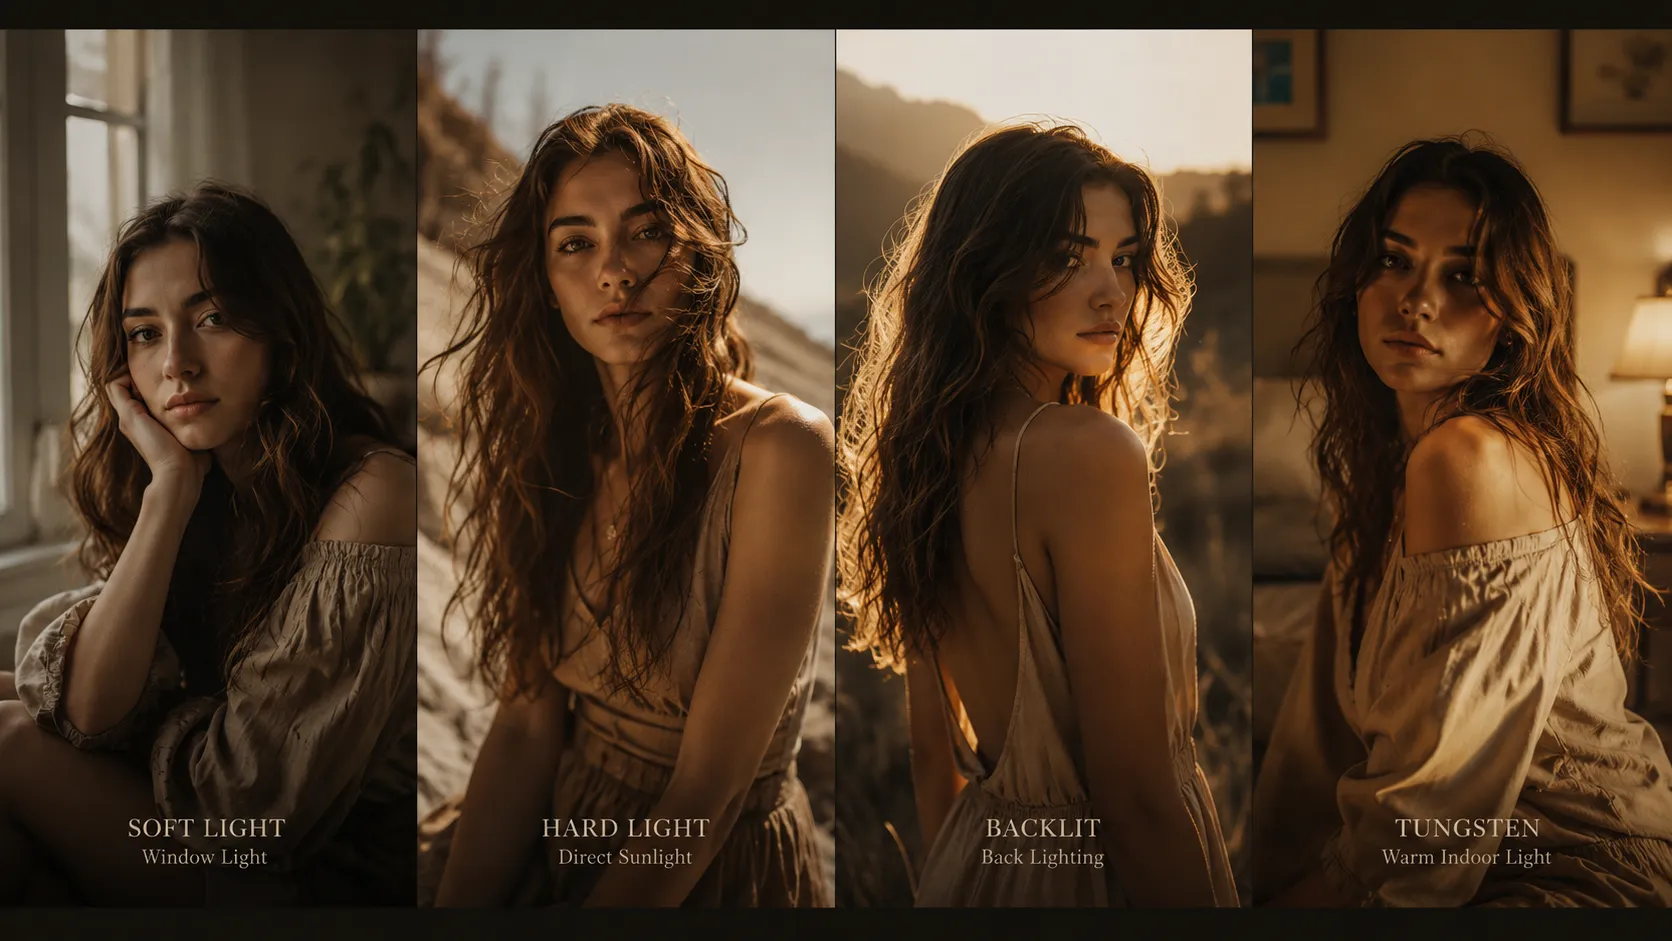
When Different Lighting Conditions Make Photo Editing Difficult… 📸
Are you someone who has used The Mood Pack (on DVLOP) by Visual Flow before? Have you ever worked on a project where every photo was taken under different lighting conditions? One next to a window with soft light, another under harsh sunlight, one under warm indoor lighting, and another with backlighting? In situations like these, creating a consistent color style across all the photos can become very time-consuming because every image responds differently to color and lighting adjustments.
Many photographers spend hours working with Lightroom and Camera Raw settings to achieve a professional Dark & Moody look—from controlling shadows and highlights to adjusting skin tones, contrast, and color tones. But when you’re dealing with a large number of photos, repeating these steps for each image not only takes a lot of time but also makes it difficult to maintain a consistent mood and style throughout the collection.
This is where presets designed for specific lighting conditions can dramatically speed up the editing process. ✨ Instead of starting from scratch for every type of lighting, you can simply choose the settings that match those conditions and achieve warm, cinematic, and emotional colors much faster—just like the style you see in professional portrait, wedding, and lifestyle photography.

What Exactly Is the Dark & Moody Style? 🌑
Before we dive into editing tools, it’s worth understanding what Dark & Moody actually means.
Many people think this style simply means darkening a photo or increasing contrast, but in reality, Dark & Moody is much more than a simple brightness adjustment. It’s about creating a specific mood within the image.
In this type of editing, you typically:
- Add more depth to the shadows.
- Control the highlights to keep the image looking natural.
- Make the colors warmer and more organic.
- Use contrast to make the subject stand out more.
- Give the image a cinematic, story-driven atmosphere.
For example, imagine a simple outdoor portrait. With a basic edit, you may end up with a beautiful photo, but with the right color grading, you can evoke the feeling of a special moment, a memory, or even a movie scene.
That’s why this style has become so popular in wedding, travel, portrait, and lifestyle photography—it helps transform a simple capture into an image that conveys emotion.
Common Ways to Create a Dark & Moody Style in Lightroom 🖥️
You don’t necessarily need a preset to achieve a Dark & Moody look. Lightroom and Adobe Camera Raw already include powerful tools that let you control color, lighting, and the overall mood of your photos. Many photographers even prefer using these tools manually to create their own signature style.
This approach usually combines several adjustments to gradually build the desired look:
- Exposure: Adjust the overall brightness of the image and find the right balance between bright and dark areas.
- Contrast: Increase the image depth and create stronger separation between shadows and highlights.
- Highlights & Shadows: Control details in the brightest and darkest parts of the image.
- White Balance: Adjust the overall color mood of the photo, creating a warmer or cooler atmosphere.
- Tone Curve: Fine-tune contrast to achieve a more cinematic look.
- Color Grading: Add color tones to the shadows, highlights, and midtones.
- HSL: Adjust individual color channels for more precise control over skin tones, natural elements, or other elements within the image.
By combining these tools, you can give almost any photo a unique style and even create your own signature color grading. However, this method works well when you’re editing only a small number of photos. The real challenge begins when you’re working on a large project with hundreds of images.
The Challenges of Manually Editing Large Numbers of Photos 😓
When a project contains hundreds of photos, manual editing can become extremely time-consuming. Imagine editing a wedding in which the photos were captured under different conditions—some next to windows with soft light, some in harsh sunlight, some with flash, and others in warm indoor lighting. In these situations, a single adjustment rarely yields the best results across all images, so each photo requires individual corrections.
On top of that, maintaining a consistent look throughout the entire collection isn’t easy. One photo may look fantastic on its own, but when placed next to the others, differences in color and lighting can make the collection feel inconsistent. Repeating color adjustments, correcting skin tones, balancing lighting, and matching hundreds of photos means photographers often spend more time on repetitive editing than on creativity.
The Mood Pack: Presets That Make Photo Editing Faster and More Professional 🚀
The Mood Pack is a professional preset collection for Lightroom, Lightroom Classic, Lightroom Mobile, and Adobe Camera Raw, designed specifically for creating Dark & Moody photos. But what this pack does goes far beyond changing a few colors. Its main goal is to help you achieve the same warm, cinematic, and emotional look commonly seen in professional portrait, wedding, and lifestyle photography much more quickly.
What sets The Mood Pack apart from many standard presets is that it isn’t built around a single fixed color style. Many presets may work perfectly on one image, but when you apply the same settings to another photo taken under different lighting, the results can look completely different.
Instead, this pack follows a different approach. The presets are designed around lighting conditions. Rather than simply choosing a specific color style, you first identify how the image was captured. Was it taken in soft light? Harsh sunlight? Backlighting? Flash? Then you choose the preset designed for that situation, resulting in a more natural and controllable edit.
With The Mood Pack, you can quickly create photos that:
- Have warm, natural colors with a more organic feel.
- Feature a cinematic, story-driven atmosphere.
- Offer better-controlled contrast without losing image details.
- Create a deeper and more emotional mood.
- Maintain a more consistent color style across large projects.
The Mood Pack Presets Based on Lighting Conditions 🎯
One of the most impressive features of this pack is that it’s built around different lighting scenarios. You don’t have to test one preset on every photo and then spend a long time correcting colors and lighting. Simply identify the lighting conditions and choose the preset designed for that situation.
The Mood Pack includes 10 different presets for different lighting conditions:
Soft Light – For Soft and Gentle Lighting ☁️
This preset is designed for photos captured in soft lighting, such as:
- Window light
- Shaded environments
- Cloudy weather
- Diffused natural light
If your photo has a calm, natural, and romantic feeling, Soft Light helps preserve that mood while making the colors warmer and more professional.
Hard Light – Controlling Photos Taken in Harsh Light ☀️
Direct sunlight is often one of the biggest challenges photographers face because it creates extremely bright highlights and deep shadows.
The Hard Light preset helps balance this lighting difference while preserving the image’s depth and visual appeal.
HDR Natural – For Photos with High Dynamic Range 🌄
Some photos contain both extremely bright and very dark areas simultaneously, such as outdoor scenes or locations with multiple light sources.
HDR Natural helps preserve more image detail while keeping the final result both professional and natural.
Backlit – For Backlit Photos ✨
Photos with light coming from behind the subject often have a unique atmosphere, but they’re not always easy to edit.
The Backlit preset helps preserve that soft, cinematic backlight while giving you better control over colors and image details.
Flash – For Flash Photography ⚡
Photos taken with flash can sometimes appear artificial or inconsistent.
This preset helps balance their lighting and colors, making them blend more naturally with the rest of your project.
Tungsten & Tungsten Mix – For Warm Indoor Lighting 💡
Indoor lighting often introduces yellow or orange color casts into photos.
These two presets are designed to manage those conditions, making colors appear more natural while preserving the warmth of the scene.
Green Tint – Correcting Green Color Casts 🌿
Sometimes environmental lighting or color reflections cause photos to develop a noticeable green tint.
The Green Tint preset helps remove these unwanted color casts and gives the image a more balanced appearance.
Over-Saturated – Controlling Excessively Strong Colors 🎨
Sometimes photo colors become overly saturated and lose their natural appearance.
This preset helps reduce excessive saturation and brings the image closer to a professional look.
Black & White – Creating Classic and Emotional Images 🖤
Sometimes removing color shifts the viewer’s attention toward the subject, lighting, and story within the image.
The Black & White preset helps you create black-and-white photos with a deeper, more classic feel.
Why Does The Mood Pack Speed Up the Editing Process? ⚡
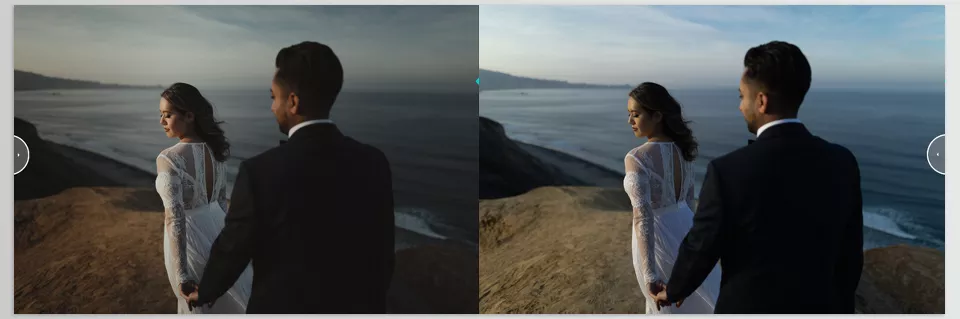
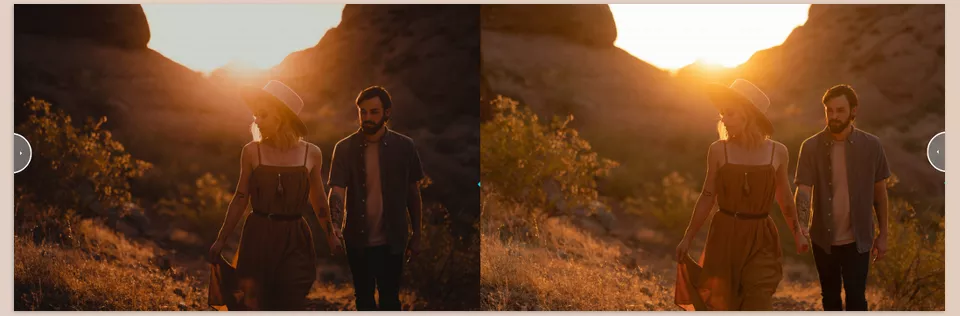
One of the biggest advantages of presets is that you don’t have to start every edit from scratch. The Mood Pack provides a professional foundation, allowing you to apply the preset first and then make only a few small adjustments to reach your final result.
Imagine a wedding photographer with several hundred images from a single event. Some were taken outdoors in direct sunlight, some next to windows, some indoors under warm lighting, and others with flash.
Instead of spending hours adjusting colors and lighting for every single image, they can simply choose the preset that matches each lighting condition and then make only the final refinements, such as exposure, skin tones, or effect intensity.
In the end, the entire collection maintains a consistent mood despite varying lighting conditions, resulting in a far more professional and cohesive look. That’s what makes The Mood Pack more than just a collection of color presets—it becomes a tool for building your own personal photo editing style.
Tips for Getting More Professional Results with The Mood Pack 💡
Using presets makes the editing process much faster, but if you want the final result to look truly professional and natural, it’s best not to rely on just a single click. There are a few simple tips that can help you get the best possible results from The Mood Pack:
- Choose the preset based on the photo’s lighting, not just its name or appearance.
The best results come from selecting the preset that best matches the image’s actual lighting conditions. For example, for a photo taken in soft lighting, choosing Soft Light will usually produce a more natural result than using a preset with stronger adjustments. The most dramatic change isn’t always the best choice. - Make a few personal adjustments after applying the preset.
A preset is only the starting point of the edit, not the final result. Small adjustments such as fine-tuning the Exposure, correcting skin tones, controlling Highlights and Shadows, or increasing or decreasing the contrast can make the image look much more natural and professional. - Maintain a consistent color direction for each project.
If multiple photos will be presented together, it’s better to use a similar color family throughout the project. This helps the entire collection share the same mood and makes the final result appear more cohesive and professional. - Pay attention to the quality of the original photo.
A preset can change the colors and mood of an image, but it can’t replace a photo with good lighting and strong composition. The higher the quality of your original image, the more impressive the results you’ll achieve with The Mood Pack.
Ultimately, you’ll get the best results from this pack when you think of the preset as a creative tool rather than a ready-made adjustment applied to every photo without modification. A little customization and attention to the conditions of each image will help you achieve results much closer to a professional edit and your personal signature style.
Conclusion: When Editing Becomes Your Signature Style 🎯
In the end, The Mood Pack isn’t just a collection of ready-made presets that apply a few colors to your photos. It’s more like a faster path to achieving the exact style and feeling you want your images to convey. Because very often, what makes a photo truly special isn’t just the moment that was captured—it’s the mood and atmosphere you create through editing.
Many photographers don’t struggle because they don’t know how to use Lightroom or how to make color adjustments. The real challenge begins when they’re faced with a large number of photos taken under different lighting conditions. Adjusting the color, contrast, and lighting of each image individually while maintaining a consistent look across the entire collection can take hours. That’s where The Mood Pack helps you achieve a professional, cohesive result much more quickly.
If you’re looking for photos with a warm, cinematic, emotional feel inspired by the Wanderlust style, this pack can make your workflow much easier. Instead of spending most of your time on repetitive adjustments, you can focus more of your energy on photography itself and on creating unique images—photos that are not only beautiful but also full of emotion and storytelling.
If you enjoy the warm, cinematic editing style of The Mood Pack but prefer a more minimalist collection with a timeless color palette, Joshua Mannila Presets is another excellent option worth exploring. While The Mood Pack focuses on matching different lighting conditions with dedicated presets, Joshua Mannila Presets takes a simpler approach with four carefully crafted looks that help create a consistent visual identity across your photos. Read our full Joshua Mannila Presets review to discover its features, compare the presets, and find out which collection best suits your editing workflow.



