


🎨 When Texturing Becomes a Challenge
Have you ever used the UVPackmaster? Anyone who has entered the world of 3D eventually reaches the stage where they need to texture their model. Everything up to that point is exciting and enjoyable; the model is shaped, the lights are set up, and now it’s time for color and details. But this is exactly where the main challenge begins — when you have to unwrap the model so the texture fits properly. This is where UVs come into play, and suddenly the screen is filled with messy, irregular pieces, each representing a part of the model.
If you’re lucky and the model is simple, the default Blender tools might get everything sorted in a few minutes. But in most cases, especially when your model is more complex — for example, a character with clothing, multiple layers, or even a detailed environment — everything gets messy. UVs overlap, there are large empty spaces, and manually adjusting each section becomes a tedious and time-consuming task.
Many artists have experienced that feeling: the moment you’ve spent hours, and the UVs still aren’t properly arranged, or when you realize half of your texture map is wasted. That frustration is exactly when you think: “I wish Blender could automatically pack everything cleanly and efficiently without all this hassle.” And this need is exactly the starting point for tools like UVPackmaster — designed to turn this painful stage into a fast, clean, and precise process.

🧩 What Exactly is UV?
To understand what UV really is, we need to step away from the 3D space for a moment. Imagine you have a 3D model, like an apple, a cup, or even a human character. Now you want to texture it — to give it color, patterns, or realistic details. But there’s a problem: your image or texture is 2D, while your model is 3D. How can you apply a 2D image to a 3D object so it fits correctly?
This is where UV Mapping comes in. The process is like peeling an orange; you unfold the surface of your 3D model and lay it flat. The result is a 2D map of the model’s surface, called a UV Map. Now you can apply your 2D image to this map, so when the model is “closed” again, everything lands perfectly in place.
Why is it called UV and not XY? In 3D space, we already have the X, Y, and Z axes. To avoid confusion, the 2D axes of the map are named U and V. So each point on the 3D model corresponds to a specific location on the UV map.
When the UV map is clean and well-organized, textures fit beautifully on the model; colors are accurate, details are correctly distributed, and there’s no stretching or distortion. But if UVs are poorly unwrapped, the opposite happens — patterns twist, lines misalign, and textures appear “wrinkled.” That’s when the quality drops and the realism disappears.
In essence, a UV map is a roadmap for textures. Without it, Blender doesn’t know which part of the image belongs where on the model. Learning how to properly unwrap and arrange UVs is one of the most important skills for any 3D artist — and that’s where tools like UVPackmaster come to the rescue.
🛠 Blender and Common UV Unwrapping Methods
Blender comes with powerful default tools for unwrapping and arranging UVs. When your model is ready, you just need to enter Edit mode, select your model, and hit Unwrap. Blender unfolds the model’s surface and distributes the UV pieces (called islands) on a 2D plane.
For simple or practice projects, these tools work fine. But when your model becomes more complex, you realize the process isn’t so easy.
⚙️ Main Blender UV Tools
Blender offers several main methods for unwrapping and arranging UVs:
- Smart UV Project – Automatically unwraps the surface and arranges UVs as neatly as possible. Great for simple and quick models.
- Pack Islands – Places UV islands within the UV square to make texturing easier.
- Manual Unwrap – Gives you full control over seam placement and the order of surface unwrapping.
These tools perform well for starting out or for lightweight models. But as your project grows, its limitations become obvious.
🚧 Problems and Limitations of Default Methods
When dealing with complex models — like a character with clothing, gear, or a detailed game environment — Blender’s default tools lack the necessary precision and speed. Common issues include:
- Too much empty space between UVs: Blender often places UVs with large gaps, wasting texture pixels.
- Tedious manual adjustments: Aligning or resizing UVs manually takes a lot of time.
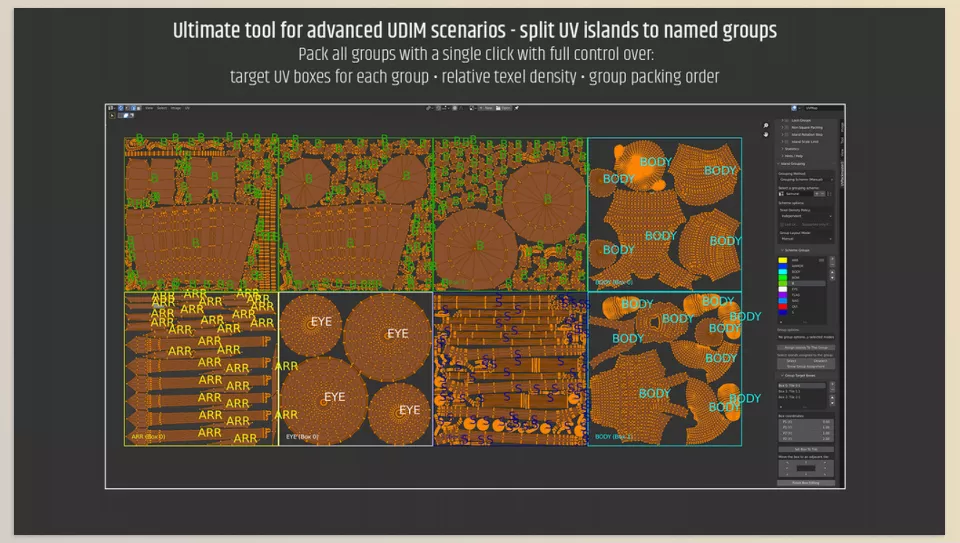
- Inefficient layout for multi-part models: When combining multiple objects into a single UV map, Blender often fails to maintain proper scale and spacing.
- No advanced alignment or stacking tools: Manually stacking similar UVs for efficiency is slow and tedious.
As the saying goes, Blender can do the job, but not efficiently or quickly. For simple work, default tools are fine. But in professional scenarios where accuracy, time, and optimization matter, you need a smart tool to maximize every texture pixel — and that’s exactly where UVPackmaster comes in.
⚡ UVPackmaster – The Smart UV Packing Solution
So far, we’ve seen Blender’s UV tools, but for complex models, slow speed, inefficient layout, and manual adjustments eat up time. That’s exactly when UVPackmaster steps in — a powerful addon designed to make the whole process smart, fast, and hassle-free.
UVPackmaster is essentially a standalone, ultra-fast UV engine for Blender. Its goal is to pack UVs so that no space is wasted, textures are perfectly dense and precise, and most importantly, it does this in the shortest time possible.
⚙️ Why UVPackmaster is Special
Unlike Blender’s default tools, which rely solely on the CPU, this addon uses both CPU and GPU power. This means it can utilize multiple processing cores simultaneously and complete tasks in seconds that normally take minutes. For heavy projects, this difference is remarkable, dramatically increasing workflow speed.
But UVPackmaster isn’t just fast — it’s smart. It uses advanced algorithms to fill UV space like a precise puzzle, leaving almost no empty areas. The results? Better texture clarity, reduced file size, and a cleaner, more professional appearance.
✳️ Key Features
- Lightning-fast speed
Utilizes CPU and all system GPUs, completing UV packing in seconds — even for very heavy models. - Optimal Packing
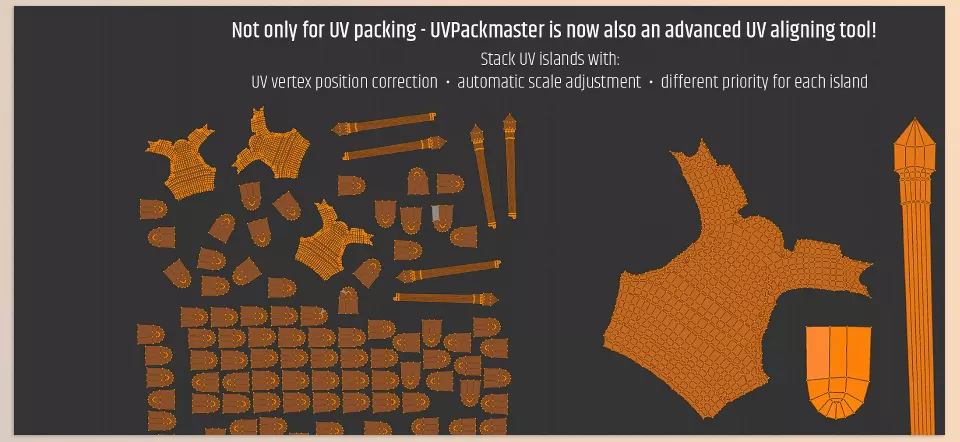
Smartly arranges UVs to maximize texture space, avoiding overlaps and wasted pixels. - Smart Align & Stack
Lets you stack similar or repeated UVs to save space and time, perfect for repeated elements like buttons or screws. - Python Scripting Support
Professional users can customize the addon, write their own algorithms, or integrate UV packing into automation pipelines. - Cross-platform Support
Works identically on Windows, Linux, and Mac. - Lifetime Updates and Support
Purchasing the addon grants lifetime use and free updates forever.
In simple terms, UVPackmaster is like an intelligent, ultra-fast engine for UV packing. Instead of hours of manual adjustments, you spend seconds and achieve results that even the most skilled manual packer would struggle to match. If you want speed, accuracy, and organization in texturing, UVPackmaster is the tool you’ve always needed.
💡 Pro Tips for Using UVPackmaster
Even the best tools require proper use for maximum efficiency. A few simple tips ensure UVs are precise, organized, and optimized:
1️⃣ Apply Scale Before Packing
Always apply all model scales in Blender (Ctrl + A → Scale) before finalizing UVs. This ensures UVPackmaster interprets sizes correctly, preventing stretched or squashed UVs.
2️⃣ Use a Shared UV Map for Multiple Objects
If you have multiple objects for a single texture, pack them in one UV map:
- Saves texture space
- Ensures color/detail consistency
- Easier texture management for large projects
3️⃣ Use Align & Stack for Repeated Elements
Stack repeated parts (buttons, screws, eyes) to:
- Place similar UVs on top of each other
- Optimize UV space
- Reduce texture usage without losing quality
4️⃣ Enable GPU + CPU for Heavy Models
For large or high-poly models, use the combined GPU + CPU mode:
- Maximizes processing speed
- Reduces wait time from minutes to seconds
- Smooth performance on complex projects
5️⃣ Additional Tips for Professional Results
- Check main UVs for overlaps before final packing
- Use margins to avoid texture bleeding
- For detailed textures, segment UVs and optimize each section separately
Following these tips ensures UVs are accurate, optimized, and ready for professional texturing, while dramatically speeding up your workflow.
🎬 Conclusion – Small but Mighty
At first, UVPackmaster is just another “UV packing tool,” but UVPackmaster is actually a creative booster. It takes your mind off of mundane and menial tasks in order to allow for attention on all other project facets that truly matter, like creating the design, lighting, coloring and adding realistic touches.
As mentioned, unwrapping and packing UVs can be one of the most time-consuming steps, especially for complex models. UVPackmaster turns this into a fast, precise, and clean workflow — tasks that once took hours now take seconds.
Think of it as a smart, always-ready assistant that wastes no texture pixels and ensures everything is perfectly placed and optimized. The result? More professional projects, higher quality, and satisfaction from speed and precision.
Ultimately, if UVs have been a headache or you’ve worried about wasting time on manual packing, UVPackmaster is exactly the tool that can transform your texturing workflow and turn this tedious step into a fast, enjoyable process 🎯.
Take full control of Blender with our complete guide about Blender Tools, which introduces all the tools and demonstrates how to use them effectively in projects.



