

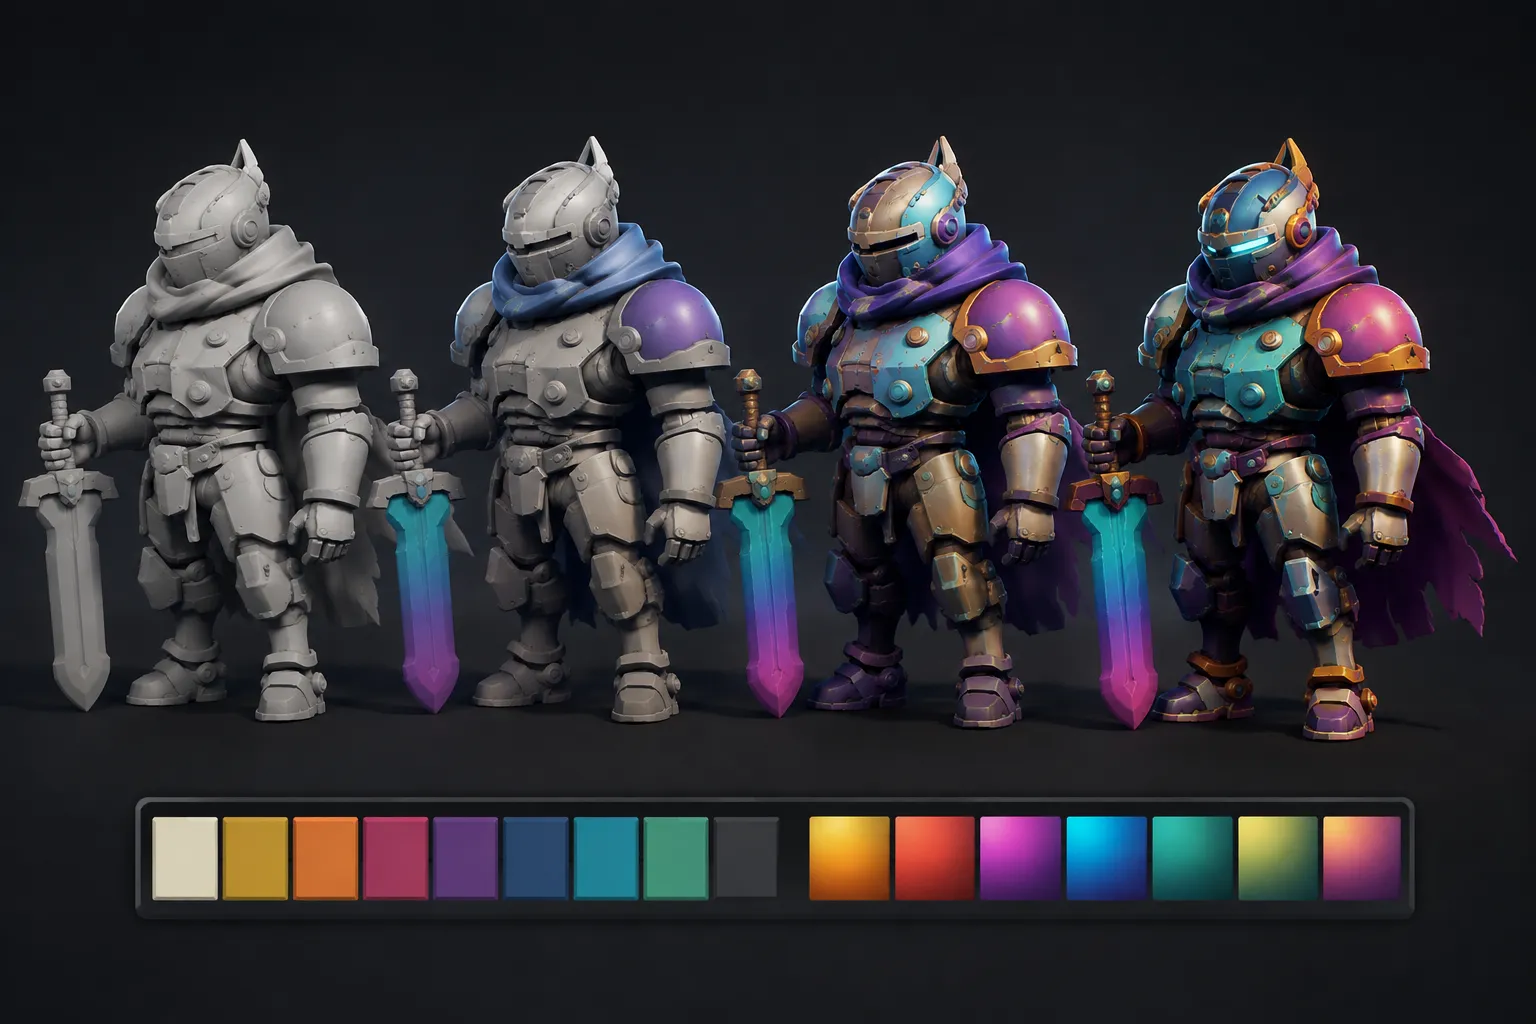
Coloring a Model Shouldn’t Turn Into a Hassle Either! 🎨
Have you ever created anything using the Palettegrid Add-on by Superhivemarket? When creating 3D models, modeling itself isn’t always the hardest part. Sometimes, the most time-consuming part is coloring and creating textures—especially when you want to apply multiple colors, gradients, or different combinations to different parts of the model.
Furthermore, when adding the complexity of UVs, it quickly becomes even more challenging 😅. Each part of the model has to be organized, and its UVs moved, to ensure each part displays the appropriate color or gradient. The more complex the model is to color, the more challenging the process becomes.
Worse yet, if you later change your mind about the colors, you may have to go back to the texture, make the changes, and import the file into Blender again. 🔄 This is where a faster and simpler workflow can eliminate a lot of this back-and-forth and repetitive work, allowing you to focus more on the look and design of the model.

What Is a Palette Texture and What Is It Used For? 🧩
Think of a Palette Texture as a small image filled with colored strips. Each part of the model connects to one of these strips, letting you create different colors on the model without needing a separate texture for every section.
This method is especially useful in Stylized designs, low-poly models, and Game Assets. For example, imagine you have a 3D sword; you can have one strip for the metal, one for the handle, one for the brighter areas, and several Gradients to create color variation.
An important advantage of this method is that by changing the Palette, you can change the model’s overall appearance without creating a new Texture for the model itself. That’s why, in character design, environments, game objects, and even Stylized effects, having a simple system for managing these colors can significantly speed up the workflow.
You Can Do It Without an Add-on Too; Just With a Few More Steps 🎨
Before specialized tools became part of this Workflow, creating a Palette Texture and applying colors to a model usually required using several different tools together. Depending on the project, you might use UV Editing, the Shader Editor, and image-editing software, then apply the result to the model step by step.
- Creating a Texture in Photoshop or Krita: You create color strips and Gradients, export the result, and then import it into Blender.
- UV Unwrap: You unwrap the model so it’s clear which part of the Texture each section of the Mesh should use.
- UV Editing: After unwrapping, you manually move and adjust the UV Islands so they sit on the desired color Strip.
- Shader Editor: To create or control Gradients, you can use different Shader and Texture nodes.
The Main Problem: Too Much Repetition and Back-and-Forth 🔄
Each of these methods is usable on its own, but as the project grows, the number of steps and manual tasks increases. For a simple color change, you may have to edit the Texture again, Export and Import it, and then check the UVs. On top of that, manually adjusting UVs for a large number of Faces can be genuinely time-consuming—especially when you want to try several different color combinations or Gradients. In these situations, a large portion of the project time ends up being spent on repetitive tasks instead of design and creativity.
PaletteGrid: Keep the Entire Workflow Inside Blender 🎯
PaletteGrid is a Blender add-on that brings almost all the steps involved in working with Palette Textures and Gradient Texturing into one place. Instead of constantly switching between Blender and other software to create the Palette, adjust colors, and organize UVs, you can handle a large part of this Workflow directly inside Blender. The result isn’t just greater speed; controlling and testing different ideas for the model’s appearance also becomes much easier.
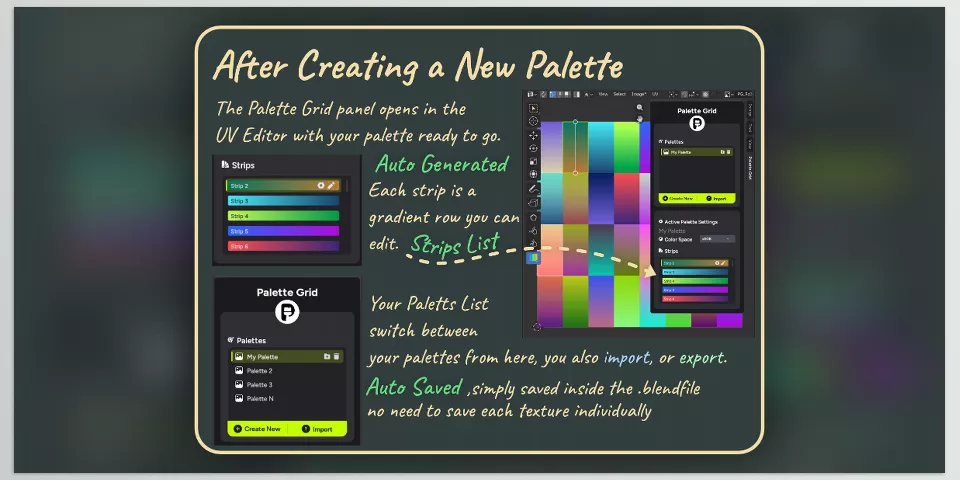
Creating a Palette: Right From the Start Inside Blender 🎨
One of PaletteGrid’s most fundamental features is the ability to create a Palette Texture directly inside Blender. You can create a Texture that includes both Flat Color Strips and Gradient Strips, so you don’t need to create multiple separate Textures for simple colors and different color ranges.
You can even choose the Texture resolution from small sizes like 32px up to sizes suitable for Production projects. This is important for Stylized models and Game Assets because you can create a lot of color variety with a small Texture while keeping the overall workload lightweight.
Changing Colors: No Export or Import Required 🔄
One of the tool’s main advantages is Real-Time Editing. You change the colors and Gradients, and the result updates directly on the Texture and the model. For example, if you have several different color Palettes in mind for a character, you can swap the colors around and quickly check the model’s appearance.
You don’t even need to reopen the Texture in Photoshop, export it, and import it into Blender for every small change. You move the Gradient Stops and see the result instantly—especially useful for Look Development and finding the right color combination.
UV Mapping: Select and Snap 🧩
Another important part is simplifying the UV workflow. Instead of manually moving each UV Island after unwrapping the Mesh and positioning it over the correct color row, you can select the Faces you want, choose a Strip from the Palette, and snap the UVs onto that Strip with a single click.
Even if the Mesh doesn’t have a UV Map yet, PaletteGrid can create the required UVs automatically. So for models with a large number of Faces, you don’t have to spend a lot of time manually moving, scaling, and aligning the UVs for every section.
Projection From the Viewport Angle: Just Choose the Angle 📐
Sometimes, your goal is to place a Gradient on the surface based on the angle from which you’re viewing the model. PaletteGrid provides Viewport Projection for this; you view the model from your desired angle and Project the Gradient directly onto the surface from that View.
This feature is especially useful for creating directional Gradients. Instead of going into the UV Editor and trying to find the correct Alignment by rotating and moving the UVs, you find the right angle in the Viewport and perform the Projection.
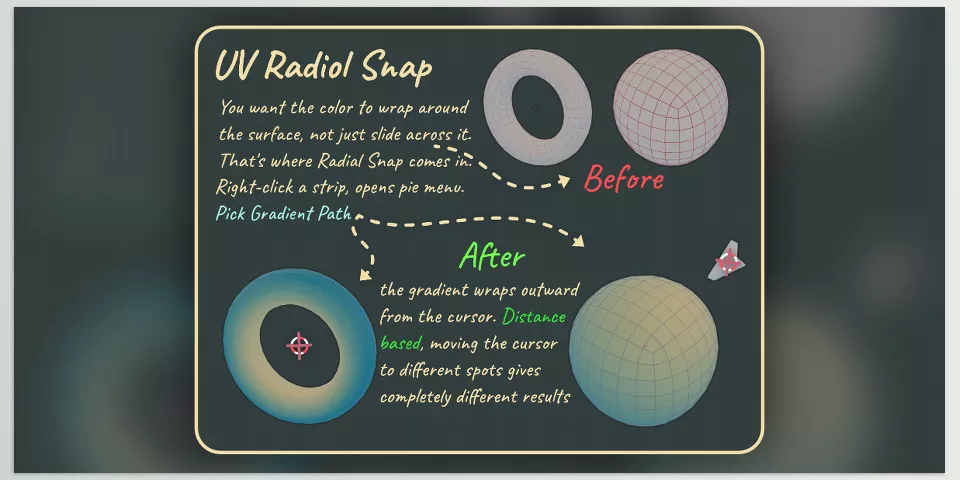
Radial Gradient: Ideal for Rounded and Organic Surfaces 🔵
For Gradients that need to spread outward from a single point, PaletteGrid uses a Distance-Based Gradient. You define the starting point with the 3D Cursor, and the Gradient is created based on the distance from that point.
This method is very useful for models such as Spheres, Domes, and Orbs, but it isn’t limited to simple models. It can also be used to create Stylized looks on organic surfaces or effects such as Shields and Energy Effects—situations where creating this kind of Gradient with manual UV Mapping is usually more troublesome.
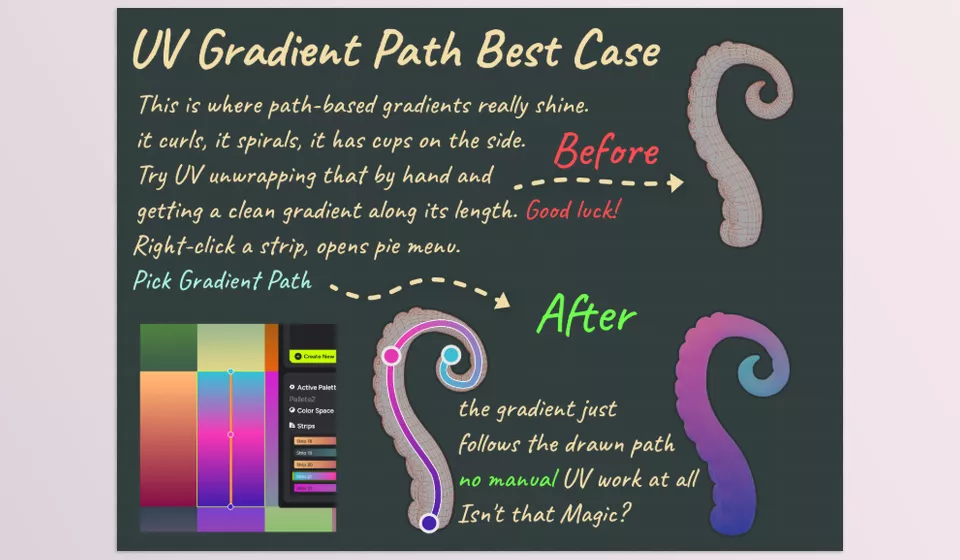
Gradient Along a Path: Color That Follows the Route 🌀
PaletteGrid also lets you create Path-Based Gradients. You draw a path and place the Gradient along that same path. The path can be a simple Curve, a Spiral, or even a freeform shape.
For example, you can create a curved path across a piece of armor and place the Gradient along it, or use more complex paths for flowing details on a model. The tool adjusts the Gradient’s direction and length based on the Path, reducing the need for manual UV adjustments.
Design Directly on the Texture Itself 🖌️
The PaletteGrid interface is also largely designed around a visual Workflow. Instead of searching for separate settings for every Strip, you can work with the Strips directly on the Texture itself.
For example, you can click a Strip with the Strip Picker to select it, and hover to preview the result before making a selection. You can even grab and move Gradient Stops directly on the image. This interaction model makes changing the Palette much faster and easier to understand.
Smart Shape Detection: From a Hand-Drawn Line to a Clean Path ✏️
One of PaletteGrid’s interesting features is Smart Shape Detection. If you want to draw a line, circle, or simple geometric shape for a Path, you don’t have to be completely precise from the beginning. The tool detects the approximate shape you’ve drawn and converts it into a cleaner path.
For example, you can draw a rough, crooked line, and the tool converts it into a straight Line. If you draw an imperfect circle, it can turn it into a clean Arc; then you can scale, rotate, or position the created shape and ultimately use it for Mapping.
One Texture, Fewer Draw Calls, More Control 🚀
All these features ultimately serve one common goal: creating Stylized Art with simpler Textures and a faster Workflow. Instead of having many Textures for different parts of the model, you can manage a variety of colors and Gradients within a single Palette Texture.
This is also appealing for Game-Ready Assets because a single optimized Texture can help reduce Draw Calls and make the Build lighter. As a result, PaletteGrid isn’t just a tool for “coloring a model”; it’s more of a complete Workflow for creating, managing, and applying Palettes and Gradients to Blender models.
Who Is PaletteGrid For? 👥
PaletteGrid is designed for Blender artists who want a faster and more flexible way to create Stylized 3D Assets.
It is especially useful for:
- Game Artists who need optimized low-poly and Game-Ready Assets with fewer Textures and Draw Calls.
- Stylized 3D Artists who create colorful Characters, Props, and Environments and need fast Color Variation.
- Blender Artists who want to simplify Palette Texturing, Gradient Mapping, and UV Placement without switching between multiple applications.
Whether you are creating a small stylized Asset or a larger 3D project, PaletteGrid helps you experiment with colors faster while keeping the workflow inside Blender.
While PaletteGrid focuses on improving how artists create and manage colors, gradients, and textures, modeling is another important part of building professional 3D assets. For artists working on more complex Hard-Surface designs, industrial models, or detailed product shapes, tools like SurfacePsycho can help create a more flexible, controlled modeling workflow inside Blender. Combining better surface creation with an efficient texturing process can make the entire 3D production pipeline faster and more organized.
A Few Tips for Better Results 🎯
You don’t need to use every PaletteGrid feature in your project. The tool’s real value becomes clear when you use the right features for the parts that take the most time to do manually.
- Use UV Snap for complex models. If you have a large number of Faces that need to be placed on different Strips, use Snap instead of manually adjusting the UVs so you can complete the repetitive part of the process quickly.
- Use Projection for difficult surfaces. If the model’s form is curved or directional and adjusting the UVs is troublesome, Viewport Projection can get you there much faster.
- Use Distance-Based Gradient for rounded forms. This feature is useful for creating radial Gradients on Spheres, Domes, and organic surfaces, and it can be a suitable alternative to manual UV work.
- Use Paths for complex Gradients. If the color needs to move along a Curve, Spiral, or freeform path, Path-Based Gradient gives you much easier control than manually creating this type of Mapping.
- Use Real-Time Editing to quickly test Palettes. Instead of creating multiple separate Textures, change the colors and Gradients and compare the results on the model instantly. This feature is genuinely useful for Look Development.
With just these few features, PaletteGrid’s main advantage becomes clear: it focuses on the areas where manual UV Mapping and Gradient Texturing usually take the most time and patience. 🚀
Spend Less Time on UVs, More Time on Design 🎨
PaletteGrid isn’t meant to add a completely new system for creating Textures in Blender; its main value is making a time-consuming Workflow simpler and more integrated. Palette creation, color changes, Gradient creation, and UV placement are brought together so you don’t have to repeat multiple different steps for every small change.
If you mostly work with Stylized, Low Poly, Game Assets, or models where color and Gradients are an important part of the look, this tool can streamline a large portion of the repetitive work. Especially when you want to try a model with several different color combinations, the ability to edit the Palette live becomes genuinely useful.
Ultimately, the most appealing part of PaletteGrid is that instead of spending your time switching between Textures, UVs, and different software, more of your attention remains focused on the design itself and the model’s final appearance—exactly what you’re looking for in a fast and creative Blender Workflow.
Learn how every Blender tool works and how to apply them in practice by reading our Blender Tools article, which explains each feature clearly and thoroughly.



